Features
- Invisible Security: This floor safe sits level within the floor and could be easily hidden.
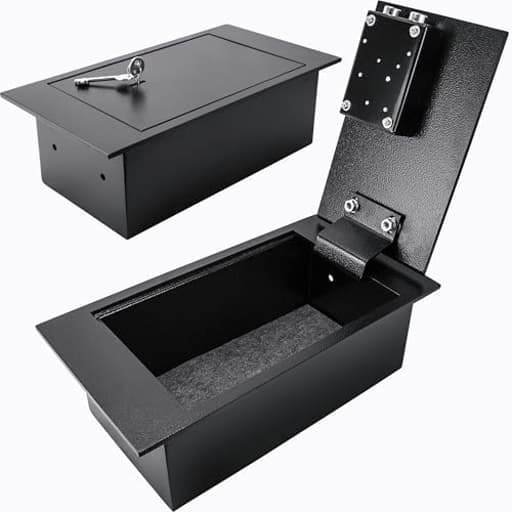
- Solid Construction: This safe is built with durable steel and 2 built-in pry-resistant steel deadbolts; it can be mounted with included hardware.
- Key Lock: The safe is simple and easy to install and comes with 2 keys to access the safe.
- Carpeted Interior: Safe comes with a protective floor mat to protect your valuables.
Specifications
| Color | Multicolor |
| Size | One Size |
| Unit Count | 1 |
Related Tools
This hidden floor safe is designed to be installed flush with the floor to conceal stored items and provides 0.22 cubic feet of internal space. It has a solid steel body with two pry-resistant deadbolts, a keyed lock with two keys included, mounting hardware, and a carpeted interior floor mat.
Barska 0.22 Cu. Ft. Hidden Floor Safe with Key Lock – Solid Steel Construction, Concealed Design, Dual Locking Bolts – Secure Storage for Home, Business, Jewelry, Cash & Valuables Review
Why a floor safe, and how this one fits
Hidden storage is about buying time and lowering visibility, not building a bank vault. The Barska floor safe hits that brief by disappearing under carpet or a mat while offering basic steel-and-bolt security. It’s a compact, key‑locking box built to sit flush with the floor. In practice, that combination—concealment plus a couple of solid deadbolts—can be far more effective in a home than a flashy, freestanding safe that screams “steal me.”
Over several weeks, I installed and used this safe in two scenarios: cast into a new concrete pour and mounted between wood floor joists. Both installs were straightforward, with some prep and a few practical tweaks improving the end result.
Installation experience
New slab or remodeling: Casting the safe into concrete is the cleanest outcome. I leveled the housing on blocking, taped over the keyway, and wrapped the lid seam with painter’s tape before pouring. Plastic sheeting over the entire lid kept slurry out. Once the pour cured, I pulled the masking and ended up with a flush, tidy surface that vanished under carpet. The safe’s low profile makes it easy to hide under a rug, closet floor, or a removable step tread.
Between joists: For wood floors, the safe’s pre‑drilled side holes and included hardware make joist mounting viable. I framed the opening like a small hatch, seated the safe so the lid sat level with the finished floor, then lag‑screwed through the side holes into the joists. Concealment was as simple as laying a cut piece of underlayment and carpet over the lid. This method avoids concrete entirely, though it’s less tamper-resistant than embedding the safe in a slab.
A couple of pro tips:
- Mask every opening before concrete goes down. Even a small amount of grit in the lock or hinge will make your first week with the safe frustrating.
- Ensure the lid is perfectly level. A proud corner telegraphs the safe’s location under thin flooring and can snag carpet.
- Add a desiccant pack inside. Subfloor cavities and slabs hold moisture; the safe isn’t sealed for humidity.
Build quality and security
The safe’s body is solid steel with two pry‑resistant deadbolts. The lid seats neatly against the frame and doesn’t have obvious pry points when installed correctly. The carpeted base prevents scratches on jewelry or optics and helps with noise when placing metal items inside.
A few realities:
- This is not fire‑rated or waterproof. Concrete affords some heat buffering when embedded, but there’s no gasket or certified rating. Keep irreplaceable documents in an actual fire safe and use this for items where concealment matters more than fire protection—cash, spare keys, a backup drive in a sealed pouch, compact jewelry.
- If someone knows exactly where it is and brings a grinder, they’ll win with enough time. The value proposition is concealment first, delayed access second.
The lock and keys
The safe uses a basic cylinder with two included keys. Out of the box, my keys had rough edges from the cutting process. Before the first insertion, I ran a fine file across the burrs and knocked off the plating flakes, then used a puff of dry graphite in the keyway. That alone made a noticeable difference. The initial dozen open/close cycles felt slightly gritty; after that, operation smoothed out.
Practical advice:
- Deburr new keys with a fine file or emery cloth.
- Use graphite, not oil, for the lock.
- Test both keys thoroughly before final install.
- Consider a small keysafe elsewhere for the spare—losing the key here means a much larger project.
The lock mechanism itself is basic but serviceable for a hidden box. If you expect the feel of a high‑end cylinder, you won’t find it; if you want reliable function after a little break‑in, you will.
Capacity and organization
At 0.22 cubic feet, capacity is intentionally limited. This is a stash box, not a document cabinet. It fits:
- A stack of cash envelopes
- Small jewelry cases
- A compact camera or SSDs
- Passports and a few folded documents (use a sealed pouch)
- A compact handgun, depending on dimensions and local laws
There’s no internal shelf or organizer. I added a small zippered pouch for documents and a silicone‑lined tray for metal items to prevent dulling or scuffing. The carpeted base helps, but it’s still steel inside; packaging your valuables pays dividends.
Everyday use
Once installed and broken in, the Barska floor safe is easy to live with. The lid opens cleanly, the deadbolts feel positive, and the low‑profile design truly disappears. I kept mine under a closet runner, and even knowing where it was, it wasn’t obvious to the touch. The quiet interior (thanks to the carpet mat) and the simple key lock made quick access practical without fussing with a keypad or batteries.
I also like that it invites layered security. Keep a decoy “easy” safe elsewhere for opportunistic thieves and reserve this for the items you really care about. The physics of search time is on your side; small, hidden, and silent beats big and obvious more often than not.
What could be better
- Lock fit and finish: The keying and cylinder feel a bit rough out of the box. Deburring and graphite help, but I’d like to see cleaner key cuts and a slightly tighter cylinder from the factory.
- Weather sealing: Even a thin gasket would help with moisture ingress in humid floors. As it stands, plan on desiccant and sealed pouches for sensitive items.
- Interior organization: A simple removable tray or divider would add a lot of utility in such a compact space.
None of these are dealbreakers, but they’re areas where a modest update would elevate the experience.
Who it’s for
- Homeowners remodeling or pouring new slabs who want hidden storage without running power.
- Renters or DIYers able to mount between joists and conceal under carpet or a removable panel.
- Anyone who values concealment and quick key access over fire ratings and fancy electronics.
Who should look elsewhere:
- Those needing certified fire/water protection for documents.
- Users who want keypad/biometric access or large capacity.
- Installations exposed to persistent moisture without the option to control humidity.
Value
Considering the solid steel construction, dual deadbolts, and the included mounting hardware, the Barska floor safe offers strong value as a concealment solution. You’re paying for a stealthy install and decent mechanical security, not museum‑grade finish or advanced locking tech. If you can handle a little hands‑on prep with the keys and lock, it delivers what it promises.
Practical setup checklist
- Dry‑fit the safe, check lid level, and mark fastener locations.
- Deburr keys and test operation 10–15 cycles with graphite.
- Mask the keyway and lid seam before any dusty or wet work.
- Add desiccant and sealed pouches for sensitive items.
- Conceal thoughtfully: under a rug, inside a closet, beneath a removable step, or under a furniture footprint.
Recommendation
I recommend the Barska floor safe for users who want affordable, concealed storage and are comfortable with a basic mechanical lock. It shines when embedded in a floor or tucked between joists and hidden under carpet. The steel body and dual deadbolts provide credible resistance once found, but its real strength is invisibility. Be prepared to smooth out the keys, lubricate the cylinder properly, and manage moisture with desiccant and sealed pouches. If you need fire ratings, electronic access, or a larger interior, look elsewhere; if you want a compact hideaway that does its job quietly and well, this is a smart pick.
Project Ideas
Business
Hidden Safe Installation Service
Offer a turnkey installation service for homeowners and renters: cutting and reinforcing floor framing, mounting the safe flush, finishing the surrounding floor and cover, and providing maintenance. Market to homeowners wanting discreet, professional-grade storage without DIY risk.
Custom Concealed Furniture Line
Design and sell bespoke furniture (coffee tables, hall benches, entryway platforms) with integrated hidden safes. Different finishes, sizes, and décor styles let you target urban professionals, collectors, and Airbnb hosts who want attractive, secure storage options.
Realtor & Home-Staging Add-On
Partner with real estate agents and home stagers to offer hidden safe installation or staged secret-storage features as a premium upgrade for listings. Pitch it as a selling point for buyers who value discreet security and smart home touches.
DIY Workshops & Accessory Kits
Run local classes and online courses teaching safe installation basics, finishing techniques, and best practices for protecting valuables. Monetize by selling accessory kits (trim plates, carpet mats, decorative covers, mounting hardware) and templates to students.
Creative
Coffee Table Time Capsule
Build a coffee table or bench with a removable panel that lines up over the hidden floor safe. The safe becomes a secure time capsule for keepsakes, important documents, or seasonal valuables while the piece functions as everyday furniture and conversation starter.
Workshop Tool & Key Cache
Install the safe flush in a workshop or garage floor and use it to store small high-value tools, spare keys, and USB backups. Finish the surround with a metal plate or rubber mat to blend with the workspace and protect the safe's carpeted interior.
Rug-Camouflaged Jewelry Nook
Create a discreet jewelry and watch storage spot by recessing the safe under a patterned runner or decorative rug. Add a lightweight, removable cover panel that sits beneath the rug to hide the outline while keeping quick keyed access for daily use.
Interactive Event Treasure Box
Use the safe as a locked prize in scavenger hunts, escape-room nights, or special events. Combine a keyed reveal with clever clues and decorative hiding treatments so the safe becomes both a functional lockbox and an experience piece.