Features
- Cuts solid, engineered, and laminate flooring
- Cross, miter and rip cuts
- Lightweight design for transport and on-site use
- Miter detents at 0°, 22.5° and 45°
- Self-aligning rip/miter fence
- Rugged die-cast aluminum fence for improved accuracy
- Onboard dust port with vacuum bag
- Carbide-tipped 36-tooth contractor blade
- Built-in cord wrap for storage
- Includes blade wrench, clamp and push stick
Specifications
| Amperage | 7.0 A |
| Product Length (Inches) | 28.90 |
| Product Width (Inches) | 20.10 |
| Item Weight (Lbs) | 29.49 |
| Tool Weight (Pound) | 30 |
| Blade | 4-3/8 in. carbide-tipped, 36-tooth contractor blade |
| Miter Detents | 0°, 22.5°, 45° |
| Included Accessories | Blade wrench, clamp, push stick, self-aligning rip/miter fence, vacuum bag |
| Color | Red |
| Vendor Part Number | 3601-02 |
| Sku | 100592971 |
| Warranty | 5 Year Limited |
| Placement Location | Indoor/Outdoor |
| Use | Residential/Commercial |
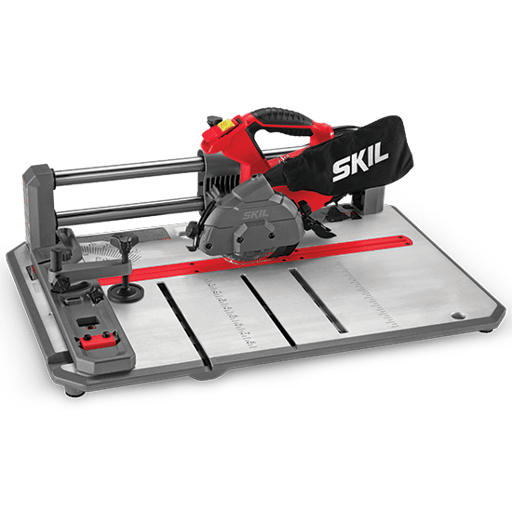
Compact flooring saw that combines basic miter and table saw capabilities to cut flooring at the installation site. Designed for on-site cross, miter and rip cuts on solid, engineered and laminate flooring; the unit is lightweight for transport and use at project locations.
Skil 7.0 Amp Flooring Saw Review
Why I reached for a compact flooring saw
On a recent upstairs hallway and bedroom re-flooring job, I wanted to keep the workflow tight, the dust down, and the trips to the garage shop to a minimum. Instead of hauling a miter saw, a table saw, and a pile of stands, I put the Skil flooring saw in the middle of the space, plugged in a small shop vac, and got to work. Over a few projects now—engineered hardwood, bamboo planks, and rigid vinyl—I’ve formed a clear picture of where this compact saw shines, where it compromises, and who will get the most out of it.
Form factor and build
At roughly 30 pounds, this saw is purpose-built for flooring: small footprint, flat table, and a carriage that slides on rails for crosscuts and miters. The motor spins a 4-3/8-inch, 36-tooth carbide blade. You get miter detents at 0°, 22.5°, and 45°, a self-aligning rip/miter fence, and a rugged die-cast fence assembly that holds settings better than I expected from such a lightweight package. There’s a built-in cord wrap, an onboard dust port with a bag, and included basics: push stick, clamp, and blade wrench. The warranty is five years.
The overall fit and finish feel better than “jobsite beater” grade. The table on mine was flat out of the box, the riving knife aligned well with the blade, and the throat plate acted as a near zero-clearance insert. All of that adds up to cleaner cuts with less chip-out on prefinished flooring.
Setup and calibration
Basic setup is straightforward: mount the fence, verify squareness at 0°, and check the miter detents. On my unit, the factory settings were close enough to start cutting right away, though I always run a few test pieces. The detents at 22.5° and 45° locked in predictably on both left and right miters, which was helpful for stair nosing returns and diagonal layouts.
One hiccup is hardware tension. A couple of the fence screws were tighter than they needed to be. If you run into stubborn fasteners, use a properly fitting driver bit, support the table solidly, and break them free with steady, deliberate pressure. A drop of penetrating oil and a short wait helps. I wouldn’t attack these with a high-torque impact; a small cordless driver on a low setting or a hand driver gives you more feel and reduces the chance of cam-out. Once adjusted, the fence stayed put through a full day of work.
Crosscuts, miters, and rips
Crosscut mode is the star here. Instead of pushing stock across a spinning blade, you bring the saw to the work by sliding the carriage along the rails. That motion feels intuitive and controlled, and it’s a confidence booster in tight conditions where you’re perched between doorways and stairs. On engineered hardwood up to about 6-1/2 inches wide and vinyl plank at 7-1/4, cuts were square and repeatable. The 36-tooth blade leaves a surprisingly clean edge on laminates; for very chip-prone materials or ultra-hard bamboo, a higher-tooth-count blade improves the finish.
Miters at 45° were also accurate enough for casing returns and transitions. The detents are crisp, and the saw doesn’t fight you as you switch angles. Support the work fully across the table and keep consistent hand placement on the carriage handle to avoid creeping off your line.
Ripping is where this saw transitions from “clever” to “genuinely useful.” The self-aligning fence is easy to set with a tape, and once locked, it didn’t wander. I ripped long hallway runs and custom-width planks without drama. That said, switching between crosscut/miters and rip mode takes a bit of time. You’ll need to reposition the fence and rethink your stance around the saw. It’s not hard, just a rhythm breaker. If your day is heavy on rips, batch them to minimize mode changes.
On dense materials, remember this is a 7-amp motor turning a small-diameter blade. It will do the work if you let the blade cut at its pace. Feed too fast on bamboo or thick engineered stock and you’ll hear the motor protest. Slow down a hair and keep the pressure even—no burn marks, no bogging.
Accuracy and cut quality
For a portable saw, accuracy is the highlight. The zero-clearance throat and riving knife do a lot of work to minimize tear-out and keep the kerf straight. I cut face-up on prefinished materials and got factory-worthy edges the majority of the time. If you notice edge chipping on brittle laminates, two quick tweaks help: apply painter’s tape over the cut line and switch to a finisher blade designed for laminates. Also, keep the work fully supported; overhanging stock vibrates, and vibration makes clean edges harder to achieve.
Dust collection and noise
Dust collection is much better than you’d expect from such a small saw, with a big caveat. Hooked to a shop vac (1-1/4 or 1-7/8-inch hoses both worked for me with a simple adapter), airborne dust was minimal and most fines were captured at the source. The included dust bag, on the other hand, is mostly a token—it catches some, but I wouldn’t rely on it indoors. Plan on using a vac for real dust control.
Noise is lower than a traditional portable table saw or a 7-1/4-inch circular saw, but it’s still a power tool. I wear hearing protection and appreciate that conversations in the room don’t turn into yelling matches.
Safety and ergonomics
Moving the saw to the workpiece, rather than feeding narrow planks across an exposed blade, feels inherently safer—especially when you’re working on subfloor in a cramped upstairs hallway. The carriage design, riving knife, and tight throat opening all reduce opportunities for kickback. The included push stick and hold-down clamp are basic but functional; I only used the clamp for odd-shaped cuts or short offcuts.
Ergonomically, having the saw at floor level is the whole point. It’s a tradeoff: you save time and steps, but you are working crouched or kneeling. I rotate in a kneeling pad and take more frequent stretch breaks on big rooms.
Limitations and quirks
- It’s not a full table saw. Sheet goods, wide crosscuts, and heavy production ripping belong to bigger machines.
- No bevel capacity. You can miter to 45° left and right, but you can’t tilt the blade. For bevels and compound cuts, you’ll want a different tool.
- Mode switching takes time. If you’re bouncing between rips and crosscuts every few minutes, expect minor interruptions.
- The dust bag isn’t a solution. Budget for a vac and an adapter if yours doesn’t fit natively.
- Blade size is 4-3/8 inches. Keep a spare on hand; not every store stocks quality replacements in this diameter.
- Power is adequate, not abundant. Dense woods cut cleanly with controlled feed rates and a sharp blade.
Tips for best results
- Batch operations: Do all your crosscuts, then your rips, to reduce fence changes.
- Use a vac: Even a small shop vac makes a huge difference in indoor air quality.
- Upgrade the blade for brittle laminates or bamboo: A higher-tooth-count finishing blade leaves cleaner edges.
- Support long rips: Use temporary outriggers or scrap blocks to keep planks flat and steady.
- Check alignment on day one: Verify squareness at 0° and 45°, adjust once, and you’re set.
- Treat tight hardware patiently: Use the right bit, apply gentle penetrating oil, and avoid over-torquing.
Who this saw is for
If you install flooring—professionally or as a serious DIYer—this saw fits perfectly into the “carry in, set in the middle of the room, and get it done” workflow. It excels in hallways, bedrooms, and occupied homes where dust and setup time matter. It also moonlights nicely in a small shop for precise crosscuts on narrow stock or quick rips when wheeling out a full-size table saw isn’t worth it.
If your work leans toward cabinetry, thick solid hardwood, or large panels, think of this as a specialty complement, not a replacement.
Recommendation
I recommend the Skil flooring saw for on-site flooring installs and any project where portability, accuracy, and dust control are priorities. It’s light enough to carry upstairs, accurate enough to trust on visible transitions, and versatile enough to handle crosscuts, miters, and rips without rearranging your entire jobsite. The tradeoffs—no bevels, modest power, and a bit of friction when switching modes—are reasonable in exchange for the convenience of a single compact tool that lives right where you’re working. Pair it with a shop vac, keep a sharp blade on it, and it becomes one of those “why didn’t I get this sooner?” tools that shortens the distance between layout and finished floor.
Project Ideas
Business
Mobile Flooring Repair & Trim Service
Offer on-site plank replacements, end-matching, and quarter-round/base trim fitting. The lightweight saw enables clean cross, miter, and rip cuts in occupied spaces with minimal dust, ideal for quick service calls.
Custom Threshold & Transition Fabrication
Partner with installers and property managers to fabricate made-to-fit thresholds, reducers, and T-molds from matching planks on-site. Charge per opening, with premium pricing for complex angles and wide transitions.
Landlord/Airbnb Turnover Refresh
Provide fast flooring touch-ups between tenants or guests: swap damaged boards, refit transitions, and tidy stair risers. Same-day service with compact gear that sets up in minutes.
Upcycled Decor from Flooring Offcuts
Collect installer scraps and produce wall art, slat panels, headboards, and vent covers. Sell via Etsy, local markets, and builder showrooms; market the sustainability angle and offer custom sizes to match clients’ floors.
Hands-On Flooring Workshops + Tool Rental
Host weekend clinics teaching basic cross, miter, and rip techniques for laminate/engineered floors. Include supervised practice, safety briefings, and offer day-rate rental packages with blades, push stick, and dust bag.
Creative
Herringbone Coffee Table Top
Turn leftover engineered flooring into a statement tabletop. Use the 45° miter detent for consistent herringbone blocks, rip planks to uniform widths with the self-aligning fence, then crosscut to length. Glue to a plywood substrate and finish with a mitered perimeter frame.
Acoustic Slat Wall Panel
Rip flooring into narrow, even slats and mount them on felt or MDF to create a modern acoustic feature. Alternate wood tones or finishes for depth. The dust port keeps cleanup manageable for indoor work.
Chevron Headboard
Build a chevron-pattern headboard using 22.5° or 45° miters for tight, repeatable geometry. Crosscut and rip to size for a framed panel that attaches to a simple cleat behind the bed.
Floor-Matching Vent Covers
Create drop-in or surface-mount vent/register covers that match the flooring. Rip slats, miter a frame at 45°, and assemble to fit standard duct openings for a seamless look.
Geometric Wall Art Mosaic
Use laminate and engineered offcuts to make a large geometric mosaic. Rip strips to consistent widths, miter pieces at 0°, 22.5°, and 45° for varied patterns, and mount on a plywood backer.