Features
- 【New Design Plank Grabber】Violetfox floor gap fixer tool can solve misaligned planks on hardwood, laminate flooring, LVP, SPC, and engineered floors, restoring both aesthetics and safety.
- 【Reusable Adhesive Pad】Wide adhesive bottom enhanced suction for firmly grip on various floor types, leave no residue. Attached with a spare sticky pad for long-lasting use and repeated performance.
- 【Heavy-Duty Floor Gap Fixer】Constructed from premium nylon, this laminate floor gap fixer tool can be hit without cracking, suitable for both new floor installations and daily maintenance of old floors.
- 【Easy to Use】Pressing the adhesive base to lock onto your clean floor, using rubber mallet to close unsightly floor gaps, no pro required, perfect laminate floor repair kit.
- 【Essential Tool for Wooden Floor Care】This vinyl floor gap fixer is suitable for a variety of smooth wooden floors. Lightweight and compact design for easy storage and carrying.
Specifications
| Color | New Version |
| Unit Count | 1 |

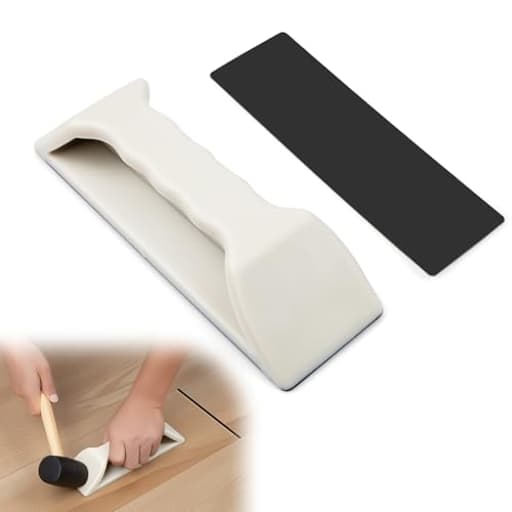
This handheld plank-grabber is designed to align and close gaps in hardwood, laminate, LVP, SPC, and engineered floors during installation or repair. It has a reusable adhesive base (with a spare pad) that grips smooth surfaces without leaving residue and a heavy-duty nylon body that withstands strikes from a rubber mallet.
Violetfox Floor Gap Fixer Tool, Violetfox Heavy-Duty Plank Grabber Laminate Flooring Tools Wood Floor Repair LVP Installation Kit Review
Why I reached for a gap fixer in the first place
Floating floors are great until the seasons change and you start noticing slivers of daylight between planks. I’ve wrestled with pull bars and tapping blocks for years, and while they work, they’re not always the best option when the problem is in the middle of a room or tucked in a tight spot. I picked up the Violetfox gap fixer to see if a compact, adhesive-based plank grabber could close those gaps more precisely and with less risk of damaging edges. After several sessions on laminate, LVP, and an engineered oak floor, I’m convinced it deserves a permanent place in a flooring kit—though it has some situational limits you should know about.
Build and design
The tool is essentially a dense nylon body with an angled striking surface and a wide reusable adhesive pad on the underside. The nylon shell feels solid and shrugs off mallet blows without chipping. It’s light enough to carry around a room, but the mass is sufficient to keep it planted and translate impact into lateral force. The adhesive pad is the star: a tacky, gel-like surface that grips smooth flooring finishes without leaving residue. A spare pad is included, which extends the tool’s usable life and gives you a ready backup when the first loses tack.
The footprint is compact, which helps in tighter areas and along runs of narrower planks. The geometry is thoughtfully angled so that a mallet strike drives the body forward rather than bouncing upward. That translates to more efficient energy transfer and fewer wild swings.
Setup and use
Using the tool is straightforward:
- Clean the floor where the pad will sit. Dust and grit are the enemy of adhesion and can reduce the tool’s bite.
- Place the adhesive base on the board you want to move, a couple of inches away from the gap.
- Press down firmly to seat the pad and remove any trapped air.
- With a rubber mallet, deliver controlled strikes to the tool’s striking face in the direction of the gap.
- Reposition, press, and tap again as needed until the joint tightens.
A few tips from my time with it:
- Work methodically from an expansion gap or a skewed corner toward the area you want to tighten; pushing against a “dead end” can cause bounce-back.
- Gentle, repeated strikes are more effective than one heavy blow. You’re coaxing a floating system to move.
- If your mallet has a dark face, it can leave smudges on some finishes when you mishit. A white mallet or a clean mallet face helps.
- On bevel-edged planks, vacuum the groove first—packed dust will keep a joint from closing no matter how well you push.
Performance on different floors
- Laminate: This is where the tool shines. On a floating laminate with click-lock profiles, I was able to close hairline to moderate gaps quickly without touching the plank edges. The pad gripped well on the satin finish, and I didn’t see any transfer or residue after removal.
- LVP/SPC: On smooth, vinyl wear layers (especially the glossier ones), the pad’s tack is excellent, and it moves narrow and wide planks cleanly. It’s particularly handy on long runs where a pull bar is awkward in the field.
- Engineered wood: On a sealed, smooth aluminum-oxide finish, the pad held fine and the tool worked as expected. On matte, oil-finished engineered boards, adhesion was weaker and I was more cautious. I recommend a quick test in an inconspicuous spot on any oiled or waxed floor to ensure you’re happy with the pad’s grab and release.
- Textured/hand-scraped surfaces: The tool still works, but grip is reduced. If the texture is pronounced, expect to clean and reseat the pad more often, and consider supplementing with a traditional pull bar near walls.
One important caveat: this is not a magic wand for glued-down or nailed-down floors. You can tidy small misalignments on some engineered systems, but if the floor can’t float, this tool won’t move it. Also, if a locking profile is broken or chipped, no gap fixer will keep that joint closed for long.
Adhesion, cleanliness, and care
The reusable pad is forgiving. As it picks up dust, hairs, or finish powder, its grip drops—but a rinse in warm water, a light rub with mild soap if needed, and air-drying restores tack. Don’t use solvents; they can degrade the adhesive. Keeping the included protective film and covering the pad between rooms or during storage goes a long way. The spare pad is genuinely useful. After a heavy day of work on dusty floors, swapping pads kept my momentum going without constant trips to the sink.
I did not see any residue on sealed surfaces after dozens of placements. That said, always press straight down and lift straight up; dragging the pad across grit could scuff a delicate finish.
Ergonomics and durability
The nylon body absorbs impact well and doesn’t ring or transmit much vibration back to your hand. The striking face has enough surface area that I never felt like I had to be surgically precise with the mallet. The body hasn’t deformed or chipped, and the base plate that supports the adhesive pad stayed flat after repeated hits. As with any striking tool, let the mallet do the work; if you’re swinging so hard you’re bouncing the tool, you’re overdoing it.
I do wish there were a small finger recess or grip texture around the shell for sweaty hands. It’s not slippery, but a little contouring would make one-handed placements quicker.
Compared to traditional methods
- Pull bar and tapping block: These are still essential during installation, especially at perimeters. But out in the field—mid-room gaps, around islands, between heat vents—the gap fixer is faster and less fussy. It also reduces the risk of chewing up plank ends with a pull bar or hammering against delicate tongues.
- Suction-cup lifters: I’ve tried glass-handling cups as a DIY alternative. They work sometimes on ultra-smooth vinyl but lose grip easily and can mar softer surfaces. The gap fixer’s pad spreads load over a wider area and resists shear better, which is exactly what you need to translate impact into lateral motion.
- Clamps and straps: Great for assemblies and glue-ups, less helpful for quick, localized corrections. The gap fixer is grab-and-go.
Limitations
- Requires a clean, relatively smooth surface to grip well.
- Not effective on fixed (glue- or nail-down) floors or severely damaged locking profiles.
- Needs a rubber mallet, which isn’t included.
- Near walls where you have very little room in front of the plank, a pull bar is still the right tool.
These aren’t dealbreakers, but they’re worth understanding so you don’t expect more than the tool can deliver.
Who benefits most
- Homeowners maintaining floating laminate or vinyl floors who want a quick way to close seasonal gaps without removing baseboards.
- Installers who want a non-marring, field-friendly way to bring joints tight during layout, especially on long runs and narrow strips.
- Anyone working on wall cladding or paneling where edge access is limited; the concept translates well to other flat, smooth surfaces that need a nudge.
Maintenance and storage
Rinse the pad as needed, air-dry to restore tack, and keep the protective film on during storage. Avoid heat and solvents. Check the pad’s edges for lifted corners and press them flat before the next use to maintain full-surface contact.
The bottom line
The Violetfox gap fixer does what a good specialty tool should: it simplifies a specific, common task and reduces the risk of collateral damage. It’s compact, durable, and the reusable pad system is more practical than I expected, especially with a spare included. It won’t replace a pull bar or tapping block at the edges, and it won’t overcome the physics of a glued or nailed floor, but for everyday gap-closing on floating laminate, LVP/SPC, and sealed engineered wood, it’s efficient and reliable.
Recommendation: I recommend this tool to DIYers and pros who routinely work with floating floors. It closes gaps quickly without chewing up plank edges, it’s gentle on finished surfaces when kept clean, and it removes the guesswork from mid-field adjustments. If your floors are heavily textured, oiled, or permanently fixed, the benefits are limited; otherwise, it’s a smart, low-cost addition to a flooring toolkit.
Project Ideas
Business
Mobile Gap-Repair Service
Offer quick-call repairs that close gaps and realign planks for homeowners and realtors. Market as a same-day, low-cost fix that restores floor appearance and safety—ideal for pre-sale staging or post-move touch-ups. Keep a small kit with spare adhesive pads and rubber mallet for efficiency.
Contractor Supply Add-On
Position the tool as a must-have add-on in installer kits sold to flooring contractors and subcontractors. Bundle it with spare pads, a mallet, and quick-start instructions; sell wholesale packs to supply houses or include in premium installation bundles.
Property Maintenance Micro-Service
Target landlords and property managers with a recurring maintenance offer: periodic inspections and minor floor gap repairs across portfolios. Use the grabber to perform fast fixes between tenants, reducing costly replacements and improving tenant satisfaction.
DIY Clinics & Workshops
Host paid workshops or in-store clinics showing homeowners how to use the grabber for common floor repairs and small installations. Sell starter kits at the event (tool + spare pads + filler) and offer discounts for attendees—turn training into a sales channel.
Staging & Photography Prep Service
Offer a niche service for realtors and photographers: prep floors before photo shoots or open houses by closing visible gaps and aligning planks for flawless visuals. Package as an hourly staging prep service—fast, low-cost improvements that elevate listing images.
Creative
Accent Inlay Panels
Use the plank grabber to precisely align and pull laminate or hardwood strips tight while you glue or biscuit-join them into geometric inlay panels (chevron, herringbone, starburst). The reusable adhesive base holds pieces steady so you can clamp, glue, and finish without gaps or shifting.
Refinish-Prep Repairs
Create a homeowner-friendly repair project: locate loose or gapped planks, use the tool and rubber mallet to close gaps, then fill seams with matching filler and sand/finish. Turn it into a step-by-step kit or demo to practice small-floor refinishing before tackling larger jobs.
Wall-Clad & Floating Shelf Assembly
When installing LVP/laminate wall cladding or building floating shelves from plank material, use the grabber to pull edges flush during assembly. The adhesive base holds the panel steady while you fasten or silicone, giving neat, seamless joins for decorative wall features or shelving.
Modular Sample Boards & Props
Make portable sample boards or photo props by tightly aligning short plank sections with the tool, then bonding them into small boards for client presentations, craft fairs, or product photography. The grabber speeds alignment so samples look professional and gap-free.