Features
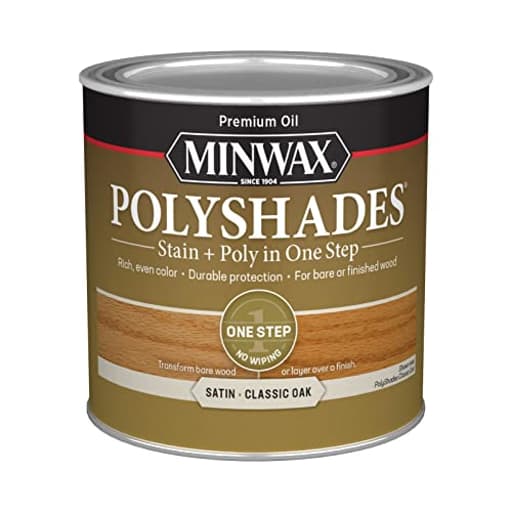
- POLYSHADES WOOD STAIN – Minwax PolyShades is an oil-based wood stain and poly in one. It enhances wood grain by combining beautiful, rich color and long-lasting polyurethane protection in one easy step.
- REDUCE FINISHING TIME – This one-step wood finish can be used over polyurethane finishes, so you can change the color of your wood surface without removing the existing finish. Use on bare or already-finished wood.
- BEAUTIFUL RESULTS – This beautiful wood stain provides a rich finish with a satin sheen. It offers a classic, light, warm color that looks great on a variety of projects. Recommended uses: furniture, woodwork, doors, cabinets & accessories.
- EASY TO USE – Simply give the wood a light sanding with a fine-grit sandpaper, remove sanding dust, and brush on a coat of PolyShades. It’s a wood stain and polyurethane wood finish that easily and effectively transforms your wood projects.
- A BRAND YOU CAN TRUST – Minwax is America’s leading brand of wood finishing and wood care products. Since 1904, we have been inspiring consumers to Keep on Finishing. We offer consumers a complete line of products to meet every wood finishing need.
- Cleans up with mineral spirits
- For use on interior wood surfaces
- Great color options to choose from
Specifications
| Color | Classic Oak |
| Size | 1/2 Pint |
| Unit Count | 1 |
An oil-based stain and polyurethane finish in one, this ½-pint Classic Oak product adds color and a satin protective topcoat for interior wood surfaces. It can be applied to bare or previously finished wood (including over existing polyurethane) after light sanding and brushing, cleans up with mineral spirits, and is suitable for furniture, doors, cabinets and trim.
Minwax PolyShades Wood Stain + Polyurethane Finish – ½ Pint, Classic Oak, Satin Review
Why I reached for PolyShades
I had two goals on a recent refresh: warm up a set of tired, 1970s interior doors and unify some mismatched trim without stripping everything to bare wood. The wood was structurally sound but finished in a dull, uneven brown that had seen better days. I wanted a lighter, warmer tone with a protective topcoat—without turning this into a week-long strip, stain, and poly marathon. That’s exactly where PolyShades, in Classic Oak satin, fit.
This is a tinted polyurethane, not a traditional penetrating stain. Think of it as a clear finish with color added. Used correctly, it can shift tone, even out tired finishes, and add a durable, satin film in one pass. Used incorrectly, it can look streaky and be frustrating. The difference comes down to preparation, thin coats, and realistic expectations.
What it is—and who it’s for
PolyShades is best when you want to:
- Refresh or slightly change the color of already-finished wood
- Darken or warm an existing tone without sanding to bare wood
- Save time by combining color and topcoat
It’s less ideal if you need to:
- Make dark wood lighter
- Achieve intricate color work with maximum control
- Finish bare wood with deep, traditional stain character
Classic Oak is a light, warm, honey-amber tone. On light substrates it adds a golden cast; on darker finishes it warms and slightly lightens the overall impression, but it won’t overcome a dark base. The satin sheen reads closer to a soft gloss under certain lighting—more on that below.
Prep and application: what worked for me
I treated the entire process like a clear-coat job, not a stain job.
- Degrease: I cleaned with a mild degreaser (then water) to remove hand oils and contaminants, especially on doors and railings. Let everything dry thoroughly.
- Scuff sand: I scuff-sanded with 220-grit to knock down nibs and give the existing finish some tooth. On bare wood pieces, I sealed first or used a sanding sealer to avoid uneven coloration.
- Dust control: Vacuumed and wiped with a lint-free cloth. Dust shows up in tinted films.
- Stir, don’t shake: I stirred gently for a full minute and periodically during use. Shaking can introduce bubbles that will dry as craters.
- Tools: A good natural-bristle brush gave me the best control on flat and profiled trim. Foam brushes can work for small, flat runs, but they load quickly and can leave bubbles if you press hard.
Application tips from the field:
- Thin coats. I cannot overstate this. The product levels well in thin films; heavy coats sag and can look blotchy.
- Maintain a wet edge. Work from one end to the other, then lightly “tip off” in the direction of the grain with the brush’s tips.
- Don’t wipe it like a stain. Lay it on like a clear coat.
- Dry time and sanding: I let coats dry at least 6 hours at room conditions, longer if humid. Between coats, I lightly scuffed with 320 and removed dust. Two coats gave me even color; a third deepened tone and added build where I wanted more protection.
On vertical surfaces like door jambs, I worked in smaller sections to avoid runs. If I saw a sag forming, I caught it within a minute by feathering it out—once it starts to set, leave it alone until you sand and recoat.
Color and sheen
Classic Oak did exactly what I expected on prefinished oak trim: it warmed the existing finish, brought out grain, and brightened the overall look without turning orange. On a small bare-maple side table I sealed first, then applied PolyShades; the result was a light, honeyed tone that looked cohesive with my older oak pieces.
Sheen-wise, the satin reads a touch shinier than a dead-flat satin. Under daylight, it’s a soft, pleasing luster. Under strong artificial light, it can appear closer to low gloss, especially after the second coat builds film thickness. If you prefer a more muted look, let it cure a few days and rub out with 0000 steel wool or a gray abrasive pad for a very gentle knockdown.
Performance and durability
As a film finish, PolyShades behaves like polyurethane with tint:
- Adhesion was solid over scuff-sanded existing poly and lacquer. I always recommend a small test patch on unknown finishes.
- Scratch and scuff resistance is good for trim, doors, and cabinetry. On high-contact points (the top rail of a frequently used door), any tinted film will show wear sooner than a clear-only topcoat over a penetrating stain. The upside: touch-ups are straightforward—scuff, dust off, and lay on a thin refresh coat.
- Choose your battles. I wouldn’t use this for floors or a hard-use tabletop where I expect years of daily abuse. For those, a full strip, stain, and a multi-coat clear is still the gold standard.
One note on color control: because the tint sits in the film, each coat accumulates color. Two thin coats gave me even, consistent results; a third coat noticeably deepened the tone. Plan your number of coats with that in mind, and don’t try to “correct” color mid-panel—complete the panel, let it dry, then adjust with the next coat.
Coverage, working time, and cleanup
A half-pint goes further than you might think for a tinted film. In my workflow, 8 ounces comfortably handled two standard interior doors (both sides) in one thin coat or a room’s worth of base and casing with some left over. If you’re doing multiple coats, budget accordingly—around 25–35 square feet per coat is a practical estimate for controlled, thin application.
Open time is reasonable; I had a few minutes to maintain a wet edge before it started to tack. At normal indoor temps, it was dry to the touch in about 4–6 hours and ready to recoat later the same day or the next morning, depending on humidity.
Cleanup is with mineral spirits. If you clean immediately, a quality bristle brush can be reused. For small jobs, foam brushes are convenient and disposable. As with any oil-based finish, manage oily rags properly—lay them flat to dry outdoors or submerge in water in a sealed metal container to avoid spontaneous combustion.
Fumes and safety
This is an oil-based product with strong solvent odor. I worked with ample ventilation—a box fan in a window pulling air out—and wore an organic vapor respirator. Pets and kids stayed out until the film was no longer tacky. Plan your schedule so pieces can cure undisturbed.
Common pitfalls—and how to avoid them
- Streaks and lap marks: Caused by overworking or partial drying. Work in manageable sections and tip off once.
- Sags and bubbles: Result of heavy coats or shaking the can. Thin applications and gentle stirring fix both.
- Uneven color: Often from inconsistent film thickness. Aim for the same pressure and speed throughout, and do at least two thin coats.
- Trying to lighten: This product won’t make dark wood light. If that’s your goal, you’ll need to strip and start fresh.
Where it shines
For trim, door slabs, cabinet face frames, and furniture accents that need a color tweak and a refresh, PolyShades saves time without sacrificing a clean, professional look. Classic Oak’s warm, light tone is especially useful for brightening dated brown finishes and tying together mixed wood tones across a room.
Where it doesn’t
If you need exact color matching on new-to-old joinery or demand the tactile depth of a penetrating stain under a crystal-clear topcoat, the traditional two-step system still offers more control. And if your surface sees constant abrasion (desktops, floors), build multiple clear coats—or choose a different system entirely.
Final thoughts and recommendation
Used as intended—thin, even coats over properly prepped wood—PolyShades in Classic Oak delivers a warm, satin film that refreshes tired finishes and subtly shifts color with far less effort than a full strip-and-stain. It’s fast, predictable, and the finish quality is entirely respectable for interior woodwork. The trade-offs are real: it’s fume-heavy, the satin sheen skews slightly glossier than some might expect, and you need discipline in application to avoid sags and streaks. Durability is good for trim and cabinetry but not a substitute for a full build on high-wear surfaces.
I recommend this finish for anyone looking to revive interior doors, trim, or cabinets and nudge color warmer without tearing a room apart. If you follow clear-coat best practices—scuff sand, dust control, thin coats, proper ventilation—you’ll get attractive results with less time and mess than the traditional route. If your project demands a dramatic color change toward lighter tones or maximum long-term wear on hard-use surfaces, reach for a separate stain and a multi-coat clear instead.
Project Ideas
Business
Upcycle & Resell Service
Offer a local furniture upcycling service: pick up client pieces, refresh color and protection with PolyShades (no stripping if previously sealed), stage and resell them online or at markets. Fast turnaround and the trusted Minwax name help market reliability and quality.
Color-Refresh for Rentals & Staged Homes
Provide a low-cost color-refresh service for landlords and realtors who need to quickly modernize cabinets, trim, or furniture between tenants/showings. Use the one-step stain + poly to change tone and protect surfaces without lengthy refinishing or removal of existing polyurethane.
Small-Batch Home Décor Brand
Create a line of finished wood goods (coasters, frames, trays, shelves) in Classic Oak and sell on Etsy or at craft fairs. The single-step finish reduces labor and inventory time; highlight the durable satin topcoat and consistent color in product listings to justify premium pricing.
Hands-On Finishing Workshops
Host short classes teaching basics of wood finishing—sanding, application, and safety/cleanup with mineral spirits—using PolyShades to demonstrate quick, professional results. Charge per participant and offer take-home kits (small ½-pint, brush, sandpaper) to boost revenue and product familiarity.
Creative
Mini Furniture Makeover
Refinish a small piece (side table, stool, nightstand) using PolyShades Classic Oak to change color and add satin protection in one coat. Lightly sand, remove dust, brush on the finish, and highlight wood grain for a quick upcycle that maintains existing polyurethane — no stripping required. Great for thrifted finds or mismatched sets.
Vintage Wood Signs
Create rustic wall signs from pine or reclaimed boards. Use PolyShades to give a warm Classic Oak tone, then distress edges and add hand-lettered or stencil graphics. The built-in polyurethane gives immediate protection for indoor décor, saving time when making multiple signs.
Handcrafted Accessory Line (Coasters & Trays)
Make small home-accessory sets—round or square coasters, serving trays, and catch-alls—from hardwood offcuts. The one-step stain + poly speeds production and produces a consistent satin finish that shows off grain. Pair sets with simple laser-engraved or burned designs for a premium look.
Jewelry & Keepsake Boxes
Build small boxes from birch or walnut and finish them in Classic Oak to create a warm, classic aesthetic. The product works over bare or already-finished wood, so you can adjust color on salvaged boxes. The satin polyurethane adds durability for items handled frequently.