Features
- Material and Function: Made with a sturdy die-casting process, it's easy to tie two downspouts together into one!
- Protect your yard and foundation :We recommend that you regularly inspect and maintain your gutter downspouts and replace them when needed. Downspout Y-connectors help prevent rain, erosion and costly repairs and enjoy a tidier lawn and yard!
- Easy to install and maintain :Easy to install and low maintenance, so you can easily squeeze the aluminum end in. Later replacement maintenance can be recycled and reused according to your needs.
- Appearance:We use baking paint to make it with full color, dirt and moisture resistance, wear and tear resistance, and long life.
- After-sales service commitment: If you have any questions, please feel free to consult, we will seriously answer the questions raised by customers and actively provide a variety of solutions. We hope we can bring you the best shopping experience!
Specifications
| Color | White |
| Size | Fits 2" X 3" |
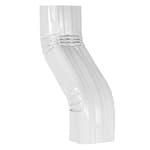
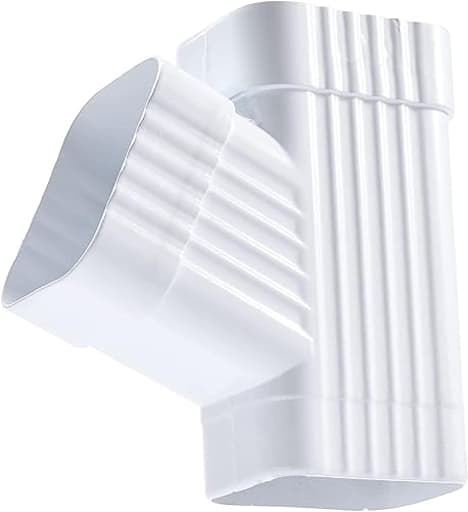
A die-cast Y connector designed to join two square downspouts into a single 2" x 3" outlet, directing rainwater into a shared downpipe. It has a white baked-coat finish for dirt and corrosion resistance and is built for simple squeeze-fit installation, low maintenance, and reuse to help manage runoff and reduce erosion near foundations.
VYH Downspout Gutter for Y Connector 2x3,Square Downspout Diverter White Rain Gutter Downspout Accessory Stainless Steel Gutter Y Connector Rainwater Drainage Review
Why I reached for a Y‑connector
A recent gutter rework on my house left me with two short downspout runs landing within a foot of each other. Running two separate drains would have meant a tangle of pipe and a trip hazard around a walkway. I wanted a clean way to join both into one 2" x 3" line without resorting to a mess of elbows and band-aid patches. That’s where the VYH Y-connector came in.
Build quality and design
Out of the box, the Y-connector feels reassuringly solid. It’s a die-cast metal piece with a baked-on white finish that’s smooth, even, and more chip-resistant than the spray-painted gutter parts I’ve used before. There are no seamed folds or tabs holding this junction together; it’s a one-piece casting, which matters for two reasons:
- Fewer potential leak paths
- A smoother interior for better water flow and less debris snagging
The edges are clean, the corners are fairly crisp, and the finish matched my existing white gutters well. The proportions are right for 2" x 3" square downspouts, with two inlets on top and a single outlet below.
One note on the geometry: the corners on the Y are sharper and squarer than many commodity downspouts, which tend to have slightly rounded, “pillowed” corners. That’s not a flaw, but it does affect how you approach the fit.
Fit and compatibility
If you’ve installed gutters before, you know “2 x 3” isn’t always identical from brand to brand. Tolerances and corner radii vary. That shows up here.
- The two upper inlets behaved like “female” ends on standard downspout. My store-bought 2" x 3" sections slid in after a little hand-squaring at the corners.
- The bottom outlet is where I had to pay attention. On my setup, it was slightly oversized compared to an Amerimax 2" x 3" downspout section. I had two options: crimp the Y’s outlet to slip inside the next piece, or slide the next piece over the outlet and secure it externally. Crimping die-cast is not ideal, so I chose the second route.
For the top connections, I squared the mating downspout ends by hand—pressing the corners to sharpen them—and they seated fully with light pressure. For the outlet, I oriented the downstream pipe as a “female” sleeve over the Y’s outlet, then tied it together with sheet-metal screws and sealant. That produced a strong, watertight joint without forcing a too-tight fit.
The short version: it fits 2" x 3" systems, but expect some variability. If your brand runs large, you might get an easy slip fit. If it runs small, be prepared to sleeve the downstream piece over the outlet or use a short transition section.
Installation experience
The product is billed as a squeeze-fit piece, and that’s true if your system’s tolerances line up. In my case, I treated it like any other metal junction and used basic sheet-metal practices:
- Tools: tin snips, drill/driver with 1/4" hex bit, 1/8" pilot bit, three #8 or #10 stainless sheet-metal screws per joint, and a tube of butyl gutter sealant.
- Prep: dry-fit all three connections, mark insertion depth, and check alignment to ensure the combined downspout keeps proper pitch and clears any siding or trim.
- Sealing: a thin bead of butyl inside each joint before assembly, then three evenly spaced screws to lock it down.
- Support: a strap above and below the Y to take the weight off the joints. The Y itself is sturdy, but the leverage from two converging runs can stress the fasteners if you don’t support it.
From start to finish, the install took about an hour including a little finessing of the upstream corners. I didn’t need adapters or shims, just patience and the willingness to adjust the squareness of the mating ends.
Performance in real weather
The first test came with a steady fall rain and then a heavier storm the week after. There were two things I watched closely:
- Leak resistance: The one-piece casting and sealed joints stayed dry. No weeping seams, no drips at the Y body.
- Flow capacity: Combining two inlets into a single 2" x 3" outlet can create a bottleneck if both upstream runs carry big roof areas. In my setup—two small roof planes totaling roughly 400–500 sq ft—flow was fine. Water moved smoothly with no audible gurgling or burping and no backup at the inlets.
If you’re planning to consolidate two full-size downspouts that each serve large roof sections, do some quick math or test during a heavy hose flow. A single 2" x 3" column can only move so much water; the Y won’t change that.
Durability and maintenance
After a few months outdoors, the finish still looks fresh, with no chalking or bubbling. The casting doesn’t oil-can like thin aluminum stock; it resists dents and holds its shape once you have it aligned.
As for maintenance, the Y doesn’t create any odd angles that trap debris, but any convergence point can become a choke if you let leaves accumulate upstream. I flush mine at the start and end of leaf season, and I added a small leaf screen at one of the inlets to cut down on twigs. Inspection is simple: a flashlight up from below tells you everything you need to know.
What could be better
- Outlet sizing tolerance: The bottom outlet runs on the generous side. That’s not a deal-breaker, and the sleeve-over method works well, but a slightly tapered outlet would make universal fit easier.
- Corner compatibility: Many downspout brands have softer radiused corners. A subtle internal radius or a very slight lead-in at the inlets would reduce the need to hand-square mating pieces.
- Documentation: A simple one-pager showing both connection strategies (inside-fit vs. outside-sleeve) would save DIYers some head-scratching.
Who it’s for
- Homeowners consolidating two short 2" x 3" runs for a cleaner exterior and fewer pipes near walkways or landscaping.
- Anyone wanting a metal, one-piece Y with a durable finish rather than cobbling together elbows and crimped seams.
- Installers comfortable with basic sheet-metal techniques who can adjust for small tolerance differences between brands.
If you absolutely require a plug-and-play slip fit with your specific downspout brand, you may need to test-fit first or be ready to use sealant and screws for a sleeve connection.
Tips for a cleaner install
- Dry-fit all three ends before sealing anything. Mark the insertion depth with painter’s tape to keep everything aligned.
- Decide which joints will be inside-fit and which will be outside-sleeve. As a rule, orient your joints to shed water—upstream pieces should sit inside downstream where possible. If you must sleeve over the outlet, use a generous butyl bead and three screws.
- Add a strap above the Y to carry the vertical load from the two inlets, and another strap below to stabilize the outlet section.
- Don’t skimp on sealant. Butyl stays flexible and plays well with painted metal.
- If your downspouts have “pillow” corners, square them gently by hand before insertion for a cleaner look and better engagement with the Y’s crisp corners.
The bottom line
The VYH Y-connector is a sturdy, clean-looking way to join two 2" x 3" downspouts into a single run. The die-cast body and baked finish feel a step above typical folded aluminum fittings, and the one-piece design minimizes leak paths. Installation was straightforward with basic tools, and once secured with sealant and screws, the assembly has handled real rain without leaks or rattles.
It isn’t a universal, friction-fit miracle—tolerances vary across downspout brands, and the outlet runs slightly large. Plan on either crimping (if your tools and the material allow it) or using the outside-sleeve method with sealant and screws. That small bit of forethought is the difference between frustration and a tidy, durable install.
Recommendation: I recommend the Y-connector for anyone consolidating two 2" x 3" downspouts, provided you’re comfortable with light sheet-metal work and prepared to manage fit with sealant and screws if needed. Its build quality, finish, and leak-resistant design make it a better long-term solution than piecing together multiple elbows, and the end result is cleaner and more robust than most DIY alternatives.
Project Ideas
Business
Stormwater Capture Kit (Retail Product)
Assemble and sell a plug‑and‑play kit containing the Y connector, mesh inlet screen, barrel adaptor, flexible hose, clamps, and step‑by‑step QR video instructions. Target DIY homeowners, gardeners, and tiny‑home owners. Price tiers: basic (connector + adaptor), standard (adds hose + screen), pro (includes barrel + instructions). Sell via e‑commerce and local hardware stores.
Gutter Retrofit & Foundation Protection Service
Offer a local service that assesses problem runoff, installs Y connectors where two downspouts can be merged, and routes water to a safe outlet (soakaway, storm sewer, or rain barrel). Package with seasonal inspections and maintenance subscriptions (spring clear, fall prep). Revenue from installations + recurring maintenance contracts.
Rainwater Harvesting Partnership Program
Partner with landscapers, permaculture designers, and roofers to include the Y connector as a recommended component for multi-roof harvesting systems. Provide trade pricing, installation training, and marketing collateral. Earn via wholesale sales and referral fees while expanding reach into green-building projects.
Local DIY Workshops & Kits
Run paid workshops teaching attendees how to install Y connectors for rain barrels, erosion control, and garden irrigation. Charge a class fee and sell bundled kits at the event. Benefits: builds community trust, generates immediate product sales, and creates online video content to drive future kit purchases.
Decorative & Branded Hardware Line
Create a small brand around attractive, finished Y connectors and matching downspout accessories (custom colors, powder‑coat, or branded decals). Target boutique landscapers, high‑end renovation projects, and homeowners wanting coordinated exteriors. Start with small batches and sell through niche retailers and direct online channels.
Creative
Rain‑Barrel Merge Station
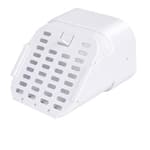
Use the Y connector to combine runoff from two rooflines into a single rain barrel inlet. Add a fine mesh debris screen on the top, a threaded adaptor to match the barrel, and an overflow hose. Benefits: captures more water during storms, reduces garden watering needs, and keeps barrels from overflowing. Quick steps: cut existing downspouts to length, squeeze-fit the connector, secure with stainless screws or clamps, attach adaptor and barrel.
Dual Feed Soakaway / French Drain
Convert two downspouts into one controlled subsurface outlet for erosion control. Attach corrugated drain pipe to the 2x3 outlet, run to a gravel-filled soakaway or French drain bed, and wrap pipe in landscape fabric to prevent clogging. Ideal for yards with runoff concentrated at a corner; preserves foundation and lawn while remaining low-visibility.
Rain Chain to Fountain Converter
Create a decorative water feature by routing two rain chains into the Y connector which channels water to a small recirculating fountain or pond. During heavy rain the Y balances flow; add a simple screen and an overflow route for safety. This blends function with curb appeal—use the white baked-coat as a neutral background or paint the chains to match.
Zone Splitter for Garden Irrigation
Turn two gutters into a small irrigation header: use the Y connector to feed a header pipe that splits into two or more drip lines serving separate beds. Add manual ball valves or simple solenoids to control zones so you can water different plantings independently while using captured rainwater.
Upcycled Outdoor Accent & Bird Bath Feed
Repurpose the connector into a small yard sculpture or functional accent: mount it on a post where two short downspouts feed into the Y, and direct the outlet into a shallow bird bath or planter. Add LED waterproof lighting inside or around the splice for nighttime ambience. The durable baked coat holds paint or decorative decals well.