Features
- NO MORE DENTS & HOLES: Sturdy door stops prevent doors from slamming into walls, stopping them when you choose.
- EASY TO INSTALL: Installation of a door stop won't take more than 1-2 minutes.
- HIGH QUALITY: Kovosch hinge pin door stop is made of hard metal-zinc alloy. Meanwhile, it has high quality rubber bumper - shoulder on stub supports rubber through entire body for engineered cushioning.
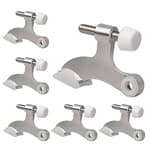
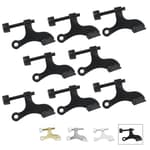
- MULTIPLE COLORS:Available in 5 colors: Satin Nickel, Black, Oil Rubbed Bronze,White,Bright Brass.
- RELIABLE QUALITY :If there is any quality problem, please feel free to contact us.
Specifications
| Color | Satin Nickel |
| Size | 2 Pack |
| Unit Count | 2 |
Related Tools
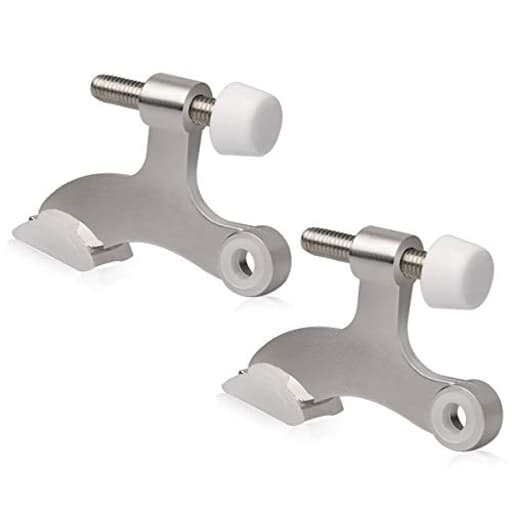
This two-pack of hinge-pin door stoppers fits over the hinge pin to prevent a door from striking the wall, reducing dents and holes. Each adjustable stopper is made of zinc-alloy with a white rubber bumper and satin nickel finish, and installs in about 1–2 minutes.
KOVOSCH 2 Pack Hinge Pin Door Stopper Brushed Satin Nickel - Adjustable Heavy Duty Hinge Pin Door Stop with White Rubber Bumper Tips Review
Why I reached for a hinge-pin stop
I had a bathroom door that wanted to swing a bit too far, threatening to clip a glass shower panel. I didn’t want to drill new holes in the baseboard, nor did I love the look of spring-style baseboard stops. A hinge-mounted solution felt cleaner and more reversible, so I tried the Kovosch hinge-pin door stop in satin nickel. It turned out to be a small upgrade that solved a big annoyance with minimal fuss.
Installation: two minutes, no drama
The appeal here is the truly simple install. I used a small punch (a finish nail works in a pinch) and a hammer to tap the hinge pin up and out on the top hinge, slipped the stop over the pin hole, and reinserted the pin. With the door slightly ajar, I oriented the long arm toward the door face and the short arm toward the jamb, then snugged the adjustable stop to set how far the door would open. From first tap to final tweak, it took under two minutes.
A few tips that made it go smoothly:
- Choose the top hinge. It gives the stop the most leverage and tends to hold adjustments best.
- Verify swing direction before you install; the bumper should contact the door face, not the edge or the casing.
- If the hinge pin is stubborn, a drop of penetrating oil and gentler, repeated taps are better than aggressive hammering.
- Once set, open and close the door a dozen times to confirm the stop lands on the flat of the door face rather than a raised panel or edge.
My pack included two small clear stick-on bumpers. I placed one on the door face exactly where the rubber tip meets it. It’s not essential—the built-in rubber bumper is already soft—but the extra dot spreads the load and keeps paint scuffs at bay.
Design and build quality
The body is zinc alloy with a brushed satin nickel finish that blended nicely with my existing door hardware. The finish is even and didn’t scratch easily during installation. The adjustable arm threads moved smoothly and locked down without slop, and the two white rubber tips are supported with a shouldered design that prevents them from collapsing under force. This matters more than it sounds: flimsier bumpers can shear or mushroom over time, which leads to squeaks and erratic stopping angles.
The stop is compact and looks tidy once installed. From across the room, you barely notice it, especially with satin nickel against standard hinge leaves. Kovosch offers multiple finishes if you care about a near-perfect match; the satin nickel here is neutral and forgiving.
Performance in everyday use
On my bathroom door (a standard hollow-core slab with 3.5-inch residential hinges), the stop did exactly what it’s supposed to: arrest the swing before anything fragile meets the wall or the shower glass. The action is quiet and cushioned. I set it so the door opens a comfortable 95–100 degrees—far enough to feel natural, not so far that the handle gets close to the wall.
After a couple of weeks, the setting held. I didn’t notice any loosening of the adjustment screw or the hinge pin walking upward. On a second door in a kid’s room—an environment known for enthusiastic door handling—the stop handled more abrupt swings without complaint. The rubber tips slightly compress under force but rebound cleanly.
A practical note on adjustability: set the stop so the bumper lands on the face of the door, not right at a panel edge or near decorative trim. If you stop the door too narrowly, you can end up transferring force into a skinny section of the door edge, which is harder on paint and can leave a little dent over time. Centering the contact patch on a flat area spreads the load and keeps things looking new.
What it won’t do (and what to watch for)
- Non-removable pins: If your hinges have non-removable or security pins (common on some exterior doors), this style of stop won’t work. You’ll want an overhead or floor-mounted solution.
- Spring hinges/closers: On doors with strong spring hinges or closers, the constant force can encourage the hinge pin to creep upward. Make sure the pin seats fully, give it a firm final tap, and check it after a few days. If your hinge leaves are worn or the screws are loose, fix that first; any stop will struggle on a wobbly foundation.
- Clearance for knobs and levers: A hinge-pin stop prevents the door itself from reaching the wall, but levers and long handles can extend beyond the door face. Adjust to a position that keeps hardware clear of the wall, or consider a secondary wall/floor stop if the handle is unusually long.
- Soft trim and mouldings: If you misadjust the stop so the door edge still meets casing or crown, you can nick the trim. Open the door slowly during setup and watch where everything lands. The right setting is one that lets the rubber bumper hit the door face and leaves the casing alone.
Durability and maintenance
Zinc alloy isn’t as bombproof as solid steel, but for residential interior doors it’s more than adequate, and the benefit is corrosion resistance and a clean finish. After daily use, the rubber tips show minimal wear and no cracking. If they ever do wear out, the design is common enough that replacement tips are easy to find.
A little preventative care goes a long way:
- Keep hinge pins lightly lubricated so the pin slides fully back down into the knuckle.
- Recheck the stop’s adjustment after the first week, then quarterly. A small twist by hand is usually all that’s needed.
- If you notice a persistent loosening on the threaded adjuster, a tiny dab of removable thread locker solves it without making future adjustments difficult.
How it compares to other stop styles
- Baseboard and floor stops: These distribute impact into framing and are great for heavy doors, but they require drilling and are more visible. They also set a fixed stop point you may need to patch and relocate later.
- Spring stops: Cheap and easy, but they can flex and still allow the knob to hit the wall. They’re infamous for getting bent by kids and pets.
- Over-hinge clip-on stops: Some non-pin styles clamp to the hinge leaf. They’re fast but bulkier, and I don’t like the way they can mar the hinge finish.
The hinge-pin approach hits a sweet spot: discreet, tool-light installation and easily adjustable without leaving scars on walls or trim. The tradeoff is that the stopping force is transmitted into the hinge screws and the door face, so you want tight hinges and a sensible setting.
Value and options
This comes as a two-pack, which covered my bathroom and a bedroom with one purchase. If you’re upgrading multiple rooms, the multi-finish availability helps keep a consistent look across the house. For the price, the combination of metal construction, clean finish, and well-supported rubber bumpers represents solid value.
Who it’s for
- Homeowners who want a clean, reversible solution with no new holes in walls or baseboards.
- Renters who need adjustability and easy removal when they move out.
- Anyone replacing flimsy builder-grade stops that rattle or mark the wall.
It’s less ideal if you have non-removable hinge pins, extra-heavy doors with aggressive closers, or you need to stop a door at a very tight angle where the bumper would land on a delicate panel edge.
Recommendation
I recommend the Kovosch hinge-pin door stop for most interior doors where you want a tidy, adjustable way to protect walls and fixtures without new holes. It installs in minutes, stays put, and looks like it belongs with standard residential hardware. The rubber tips cushion impact effectively, the finish blends in, and adjustments are intuitive. As long as your hinges accept removable pins and you set it so the bumper contacts the door face cleanly, it’s a simple, durable fix that makes everyday door use quieter and safer.
Project Ideas
Business
Landlord & short‑term rental protection kits
Package the hinge-pin stoppers into low-cost 'door protection kits' for landlords, property managers, and Airbnb hosts. Include 2–4 stoppers, simple installation instructions, and a one-page benefits sheet (reduced wall repairs, guest damage prevention). Sell kits online, to local real-estate agencies, or as add-ons for move-in packets.
Custom finish bundles for interior designers
Offer curated multi-color or custom-finished packs (satin nickel, black, oil-rubbed bronze, white, brass) targeted at interior designers and cabinetmakers who want hardware to match finishes. Provide small minimum-order custom branding/packaging and sample kits so professionals can order by project.
Turnkey install service for short-term rentals
Market a local service that inspects unit doors and installs hinge-pin door stoppers (and other low-cost protective hardware). Charge per-unit or subscription for periodic checks. Sell the service as a cost-saving preventative maintenance offering that reduces wall repair expenses and guest complaints.
Etsy / Shopify upcycled home-accessory line
Create a small product line using the stoppers as components — e.g., framed protective bumpers, decorative mini-feet for artisanal boxes, or keychain accessories. Photograph styled product shots and sell on Etsy/Shopify; use keywords like 'hardware upcycle', 'door stop decorative', and target customers seeking industrial/minimal home accents.
Wholesale supply for small furniture shops
Position the product as a bulk accessory for cabinetmakers, bespoke furniture shops, and millworkers who need reliable door stops and small bumpers. Offer volume discounts, quick reordering, and the option for labeled packaging or co-branding. Provide installation tips and small sample packs to get local workshops to trial the hardware.
Creative
Mini adjustable feet for decorative boxes
Turn each hinge-pin stopper into a low-profile foot for jewelry boxes, wooden crates or decorative stands. Epoxy the metal body into a shallow recess at the box corners (or screw into a small threaded insert) so the rubber bumper protects surfaces and raises the piece slightly. Use different colored bumpers for contrast and to create floating-look display boxes.
Hinge-pin wind chime / mobile
Use several stoppers as the structural and sound elements of a small wind chime or mobile. String them on wire or thin chain (the metal bodies act as attractive weights) and let the rubber bumpers tap metal or wood chimes for a soft, muted tone. The satin-nickel finish gives a modern industrial aesthetic that works indoors or on sheltered porches.
Scaled door stops for dollhouses & model cabinetry
These small, adjustable stoppers are perfect for scale models and dollhouses where a full-size door stop is out of proportion. Install them on miniature hinge pins or glue into tiny hinges to prevent miniature doors from banging, adding realism and function to crafted mini interiors.
Floating-frame & shelf bumper system
Create a cohesive gallery display by mounting stoppers behind floating shelves and picture frames as uniform bumpers. The stoppers keep frames level, protect walls, and can be color-coordinated for a clean, intentional look. This is fast to install and makes framing look professionally finished.
Industrial keychain & zipper pull upcycle
Convert a stopper into a rugged keychain or zipper pull: drill or epoxy a small split-ring loop into the end and attach to keys or bag zippers. The rubber bumper gives a tactile grip and soft contact, while the metal body provides industrial style—optionally paint or etch initials for personalization.