Features
- HANDS-FREE LIGHTING SOLUTION: Minimize the need to flip the switch with this hands-free lighting door switch from Morris Products. This lighting solution easily mounts in door jams for convenience.
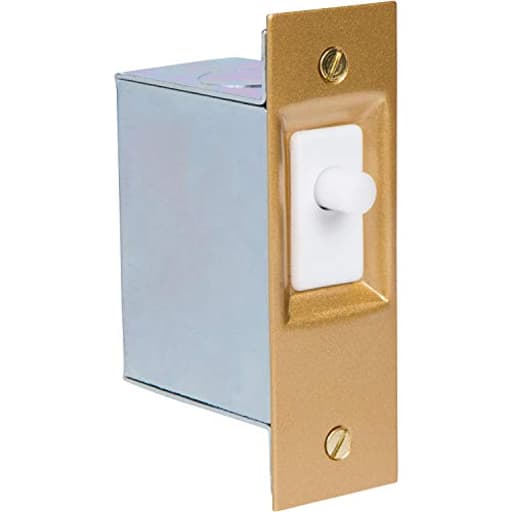
- EASY OPERATION: This innovative door switch includes a push-button switch with a metal box, cover plate and mounting hardware. Easily operate the lights by opening the door to closets, dark rooms or walk-in refrigerators.
- MOUNTING UNIT: Easily mount this hands-free lighting door switch with 6” wire leads in door jams. Approximate mounting holes measure at 1.25” W x 2.75” H x 2” D.
- RESIDENTIAL, COMMERCIAL USE: Provide ample lighting in homes or businesses with this door switch offering 10 Amps 125 VAC and 10 Amps 250 VAC operation. This AC/DC SPST door switch is UL/CSA Listed.
- COLLECTION OF COMPREHENSIVE ELECTRICAL TOOLS: Morris Products is proud to feature a variety of electrical tools and applications that range from wire connectors and non-insulated ferrule to nylon cable ties and cable splicers.
Specifications
| Release Date | 2017-11-25T00:00:01Z |
| Size | Pack of 1 |
| Unit Count | 1 |
A hands-free door-activated light switch designed to mount in a door jamb and actuate lighting via a push-button when the door opens. It includes a metal box, cover plate, mounting hardware and 6" wire leads; SPST rated 10 A at 125 VAC or 250 VAC and is UL/CSA listed. Approximate mounting dimensions are 1.25" × 2.75" × 2".
Wuiil Morris Products Hands-Free Lighting Door Switch – For Closets, Dark Rooms, Walk-Ins – Push Button, Cover Plate, Mounting Hardware, Metal Box – AC/DC SPST 6” Wire Leads – 1.25” x 2.75” x 2” Review
A simple, reliable way to make closet lights automatic
After getting tired of fumbling for a switch with an armful of groceries, I retrofitted my pantry and a small linen closet with this hands-free door-jamb light switch. It’s a mechanical, push-button switch that lives in the jamb: open the door and the light pops on; close the door and it shuts off. No apps, no sensors to aim, just a spring and contacts in a small metal box. That simplicity is the appeal—and in practice, it works exactly the way you hope.
What you get and how it’s built
The kit includes a metal switch box, a cover plate, mounting hardware, and a pre-wired SPST push-button switch with 6-inch leads. The assembly is compact—roughly 1.25 × 2.75 × 2 inches—so it’s sized to fit a standard door jamb mortise without intruding into the doorway. It’s UL/CSA listed and rated at 10 A at 125 VAC or 250 VAC, which is more than enough for any closet fixture, including older incandescent cans and newer LED strips or surface mounts.
The switch itself has a positive, tactile action with a short throw. The plunger is firm, and the return spring is strong enough to resist accidental half-presses if the door brushes the jamb. The metal box is thin but appropriately rigid; edges are finished and the cover plate keeps everything tidy once installed. The included screws are fine for softwood jambs, though I swapped for slightly longer wood screws in one location for additional bite.
Installation: straightforward if you plan your layout
If you’ve ever mortised a strike plate, you can handle this. My steps:
- Map the location. With the door closed, mark a spot on the hinge side jamb where the door face meets the stop. You want the plunger to land squarely against the flat of the door—not on a bevel or molding.
- Check clearances. Make sure the plunger will fully depress when the door is closed. If your door stop is thick, you might need to position the switch slightly proud of the stop to guarantee full travel.
- Prep the opening. I traced the cover plate, drilled a pilot, and used a sharp chisel to create a neat mortise. Go slow—square shoulders help the plate sit flush.
- Run and identify conductors. The switch is a simple in-line device. It should interrupt the hot conductor feeding the light. I pulled the feed and load into the metal box, joined the neutrals together, and used the switch leads to break the hot. The 6-inch leads give you enough slack for clean splices with standard wirenuts.
- Grounding. It’s a metal box—bond it per code with a grounding screw/pigtail to your equipment ground. Don’t skip this step.
- Mount and align. Dry-fit the box, test the plunger’s travel with the door, and adjust as needed before final screws go in. I like to loosely mount, test, then snug everything after confirming the light toggles reliably.
Safety note: Shut off the breaker and verify. Also, closets have fixture clearance rules—if you’re upgrading the light at the same time, make sure your luminaire placement and lens type are compliant.
Time-wise, the pantry took me about 40 minutes start to finish; the linen closet, about 20, since I’d already done the layout once.
Daily use and performance
This is where the door-jamb switch shines. The response is instant and repeatable. Open the door half an inch, the light is on. Close it, and it clicks off without delay. I tested it with a mix of fixtures—legacy incandescent in one closet, a dimmable LED flush mount in the other—and the switch behaves well with both. There’s no ghosting or flicker with the LED load, which you sometimes see with electronic sensors.
Mechanically, it has a crisp, audible click that you’ll notice for the first day and then forget. The plunger face is small and makes reliable contact with a flat-painted door. I added a clear bumper dot where the plunger meets the door on one opening; it quieted the contact and protected the paint without affecting travel.
Fit, door types, and placement tips
- Standard hinged doors: This is the ideal scenario. Mount on the hinge side jamb where the door leaf seals. Avoid the latch side—the bevel and latch cutout can complicate alignment.
- Double (French) doors: Choose the primary leaf that closes last. The switch needs a consistent stopping surface.
- Bi-fold or bypass doors: It can work, but you’ll spend more time on alignment to ensure the plunger sees full travel when the door is “closed.”
- Pocket doors: Not recommended without extra carpentry, since the door disappears into the wall and won’t press the button.
Two practical tips:
- Align for full depression. If the button doesn’t bottom out with the door closed, you risk inconsistent off behavior. Shim behind the plate or tweak the stop if needed.
- Keep the plunger clean. If you’re painting the jamb, mask the inside of the box and the plunger carefully. Don’t let paint or tape residue gum up the mechanism.
Durability and maintenance
Mechanical switches live or die by contact quality and spring design. The action on this one feels robust, with no side play in the plunger and a good return snap. After a few months of multiple daily cycles, mine hasn’t missed a beat. With proper alignment (full press when closed, full release when open), mechanical wear should be minimal. If you’re in a dusty space—think utility closet with a dryer nearby—wipe the plunger occasionally.
One subtle reliability safeguard is to ensure the door actually closes to the same point every time. Settling hinges or a sagging strike can reduce plunger travel. If the door starts to bind or leave a wider reveal over time, re-adjust the hinges or add a strike shim.
Safety and code considerations
- Switch the hot conductor only. Leave the neutral continuous to the fixture.
- Use the included metal box. Don’t bury splices in the jamb without an enclosure.
- Bond the box. A green grounding screw and a short copper pigtail are inexpensive and essential.
- Fixture clearances in closets exist for a reason. Lens-covered LEDs are your friend here.
If you’re not comfortable identifying line/load and working in tight spaces, this is a quick job for a licensed electrician.
Pros and cons
Pros:
- Immediate, hands-free operation with any door opening
- Simple, mechanical reliability—no batteries, no programming
- UL/CSA listing and a sensible 10 A rating for typical lighting circuits
- Compact footprint and included metal box keep the install tidy
- Works cleanly with LEDs, CFLs, and incandescents
Cons:
- Industrial look; the cover plate won’t match decorative switches or fancy trim without custom work
- Requires precise alignment for consistent off behavior on door close
- Not ideal for pocket or complex door configurations
- Short leads are neat but can be tight in a crowded jamb cavity
Who benefits most
If you have a pantry, coat closet, or utility cabinet that gets frequent use, this is an easy lifestyle upgrade. It’s especially nice where hands are often full or dirty—garages, basements, or laundry room closets. In commercial or back-of-house spaces, it’s an inexpensive way to reduce accidental “left on” lights.
If your priority is aesthetics and a perfectly matched wall plate, or your door setup is non-standard, consider a ceiling-mounted occupancy sensor instead. For a straightforward hinged closet door, though, the door-jamb approach is the most natural interaction—open equals on.
Recommendation
I recommend this door-jamb light switch. It’s a low-tech, high-convenience solution that installs with basic tools, plays nicely with modern fixtures, and simply works. The included metal box and hardware make for a clean, code-conscious installation, and daily use is as intuitive as it gets. As long as you take a few minutes to align the plunger for full travel and keep paint out of the mechanism, you’ll get dependable, hands-free lighting every time you open the door.
Project Ideas
Business
Airbnb/Short-Term Rental Retrofit Service
Offer a targeted installation service to short-term rental hosts: install hands-free door switches in closets, pantries, and bathrooms to improve guest convenience and reduce complaints about dark storage areas. Package the work with a quick inspection form and offer a small follow-up maintenance plan. Charge per unit installed plus a flat site fee; upsell LED fixtures and smart integration.
Pre-Wired Closet Light DIY Kit
Create and sell a ready-to-install kit (switch, metal box, cover plate, pre-cut wiring harness, LED puck or strip, instructions and templates). Position it for DIYers on Etsy/Amazon or local hardware shops. Offer tiered kits (basic AC LED, low-voltage with driver, plug-and-play battery option) and optional video support for an additional fee.
Accessibility Retrofit Business
Specialize in hands-free lighting installs for seniors and people with limited mobility—bathrooms, closets, and hallways. Market through occupational therapists, senior centers, and home-care agencies. Provide assessment, installation, follow-up, and documentation for insurance or care plans. Charge per room plus assessment fee; offer bundled discounts for whole-home retrofits.
Commercial Walk-In & Utility Room Compliance Package
Target small businesses (restaurants, grocery stores, bodegas) by offering to install door-activated switches in walk-in coolers, storage rooms, and janitorial closets to improve safety and reduce wasted energy. Bundle installation with regular maintenance checks and emergency replacement service contracts. Use the UL/CSA listing as a selling point for compliance-minded customers.
Workshops & Certification Classes
Run hands-on community workshops teaching safe installation of door-activated lighting systems. Include a take-home mini-kit and provide certificates of completion. Monetize through ticket sales, kit fees, and partnerships with local hardware stores. Offer specialized sessions for contractors who want to add the service to their offerings.
Creative
Integrated Closet Light Upgrade
Turn a dark closet into a finished, user-friendly space by recess-mounting the hands-free door switch in the jamb and wiring it to an LED strip or puck light inside. Include a diffuser strip and magnetic cable channel for a clean look. Project steps: cut jamb recess, install metal box and switch, run low-voltage LED or AC LED fixture, hide wiring with trim. Result: elegant, automatic closet illumination ideal for clothing, craft, or tool closets.
Interactive Theater/Prop Trigger
Use the door-activated switch to trigger lighting and sound effects for a stage prop, haunted-house cabinet, or escape-room puzzle. The SPST contacts can actuate relays or controllers to power theatrical LEDs, fog machines, or cue recorded audio when a door is opened. Add a small microcontroller or delay circuit to create timed sequences and reactive effects.
Under-Stairs Pantry Retrofit
Convert an under-stairs pantry into a user-friendly storage area by installing the switch at the pantry door to activate soft, low-glare lighting and a small ventilation fan. Include strip lights with motion-safe low-wattage drivers, labeled shelves, and a simple hinge-mounted wiring channel so the project stays tidy and functional.
DIY Accessible Nightlight System
Create a hands-free nightlight solution for kids' rooms, elderly bathrooms, or hallways. Mount the door switch so opening a bedroom or bathroom door brings on a dimmable LED panel or a warm nightlight. Add a small timer or soft-dim circuit so lights fade after a set interval to conserve power and reduce startling bright light at night.
Tool/Equipment Cabinet Power Gate
Modify a tool cabinet or equipment enclosure so the door switch enables interior task lighting and powers down sensitive tools when closed. Useful in workshops where visibility is required only when the cabinet is open. Combine with a keyed switch or simple lockout for safety.