Features
- Easy Assembly with Numbered Parts & Dedicated Support: Quick and hassle-free setup! Every component is clearly numbered for straightforward assembly. (Note: Please wear gloves during installation to protect against sharp edges. Our customer service team is ready to assist if needed.)
- Robust Steel Construction for Long-Lasting Durability: Built with heavy-duty galvanized steel, this shed resists rust, harsh weather, and wear, offering reliable protection for your tools and equipment year after year.
- Flexible Storage Space – Verify Size Before Purchase: Ample room to organize garden tools, bikes, and more! Maximize your storage potential—please check the detailed size guide to ensure perfect fit for your needs.
- Lockable Door (Lock Not Included) for Secure Access: Features a door with pre-drilled holes for easy padlock addition, keeping your valuables safe and accessible only to you.
- Single-Shipment Delivery – Floor Not Included: Conveniently delivered in 1 box. Note: 1.Base not included; please install on a flat, solid surface (e.g., wooden platform) for stability and moisture protection. 2.Before purchasing, please check with your local Homeowners' Association (HOA) for any specific rules or approvals regarding shed installation.
Specifications
| Color | Brown |
| Size | 5' x 3' |
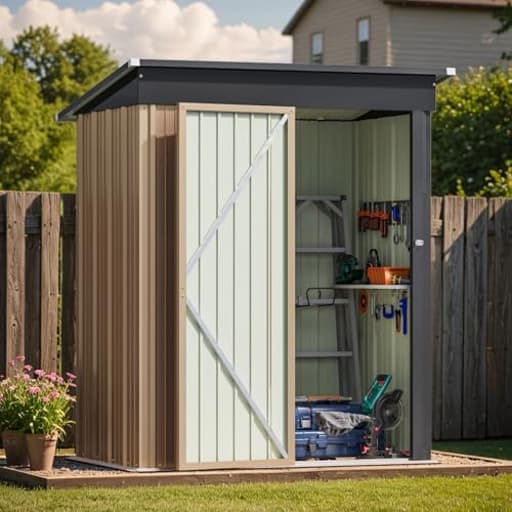
This 5×3 ft outdoor metal storage shed provides covered storage for bikes, garden tools, and pool equipment, and is built from galvanized steel for rust and weather resistance. It ships in one box with numbered parts for assembly, has a door prepared for a padlock (lock not included), and requires a separate flat solid base (floor not included); wear gloves during installation and verify dimensions and local HOA rules before purchase.
Greesum 5×3FT Outdoor Storage Shed, Metal Patio Storaged Sheds with Lockable Doors, Sheds & Outdoor Storage for Bike, Backyard, Pool and Garden, Brown Review
Why I picked the Greesum 5x3 shed
I needed a compact, weather-resistant place to corral garden hand tools, a pressure washer, a couple of storage totes, and occasionally a bike. A full-size walk-in shed wasn’t practical for my patio footprint, and I didn’t want resin. The Greesum 5x3 metal shed promised a small footprint, a lockable door, and galvanized steel panels shipped in a single box. On paper, it checked the right boxes for a budget-friendly, renter-friendly storage upgrade.
After assembling and living with it, it’s clear this is a capable little shed—provided you give it a solid base and don’t expect heavy-gauge steel or high-security hardware out of the box.
Unboxing and first impressions
Everything arrived in one carton with a lattice of numbered panels, a small hardware pack, and pictogram instructions. The steel is on the thinner side (as expected at this price), but it’s properly galvanized and finished in a neutral brown that blends into a garden line nicely. A few edges were sharp enough to warrant gloves, and one panel had a minor bend that I straightened by hand. It’s not unusual with budget metal sheds, but it’s worth unpacking carefully and flattening anything that looks off before you begin.
A protective plastic film covered some panels. You can leave it on for extra abrasion protection during assembly, then peel it later; just don’t trap it under fasteners.
Plan your base before you start
There’s no floor included, and that’s intentional. If you set this directly on dirt or grass, water will migrate inside and the structure will rack in wind. My setup:
- A level “pad” of 12"x12" pavers, tamped and checked for level
- A 5/8" exterior-rated plywood deck cut to fit the base frame
- Construction adhesive between plywood and pavers, plus four masonry screws at the corners
- L-brackets through the metal base rails into the plywood to tie the shed down
This raised floor keeps contents out of splash and helps the shed feel planted. If you’re on a slab, Tapcon-style anchors through the base rails work well. If you’re in an HOA, confirm placement rules and setbacks before you start—this size often flies under the radar, but it’s still your responsibility to check.
Assembly: doable with patience and the right tools
I wouldn’t call this a one-person project unless you have sawhorses or straps to hold panels upright. With a helper, assembly took an afternoon. A few practical notes from the build:
- Tools that helped: a cordless drill/driver with a low clutch setting, a nut driver bit, a hand ratchet for final snugging, a magnetic tray for the small screws, painter’s tape for panel orientation, tin snips (just in case), and work gloves.
- Don’t build on a windy day. The panels act like sails.
- The instructions are diagram-only. Follow the panel numbers closely and leave all screws finger-tight until the shell is squared. If holes don’t line up, it’s often because a panel is flipped—check the orientation marks before you reach for a drill.
- I encountered a couple of spots where predrilled holes didn’t perfectly align. A 1/8" bit and careful reaming solved it.
- The supplied self-tapping screws are small and easy to strip. Keep your drill on a low setting and press straight. If you have stainless or better self-tappers with sealing washers, they’re a worthwhile upgrade.
- Wear gloves the whole time; the flanges are crisp.
Once the walls and roof were tied together, the structure gained rigidity. Adding the door was straightforward after I squared the opening.
Build quality and design
- Size and access: At 5 by 3 feet, this is a storage shed, not a walk-in. I can’t stand upright inside. For rakes, shovels, a string trimmer, compressor, or one adult bike parked at an angle, it works. I added hooks on the back panel and a narrow shelf to maximize the vertical room.
- Steel and finish: The galvanized panels and baked-on finish are appropriate for light-duty outdoor storage. They’ll flex if you lean hard on them, but they resist corrosion and shrug off normal weather.
- Doors and hardware: The door(s) hang true when the frame is square, and they include holes for a padlock. The included latch and bolts are serviceable but flimsy. I swapped the latch for a heavier hasp with carriage bolts and backing washers—10-minute job, big improvement in feel and security.
- Fasteners and sealing: The screws don’t include sealing washers. I ran a thin bead of exterior-grade silicone along the base rail-to-floor joint and at the roof ridge. That kept out wind-driven rain.
Weather performance
After a few storms, here’s how it fared:
- Rain: With the floor raised and the base seam sealed, I haven’t had standing water inside. If you skip the floor or set it on bare ground, expect water ingress at the bottom edge. The roof seams benefited from a touch of sealant; without it, capillary action can wick droplets through overlapping panels in heavy rain.
- Wind: Anchoring matters. Before I tied it down, a gust shifted the shell slightly. After anchoring to the plywood deck and adding weight on the floor (two concrete pavers under the shelf), it’s been stable.
Everyday use and storage capacity
For a small footprint, it swallows a surprising amount of gear if you plan the layout:
- Long-handled tools hang along the back with S-hooks
- A 20" push mower and blower sit side-by-side
- Two 27-gallon totes stack in the corner
- A kids’ bike fits with the front wheel turned
If you need to store a full-size adult bike regularly, measure the handlebar width against the door opening; it’s doable at an angle but not as convenient as a wider shed. The brown color helps it disappear against fencing and mulch, and the low height avoids blocking sight lines.
Ways to make it better
These tweaks took little time and improved durability and user experience:
- Upgrade the latch/hasp and use a weather-resistant padlock
- Add L-brackets from the base rails into your floor
- Use sealing washers or a silicone bead at roof seams and the base perimeter
- Add a thin plywood backer on the inside of the door where the lock engages to stiffen the panel
- Consider 2x2 corner cleats on the inside, screwed through existing flanges, to stiffen the shell and create mounting points for shelves
- Label panels with painter’s tape as you unbox so orientations are obvious during assembly
Maintenance
This is low-maintenance if you respect its limits. A quick wash a couple of times a year keeps grit off the finish. Check fasteners after the first big temperature swing and again after storm season. Touch up any deep scratches with rust-inhibiting paint. Keep sprinklers from blasting the lower edges, and clear leaves from the perimeter so moisture doesn’t sit against the base.
Who it suits—and who it doesn’t
- Good for: small patios and side yards, renters who can’t pour a slab, anyone who needs budget-friendly storage for garden tools and seasonal gear, and folks comfortable with a couple of simple upgrades.
- Not ideal for: storing high-value items, heavy-duty shop use, or anyone expecting the heft of a thick-walled steel shed or a turnkey, no-prep install. If you want to walk inside and work, you’ll want something larger and taller.
The bottom line
The Greesum 5x3 shed is a budget metal shed that earns its keep if you meet it halfway: build a proper floor, anchor it, and consider a few small hardware upgrades. The steel is thin but weather-resistant, the footprint is perfect for tight spots, and the door can be secured with a decent padlock once you replace the latch. Assembly isn’t hard with a helper and some patience, though the pictogram instructions demand attention to part orientation and the occasional pilot hole.
Recommendation: I recommend it for homeowners or renters who need compact, affordable storage and are willing to prep a base and spend an extra hour on anchoring and sealing. If you want high security, thick-gauge steel, or a stand-up interior without DIY tweaks, look elsewhere. For small outdoor storage on a sensible budget, this shed is a practical, fixable solution that does the job.
Project Ideas
Business
Neighborhood Tool Library Kiosk
Operate a small community tool library: stock commonly used items (lawn tools, basic power tools, ladders) and run memberships or per-checkout fees. Use signage, simple inventory tracking (QR codes + spreadsheet/app) and a secure padlock or smart lock. Offer basic maintenance and replacements; check HOA/permit rules and insurance for lending operations.
Contractor On-Site Storage Service
Rent out the shed as a small on-site storage locker for contractors working on suburban projects—store hand tools, consumables, and PPE securely between shifts. Provide a mounted lockbox or smart lock, offer scheduled delivery/installation on a wooden base, and sell multi-week rental packages. Emphasize weatherproofing and anchoring in the service, and include optional inventory checks and re-stocking.
Pop-up Retail / Farmers Market Backstock
Use the shed as backstock and changing area for a pop-up stall or market vendor—store overflow inventory, packaging, and a small cash box. Brand the exterior with vinyl wraps or removable signage and equip the interior with shelving and a fold-out counter. Offer weekend rental rates to market vendors who need a secure, portable inventory hub.
Event & Airbnb Supply Locker
Offer short-term storage for nearby Airbnb hosts or event planners to keep extra linens, pool toys, cleaning supplies, or party decor between bookings. Charge a subscription for seasonal storage and include secure locking, climate-mitigation tips (insulation/venting) for sensitive items, and scheduled pickup/drop-off options. Make sure you document contents and provide insurance guidance to clients.
Micro-Retail Locker for Garden & Pool Rentals
Set up a neighborhood rental station for bulky yard items (portable pumps, leaf blowers, pool maintenance kits) that residents can rent by the day. Use a simple booking system (online calendar + code-access padlock), keep clear signage with instructions, and rotate inventory based on demand. Promote via local social channels and partner with homeowner associations to find customers; ensure items are secured to the shed floor and weather-protected.
Creative
Mini Potting Bench + Seedling Greenhouse
Convert the shed into a potting station by adding a raised wooden platform floor, staggered shelving, and a shallow tray table for potting. Replace one metal panel with a clear polycarbonate window for passive solar heat to start seedlings; add vents and a small battery-powered fan for airflow. Use hooks for hand tools and magnetic strips for small metal items; remember to anchor the shed to its base and use gloves during assembly.
Compact Bike Workshop
Fit wall-mounted bike hooks, a fold-down workbench and a pegboard to create a tidy bike repair shop for two wheels. Store spare tubes, tools, lubricants and a small pump in labeled bins; use the pre-drilled door hole for a padlock to secure inventory. Install a rubber mat on the floor and a small LED strip light for safer, cleaner work.
Mini Maker / Woodworking Nook
Turn the shed into a small maker space for light woodworking or crafts by installing a sturdy countertop, clamps, and a vertical lumber rack. Add insulation panels on the inside of the metal walls to dampen noise and moderate temperature, plus a smoke detector and a bench vise. Keep heavy tools on low shelves and secure power tools with a lockable cabinet for safety and theft prevention.
Children's Playhouse & Toy Chest
Transform the shed into a kids’ play nook by painting it bright colors, cutting a safe plexiglass window, and adding soft flooring and low shelving for toys. Keep the original door padlock-ready but use a child-safe latch inside; ensure there’s adequate ventilation and anchoring. Use removable decorations and avoid small detachable parts to keep it safe for young children.
Outdoor Beverage & Entertaining Station
Repurpose the shed as a compact backyard bar by adding insulated shelving for coolers, a fold-down serving counter on the door side, and string lights inside for ambiance. Use pegboard hooks for glassware and bottle openers, and secure liquor/valuables in a lockable box. Ensure the shed sits on a flat, raised base to avoid moisture and install ventilation so cold items don’t create excessive condensation.