
Features
- Applicable Models:CYBEREBEANS HEPA Cabin Air Filter is designed for Tesla Model 3 (2016 - 2024 2025 2026) and Tesla Model y (2020-2024 2025 2026) Including Juniper and Highland series to ensure seamless integration with the vehicle’s HVAC system, guaranteeing the best performance
- High Efficiency Filtration:Cabin Air Filter for Tesla ModelY/3 Including Juniper and Highland series utilizes a High-Efficiency Particulate Air filter HEPA that can remove 99.5% of harmful particles from the air.
- Sub-Micron Particle Capture:The HEPA filter is made of H11 grade fiber, which can capable of capturing particles as small as 0.3 impurities in diameter,improve the air circulation system inside the car to give you a fresh spac
- High-quality materials:our Air Filter Replacement features a five-layer design that includes a high-quality melt-blown electrostatic layer,HEPA filter,and coconut shell activated carbon.This robust composition effectively blocks PM2.5,dust.
- Maintenance and Replacement:Easy installation of the Model 3 and Model Y Air Filter HEPA. CYBERBEANS recommends replacement every 8-12 months or 12,000 miles depending on driving conditions and environmental factors, especially in desert and humid areas to ensure effective air purification and optimal performance of the filtration system
Specifications
| Size | Model 3/Y Cabin Air Filter 2Pcs |
| Unit Count | 2 |
Related Tools
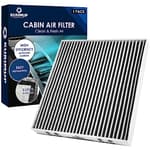
Replacement cabin air filter for Tesla Model 3 and Model Y (including Juniper and Highland variants) that combines H11-grade HEPA media with coconut-shell activated carbon to remove particles and reduce odors. Its five-layer construction, including a melt-blown electrostatic layer, captures particles down to 0.3 microns with up to 99.5% efficiency; replacement is recommended every 8–12 months or about 12,000 miles depending on driving and environmental conditions.
CYBERBEANS Air Conditional Replacement with Activated Carbon for Tesla Model 3 Model Y HEPA Cabin Air Filter Accessories 2016-2024/2025/2026 Juniper Highland Upgraded Version Review
Why I swapped my Tesla’s cabin filters
I swapped the cabin filters in my 2023 Model Y on a Saturday morning after noticing the familiar “gym-bag” whiff when the A/C first kicked on. I picked up the CYBERBEANS HEPA cabin filter, a two-piece set designed for the Model 3 and Model Y (including the Highland and Juniper iterations). It combines H11-grade HEPA media with a coconut-shell activated carbon layer, promising better particulate capture and improved odor control. After a week of daily commuting and a couple of highway trips, here’s how it performed.
What you’re getting
The CYBERBEANS filter is a five-layer design that includes a melt-blown electrostatic layer, HEPA-grade fibers, and an activated carbon bed. The headline numbers are familiar for this category: capture of particles down to 0.3 microns with up to 99.5% efficiency. In practice, that translates to better control of fine dust, pollen, and brake/road particulate that can make its way into the cabin. The carbon layer is there to reduce odors from outside sources (diesel, smoke, fertilizers) and to tame the musty evaporator smell that can build up in humid climates.
It’s a two-piece set because the Model 3/Y housing stacks two filters on top of each other. This pack includes both. The sizing and tab orientation matched the factory layout in my car, and the airflow arrows are clearly marked.
Installation: DIY-friendly, with a few caveats
If you’ve never changed a Tesla cabin filter, budget 20–30 minutes and a bit of patience for the passenger-side panel clips. Here’s how my install went and what I recommend:
- Tools: trim tool (or a plastic pry tool), T20 Torx driver, flashlight, small vacuum or microfiber towel.
- Access: remove the carpeted side panel on the passenger footwell. The clips are stout; work from the edge with a trim tool and support the panel as you release each clip. Take your time—you don’t need to muscle it.
- Cover and screw: unplug the footwell light, then remove the T20 Torx screw holding the narrow cabin filter cover. Keep the screw somewhere safe.
- Old filters out: pull the top filter tab first, then slide it out; the second filter sits behind it and slides upward and out. Expect some dust—this is a good moment to vacuum the housing.
- New filters in: install the lower filter first (airflow arrows pointing down in my 2023 Y), then the upper filter. You’ll need a slight flex to get each filter past the lip; bend gently along the long edge, not sharply, to avoid creasing the media.
- Reassemble: refit the cover, reconnect the footwell light, and snap the side panel back on, pressing firmly around the edges to seat the clips.
Fit was snug, but the cover seated flush and the screw threaded normally. The hardest part remains the side panel clips; if you’re cautious and use a proper trim tool, it’s straightforward.
Pro tip: before closing up, run the blower on low for a minute to confirm there’s no whistling—an indicator of a misaligned filter or a trapped tab.
Immediate impressions: fresher air, less bite from outside odors
The first drive after installation had a faint carbon “new filter” scent that dissipated within a day. More importantly, the stale start-up odor was gone. On a city run with buses ahead and a bit of road dust from nearby construction, the cabin stayed neutral. The carbon layer doesn’t eliminate strong odors outright, but it blunts them noticeably compared with my outgoing filters. With ventilation set to fresh air, the exhaust note from traffic was reduced to a background hint rather than an intrusive smell.
Allergy-wise, my spring sniffles usually spike on high-pollen days; with the CYBERBEANS set in place, I found myself keeping the fan on lower speeds with no irritation. That aligns with what an H11-grade media should deliver: better capture of the fine stuff that triggers symptoms.
Airflow and HVAC load
Upgraded filters can add resistance, which sometimes shows up as extra fan noise or reduced airflow at the same setting. I listened closely from fan level 2 through 7. In my car, airflow felt essentially unchanged through the mid-range, and I didn’t notice extra blower noise until level 7–8, where there was a modest change in tone—nothing dramatic, and cooling performance remained consistent. For daily use, it’s a non-issue.
If your evaporator is already musty, a filter alone won’t fix everything. Consider running the A/C dry-out routine (turn A/C off, fan on, heat slightly up for a few minutes before parking) for a week, or use a proper evaporator cleaner if the smell persists.
Build quality and materials
Out of the box, the pleats were uniform, and the frame felt adequately rigid for a snug housing like Tesla’s. The edges were clean, and the tabs were firmly attached. The carbon layer is not loose or gritty; I gave each filter a couple of taps and didn’t see shedding. Still, it’s smart practice to inspect before installing—any filter with visibly loose media should go back.
The five-layer story matters less than how well the filter seals in the housing. With these, the perimeter seated nicely, and I didn’t hear any telltale whistles that would suggest bypass. After a week, there was no residual charcoal scent in the cabin.
Fit and compatibility notes
These are marketed for Model 3 and Model Y, including Highland and Juniper updates. I can only speak directly to my 2023 Model Y and a quick check-fit in a friend’s 2021 Model 3—both were correct. The stack height and cover alignment matched OEM. The housing requires a minor flex for insertion; if you’re too aggressive, you can crease any aftermarket filter, so take your time. Also, install both pieces—your car uses two filters, and running a single filter will compromise performance.
If your vehicle has had interior trim work before, be mindful that a previously bent or cracked side panel clip can make reassembly fiddlier. That’s not the filter’s fault, but it will color your installation experience.
Maintenance and lifespan
The guidance of 8–12 months or about 12,000 miles is sensible. I’d stay closer to the 8-month interval if you drive in dusty areas, near construction, or in regions with wildfire smoke or high humidity. A quick visual check at six months takes two minutes: pop the cover, slide out the top filter, and look for darkened pleats or odor return.
One benefit of a carbon layer is odor reduction; the trade-off is that carbon adsorbent capacity is finite. Even if the media still looks clean, odors can creep back once the carbon is saturated. That’s your cue to replace.
What I liked
- Noticeable odor reduction without relying on recirculation
- Fine particulate capture that feels kinder to allergy-prone passengers
- Clear airflow markings and familiar two-filter layout with a snug, OEM-like fit
- Reasonable install time for a DIYer with basic tools
- Good value as a two-piece pack
What could be better
- The passenger-side panel clips make this job feel scarier than it is; a simple printed guide in the box would help first-timers
- Initial carbon scent (brief, but present)
- Tolerances are tight; if you’re heavy-handed during the bend-and-insert moment, you can crease the media
- In very heavy traffic or behind older diesel vehicles, you may still sense a faint odor on fresh-air mode—this is normal for cabin-sized carbon filters
Who it’s for
If you’re looking to improve cabin air quality over the stock setup—especially for odor control and allergens—the CYBERBEANS HEPA cabin filter is a strong, easy recommendation. It’s also a good fit for drivers who spend time in urban traffic, around farms, or near construction zones where airborne irritants are common. If you prefer to never touch interior trim clips and want a guaranteed service experience, having a shop install an OEM set might be your path; performance will be good, though in my experience the odor reduction won’t be as strong as a carbon-loaded HEPA media.
Final recommendation
I recommend the CYBERBEANS HEPA cabin filter for Model 3 and Model Y owners who want cleaner air and better odor control without sacrificing airflow or adding fan noise. Installation is approachable with basic tools, the fit is correct, and the combination of H11 media and coconut-shell carbon makes a clear difference in day-to-day driving. Replace on a sensible schedule, handle the filters gently during installation, and you’ll get a fresh, neutral-smelling cabin for months at a time.
Project Ideas
Business
Subscription Replacement & Recycling Program
Offer a recurring subscription that ships the correct Model 3/Y HEPA replacement every 8–12 months. Include prepaid return packaging for customers to send back used filters for recycling or upcycling (e.g., carbon pouches). Market to Tesla owner clubs, EV forums and via targeted ads.
Mobile Installation Service for Tesla Owners
Launch a mobile service van that performs on‑site filter replacements (home, office, events). Offer add‑ons like cabin vacuum, vent clean, and a quick air quality demo. Use scheduling app and local SEO to reach busy EV owners who prefer convenience and premium service.
EV Cabin Care Kit — Retail Bundle
Create a branded kit bundling the HEPA filter, a small vent freshener, microfiber cloth, installation guide (video QR code) and a discount for the next purchase. Sell through Amazon, Etsy, Shopify and Tesla-owner marketplaces as an easy gift or maintenance kit.
Upcycled Accessory Line
Collect returned/used filters and transform them into eco products (shoe pouches, vent clips, decorative panels) with clear labeling about the upcycle process. Sell as sustainable accessories with higher margins and strong storytelling for green-minded buyers.
Workshops & Online Course + DIY Kits
Run local hands‑on workshops teaching filter replacement, basic car air quality testing and simple upcycling projects (pouches, purifiers). Complement with a digital course and sell accompanying DIY kits (cut pieces, fabrics, small fans). Use workshops to build a local customer base and upsell subscriptions.
Creative
Mini USB Portable HEPA Purifier
Cut a piece of the H11 HEPA media to fit a small 3D‑printed or laser‑cut plastic frame, add a compact USB fan and foam gasket to seal, and power it from a phone charger or powerbank. Great for desk, bedside, or baby strollers — demonstrates the filter's particle-capture performance in a compact, giftable form.
Activated Carbon Odor Pouches
Cut the coconut‑shell activated carbon layer into small pouches, sew or heat-seal into breathable fabric (cotton/linen) and add a loop. These become reusable odor absorbers for gym bags, shoes, glove compartments or closets. Optionally add a few drops of essential oil to create scented variants.
Vent Freshener / Scent Panel for Cars
Use the pleated filter sheet as a backing for a vent clip: sandwich a thin scent strip (essential oil on felt) between filter layers, compress into a small rigid frame and clip onto air vents. The activated carbon reduces nasty smells while the HEPA layer doubles as a tiny re-filter for vented air.
Textured Wall Art / Paneling
Flatten and mount pleated HEPA material in shadowbox frames or under clear acrylic to showcase the unique texture. Optionally dye or lightly spray paint (test compatibility) for colored pieces. Works as eco‑industrial decor, especially for car‑themed rooms or showrooms.
Garden Seedling Tray Liner
Use activated carbon layer as a breathable liner beneath seedling trays to improve drainage, reduce odor and help control mold. Trim to size and place between tray and soil — a useful upcycle for gardeners who want a moisture‑management layer with anti‑odor properties.