Features
- PERMANENT & STURDY: Engineered for long-term durability —complete with premium hardware for a polished, professional finish.
- LIMITED LIFETIME WARRANTY: Made with high quality PVC and backed by a limited lifetime warranty. We are confident in our product and we want you to be too!
- EASY INSTALLATION: Assemble & install your gate in less than an hour. No experience? NO problem! Our detailed guides will help you along the way.
- EASY ORDERING: Everything you need to install your gate is in the box except for posts. Only ONE additional post [BL19042] is required if you are installing in a [BL19105] fence run. If you are installing the gate with no fence, you will need to purchase 2 [BL19042] posts.
- TIME SAVER: Save time & mess by using our no-dig compatible post [BL19042] & fence BL19105]. No digging, pouring, or setting concrete is required.
- CUSTOMIZABLE: Need a gate wider than 48"? Install 2 gates side-by-side to achieve a wider opening. You can easily trim down the width of your gate with a hack saw or any kind of fine tooth blade if needed.
Specifications
| Color | Westport Gate |
| Size | 4ft H x 4ft W |
| Unit Count | 1 |
Related Tools


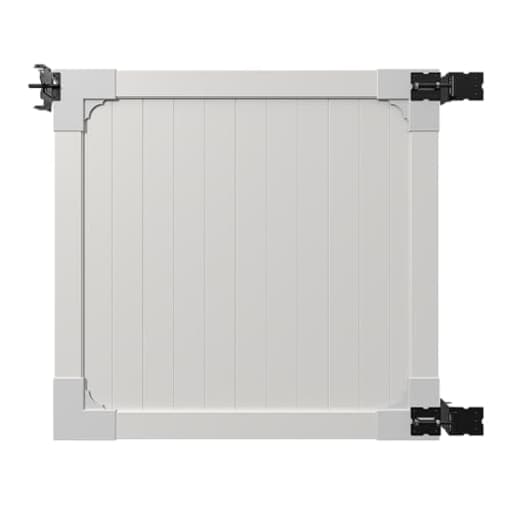
This 4 ft high by 4 ft wide white vinyl privacy gate is designed for yard or garden openings and includes the mounting hardware. It is constructed from PVC for outdoor durability and is compatible with no-dig post systems; posts are sold separately (one post if installed with a matching fence run, two posts if used standalone). The gate can be assembled and installed in under an hour with basic tools and is covered by a limited lifetime warranty.
WamBam Fence 4ft H x 4ft W (1 Gate) No Dig WamBam Westport Gate Kit, White Vinyl Privacy Yard Fence Gate with Hardware Included for Westport Fence Kit, Durable Outdoor Gate for Yard or Garden, BL19106 Review
Why I chose the Westport Gate Kit
A tired wood gate at the side yard pushed me to look for something sturdier and low-maintenance. I wanted privacy, a clean look, and an install that didn’t involve digging holes or mixing concrete. The Westport Gate Kit checked those boxes with a 4-foot by 4-foot vinyl panel, included hardware, and compatibility with no-dig posts. I paired it with a matching fence run and used a single post at the latch side, as the hinge side tied into the existing line.
From unboxing to final latch click, this felt like a product designed with DIYers in mind—clear instructions, well-labeled parts, and a build that doesn’t punish small mistakes.
Unboxing and first impressions
The vinyl components arrived blemish-free, color consistent, and rigid enough to inspire confidence. The surface is smooth with a matte sheen that avoids the chalky look some PVC products get out of the box. Hardware quality is a notch above the generic packs you see at big box stores—hinges and latch feel substantial and corrosion-resistant. I also appreciated that the packaging kept rails and pickets from scuffing during transit.
Two small but welcome details:
- Instructions are clear, with diagrams that make order-of-operations obvious.
- The kit anticipates trimming, calling out cut points and tool choices if your opening isn’t exactly 48 inches.
Note: Posts are not included. If you’re installing the gate in a fence run, plan on one post. If it’s standalone, you’ll need two. This is easy to miss, so build it into your shopping list.
Tools and prep
I installed this with a pretty basic kit:
- Tape measure, pencil, string line
- 24–48" level (avoid relying solely on a torpedo level)
- Cordless drill/driver, small pilot bit
- Fine-tooth handsaw or miter saw (if trimming width)
- Rubber mallet and a sledge or manual post driver (for the no-dig post anchors)
If you’re using the no-dig posts, setting your lines is crucial. I snapped a string line to mark the fence run and measured the gate opening three times. Vinyl is forgiving in appearance, but misaligned posts will translate to latch headaches later.
Installation experience
Once the posts were in, assembling and hanging the gate took me just under an hour at a steady pace. The no-dig approach saved the most time—driving the anchors, checking plumb as I went, and sliding the vinyl sleeves over felt almost too easy compared to traditional footings. I didn’t need to pour concrete, and there was no messy cleanup.
A few practical notes from the install:
- Dry-fit the gate between posts before you commit to hinge holes. It’s worth the extra minute.
- Pre-drill through the vinyl for hinge and latch screws. It prevents wandering and minimizes the chance of cracking near edges.
- Keep an eye on hinge spacing. Equal spacing from top and bottom rails keeps the panel square and reduces long-term sag.
I set the bottom clearance at just over 1 inch to clear winter heave and avoid dragging on the pavers. The hinges offer enough play to fine-tune swing alignment, and the latch adjusted easily to engage without slamming.
Fit, finish, and daily use
Once installed, the Westport Gate Kit looks neat and balanced alongside a matching privacy-style fence. The panel offers solid visual coverage—ideal for screening trash bins and AC units—without feeling bulky. Swing is quiet and predictable. The latch is straightforward, and the hinge action remained consistent after a few weeks of daily use and a couple of gusty days.
Vinyl has some inherent flex, and that’s true here too. It’s not a problem if your posts are set solidly. If you expect constant hard use (kids slamming, large dogs pushing, or high winds), consider stiffening strategies:
- Ensure your post anchors are fully driven and perfectly plumb.
- If your site allows, add a core inside the post sleeve for extra rigidity at the hinge side.
- Keep hinge screws tight and check them seasonally.
Cleaning is simple—hose it down or wipe with a mild soap solution. The surface sheds dirt well, and there are no paint touch-ups to worry about.
Customization and compatibility
A few design choices make this kit adaptable:
- Trimming: If your opening is shy of 48 inches, you can trim with a fine-tooth blade. Go slowly and deburr the cut edges.
- Wider openings: Two gates can be installed side-by-side to create a larger pass-through. Just plan for a center stop or drop rod.
- Ground slope: You can cheat the hinge height a bit to follow grade, but there’s a limit. On steeper slopes, orient swing downhill or regrade slightly around the swing arc to avoid scraping.
- Posts: The kit plays well with no-dig posts. If you’re integrating with an existing fence line or different posts, mind the exact opening width and hinge throw to ensure full swing.
If you’re installing near a pool or want added security, you may want to upgrade to a self-closing hinge and a lockable latch to meet local codes. The included hardware is sturdy, but it’s not a dedicated pool-safety set.
What I liked
- Genuinely DIY-friendly install. The no-dig system saves time and avoids concrete.
- Clean, consistent finish with a professional look after a single afternoon’s work.
- Hardware quality matches the demands of a privacy gate.
- Practical adjustability that helps you compensate for real-world posts and not-perfect openings.
- Low maintenance—no painting, just occasional washing.
What could be better
- Posts are separate, which is fine, but easy to overlook in the planning phase. Clearer callouts on how many you need for each scenario would help first-time buyers.
- In high-wind areas, a privacy gate acts like a sail. While the kit holds up well when installed correctly, I’d like optional reinforcement guidance included in the instructions.
- The included latch is functional; some users will want a lockable or self-closing upgrade for security or code compliance.
Tips for a smoother install
- Set a precise opening. Use a spacer block cut to 48 inches to maintain consistent width while mounting hinges and latch.
- Check post plumb from two directions, not just one face. Small twists show up later as latch misalignment.
- Pre-drill and take your time on the first hinge; it dictates the rest of the alignment.
- Protect the finish during assembly by laying components on a drop cloth, not on rough concrete.
Durability outlook
Vinyl fencing lives or dies by UV stability and joint integrity. After several weeks of exposure, I’ve seen no chalking, warping, or discoloration. The rails seat firmly, and the panel doesn’t rattle under normal use. My expectation is that it will outlast a comparative wood gate with far less upkeep. As with any vinyl gate, the longevity hinges—literally—on how solidly the posts are set. Get the foundation right, and the rest follows.
Value and who it’s for
If you want a privacy-style gate that looks crisp without the maintenance overhead of wood, this kit is a strong value. The time saved by the no-dig approach is real, and the end result looks like a professional install. It’s ideal for:
- Homeowners updating or adding a side yard or garden gate
- DIYers who want a weekend upgrade without concrete work
- Anyone matching an existing Westport-style vinyl fence
It may not be the best fit if you’re on a steep slope or need a code-compliant pool barrier out of the box without hardware upgrades.
Bottom line: Recommendation
I recommend the Westport Gate Kit. It combines an approachable install with a durable, clean finish and sensible hardware. The no-dig compatibility saves hours, the vinyl construction eliminates ongoing maintenance, and the adjustability makes it forgiving to install. Plan for the correct number of posts, consider a hardware upgrade if you need self-closing or lockable functionality, and take the time to set your posts perfectly plumb. Do those things, and you’ll end up with a sturdy, attractive gate that should stay that way for years.
Project Ideas
Business
Rapid No-Dig Gate Installation Service
Offer quick-turn residential installations using the no-dig post system as a selling point: same-day or next-day installs with minimal yard disruption. Target homeowners wanting fast privacy upgrades or pet enclosures. Upsell matching fence runs, decorative hardware, and a maintenance check package leveraging the product's limited lifetime warranty as a trust-builder.
Event & Pop-Up Gate Rentals
Create a rental inventory of gates and no-dig posts for outdoor events, markets, weddings and film sets to build temporary partitions, VIP entries, vendor stalls or signage backdrops. Provide optional branded vinyl wraps or custom signage and quick-install crews. The no-dig system keeps setup/teardown fast and repeatable.
DIY Transformation Kits + Workshops
Sell curated kits that pair the gate with cut lists, specialty hardware and small parts to make projects (bench back, planter wall, pet-gate conversion). Run weekend workshops or online classes teaching the conversions; charge for kits plus tuition. This builds community, showcases product versatility, and drives gate sales.
Finished Upcycled Gate Products for Retail
Produce a line of finished, resale-ready items built around the gate: garden screens, bench-back seating, headboards and pet-run doors. Market on Etsy, local markets and to landscape designers. Emphasize weatherproof vinyl, easy maintenance, and customization options (color-safe decals, hardware finishes) to appeal to buyers wanting low-maintenance outdoor furnishings.
Creative
Planter-Backed Privacy Screen
Mount the 4x4 gate between two no-dig posts and attach shallow planter boxes along the bottom and climbing-wire at the top to create a living privacy screen. Use the gate's solid panels as a backdrop for trailing plants or fast-growing vines (morning glory, clematis). Trim the gate if you need a custom width and use removable hooks so planters can be switched seasonally.
Garden Bench with Gate Backrest
Repurpose the gate as an attractive vinyl backrest for an outdoor bench. Build a simple cedar or pressure-treated seat frame, bolt the gate to the rear supports, and add decorative post caps from the gate kit to finish the arms. The PVC backrest is weatherproof and easy to clean — ideal for a porch or patio seat.
Compact Greenhouse/Cold-Frame Door
Use the gate as a sturdy hinged door for a small hoop-house, cold-frame, or DIY greenhouse entrance. Its 4' width fits many small structures; the vinyl surface resists moisture and pests. Install self-closing hinges and a latch, or pair two gates side-by-side for a wider double-door entry.
Vertical Herb/Trellis Wall
Install the gate flat against a wall or freestanding posts and convert it into a vertical herb garden and trellis. Hang small pots or attach zip-tied planters and use the top lattice or added wire to support climbing herbs. This is space-efficient for patios and urban balconies and leverages the gate's clean white look as a modern backdrop.