Features
- 14.25 sq. ft. per box.
- Ultra realistic stone veneer product
- Individual stones allow for a natural appearance compared to repetitious panelized products
- Can be face nailed in the same fashion as traditional siding or installed with primer/adhesive
- Stone cuts with ease using any standard woodworking tool
Specifications
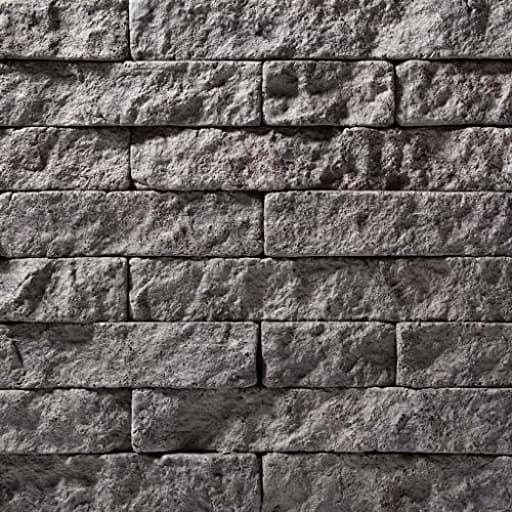
| Color | Phantom Shadow |
| Size | 14x22 |
| Unit Count | 1 |
Related Tools

Fire-rated flat stone veneer in Phantom Shadow, supplied as 14.25 sq. ft. per box (14 x 22 in panels). Individual stones provide a varied, natural appearance; the veneer can be face-nailed like traditional siding or installed with primer/adhesive and can be cut with standard woodworking tools.
Kimberly Bay Evolve Stone District View Fire Rated Flat Stone Veneer (14.25 sq. ft. per Box) Review
Why I reached for this stone veneer
I had a fireplace surround that needed upgrading, and I wanted the look of hand-laid stone without dragging in a wet saw, mortar, and a weekend of cleanup. This stone veneer in Phantom Shadow stood out because it’s fire-rated, face-nails like siding, and—crucially—cuts with standard woodworking tools. On paper, it promised a faster pathway to a masonry look. In practice, it delivered on most of those promises with a few nuances worth noting for planning your project.
What you’re getting
- Coverage: 14.25 square feet per box
- Panel size: roughly 14 x 22 inches
- Color: Phantom Shadow (a deep gray blend with natural-looking shadowing)
- Installation: face-nail or primer/adhesive
- Cutting: works with common woodworking tools
Although it ships as panels, the surface reads as individual stones. That matters; panelized faux stone often suffers from obvious repetition. Here, the molded faces vary enough that, once installed and staggered, the wall looks convincingly like individual pieces set by hand.
Installation experience
I tested two scenarios: a fireplace surround and a short accent wall. I installed both by face-nailing into sheathing and framing, with careful attention to joint staggering. The biggest surprise was how much the workflow felt like standard siding rather than masonry. I snapped a level line, started from the bottom, and worked upward, checking plumb and staggering seams. Prepping the substrate clean and flat is key. On the adhesive route, you’ll want to follow the manufacturer’s recommended primer and adhesive system; the face-nail path is simpler and faster if your substrate allows it.
Fasteners: I had the best results with corrosion-resistant, ring-shank siding nails set flush. If you miss a framing member and land only in sheathing, use the manufacturer’s guidance on minimum substrate thickness. A finish nailer is tempting for speed, but I preferred hand-driving to control placement and avoid compressing the panel faces. Fastener placement takes a little forethought to keep heads discreet; aim through “mortar lines” or shadowed areas where they visually disappear.
Layout: The panels interlock well, but as with any stone pattern, you’ll want to dry-fit a few courses and blend from multiple boxes to avoid pattern echoes. I also like to cut down a panel to start a course so vertical seams don’t stack. Expect some trimming around outlets, mantels, and returns—this is where the cut friendliness shines.
Cutting and handling
This is the standout feature. I cut everything with a 12-inch miter saw fitted with a standard fine-tooth woodworking blade and did detail cuts with an oscillating multi-tool. No masonry dust clouds, no water. The cuts were clean with minimal chipping, and the panels were light enough to handle solo. For scribing to irregular surfaces, a jigsaw with a clean-cut wood blade worked well.
Because you’re not grinding stone, shop cleanup is straightforward. I still wore eye and hearing protection, but I never felt like I was staging a concrete cutting operation in my living room.
Fit, finish, and realism
Phantom Shadow reads as a charcoal-to-dark-gray palette with depth, not a flat paint-on look. Under natural light, the relief catches shadows convincingly, and the “stones” have enough texture variation to fool the eye at typical viewing distances. In a fireplace application, it elevates the space without pushing too rustic.
Seam concealment relies on both the sculpted edges and your staggering strategy. With careful layout, seams are tough to spot. Up close, if you know what you’re looking for, you can find panel transitions—but that’s true of most panelized systems. Overall realism sits high on the scale for this category.
Planning and coverage
At 14.25 square feet per box, coverage adds up faster than you might think, but don’t skip a waste factor—10 to 15 percent is reasonable if your layout includes lots of corners and penetrations. Measure wall height against panel height and plan your first course so you don’t end up with a narrow sliver at the top. On taller walls, snapping reference lines every couple of courses helps keep things visually true even if your floor or ceiling isn’t.
Corners and terminations deserve planning. If you need outside corners or returns, confirm your approach before you start. Mitering panel edges can work if you take your time and feather the edge profiles, but purpose-made corner pieces are cleaner if available for your configuration.
Fire rating and where it fits
Being fire-rated makes this veneer a sensible option for fireplace surrounds and feature walls near heat sources, as long as you observe local codes and appliance clearances. The added peace of mind is real compared with purely decorative plastics or foams. I can’t speak to the specific test classification without the documentation, but it handled typical surround heat without discoloration or odor during my use.
If you’re considering it for an exterior application, follow the manufacturer’s guidance for water-resistive barriers, flashing, and fastener type. Because it installs like siding, the detailing mindset is different from mortar-set stone, but the same fundamentals apply: keep water out and provide proper drainage.
What I liked
- Fast, clean install: Face-nailing and wood-tool cutting keep the workflow simple and tidy.
- Convincing aesthetic: The molded “individual stones” avoid the cookie-cutter repetition common to panel products.
- Manageable weight: Easy to handle solo, especially on an interior project.
- Flexible installation: Choice of face-nail or primer/adhesive opens options for different substrates.
- Fire-rated peace of mind: Appropriate for fireplace surrounds within code limits.
What could be better
- Visible fasteners demand finesse: If you’re not careful with fastener placement, you’ll see them. Plan your nailing points in shadow lines.
- Blending boxes is essential: Like any patterned system, mix panels from multiple boxes to keep the look random.
- Coverage planning: At 14.25 sq. ft. per box, small projects are simple, but larger walls require strict takeoffs and a healthy waste buffer to avoid mid-project shortages.
- Corners/returns take thought: If dedicated corner pieces aren’t part of your order, expect to spend time mitering and shaping edges for clean terminations.
None of these are deal-breakers, but they’re worth having on your radar so the install stays smooth.
Durability and maintenance
Once installed, the veneer has held up well to the bumps and scrapes of daily life around a fireplace. I’ve done light cleaning with a soft brush and damp cloth without affecting the finish. Because there’s no mortar joint to crack, seasonal movement in typical interiors isn’t a concern. If you face-nail, using the right fasteners and hitting solid substrate will determine long-term hold just as it would with siding.
Who it’s for
- DIYers comfortable with basic carpentry who want a stone look without masonry tools
- Pros seeking a faster-turn option for feature walls and fireplace surrounds
- Remodels where dust and mess are tightly controlled
- Projects that benefit from a fire-rated decorative surface
If you want a traditional, trowel-set stone experience—or absolute invisibility of panel seams—this may not be your choice. But for speed, cleanliness, and convincing appearance, it’s compelling.
Recommendation
I recommend this stone veneer for interior feature walls and fireplace surrounds where you want the look of masonry with a straightforward, low-mess installation. It cuts with common woodworking tools, installs quickly by face-nailing or with primer/adhesive, and the Phantom Shadow color provides a realistic, modern stone aesthetic. Plan your layout, blend panels across boxes, and pay attention to fastener placement, and you’ll get results that read as hand-laid stone without the usual weight, dust, or learning curve of masonry work.
Project Ideas
Business
Boutique Veneer Installation Service
Start a local specialty trade installing fire-rated flat stone veneer for homeowners, real-estate flippers, and small commercial clients. Differentiate by offering design consultations, sample mockups in Phantom Shadow, and small-feature installs (fireplaces, entry walls) that fit modest budgets. Use per-box coverage (14.25 sq. ft.) to create transparent pricing packages.
DIY Veneer Kits and Video Guides
Package DIY kits that include the right number of panels per typical project (e.g., fireplace, accent wall), adhesive recommendations, trim pieces, and a step-by-step printed guide plus access to a video walkthrough. Upsell pro tips for face-nailing vs. adhesive installs and cutting patterns. Sell kits online or through local hardware stores.
Real-Estate Staging & Rapid Upgrade Service
Offer quick curb/inside upgrades to increase resale value—install temporary or permanent veneer accents in listings to boost perceived value. Target flippers and agents with small, high-impact installs (entryway, fireplace surround) and guaranteed turnaround times. Use the veneer’s realistic look to justify premium staging rates.
Workshops & Certification Classes
Host hands-on weekend workshops teaching homeowners and independent contractors how to install the veneer, cut panels, and finish edges. Create a paid certification for contractors that increases their credibility; supply starter toolboxes and bulk-purchase discounts to attendees to create a repeat revenue stream.
Etsy/Marketplace Micro-Products from Offcuts
Turn leftover cut pieces into small retail products—coasters, mosaic art panels, address plaques, and garden markers—and sell them on Etsy or at craft markets. This monetizes waste material, showcases the product’s realism, and serves as low-cost marketing samples for larger installs.
Creative
Phantom Shadow Fireplace Surround
Refinish an existing fireplace by applying the flat stone veneer as a surround and hearth skirting. Use adhesive for a clean look or face-nail for a traditional installation; cut panels with standard woodworking tools to fit corners and openings. The fire-rated veneer provides safety for close-to-fire installations and the Phantom Shadow color gives a dramatic, upscale focal point.
Entryway Accent Wall
Create a textured accent wall in the entry or foyer using staggered panels to showcase the natural variation of the individual stones. Plan material using 14.25 sq. ft. per box coverage, trim panels for outlets and trim, then install with adhesive and finish with a low-profile trim to transition to painted walls.
Raised Garden Planters & Retaining Borders
Wrap raised garden beds or small retaining walls with the veneer for a durable, natural exterior look. Because the panels cut easily with woodworking tools, you can shape them around curves and corners; the fire-rated property is an added safety plus weather-seal with an exterior-grade primer/adhesive and suitable sealant.
Bedroom Stone Headboard Wall
Turn the bed wall into a striking headboard feature by covering the area behind the bed with the veneer up to a chosen height. Use individual stone placement to create a balanced composition and incorporate recessed lighting for depth. The 14 x 22 in panels make layout planning straightforward for common bed sizes.
Custom House Number & Mailbox Surround
Design a small focal installation around a mailbox or house numbers: mount a trimmed veneer panel as a backdrop, inset metal numbers, and add a weatherproof clear coat. Smaller leftover pieces from cut panels are ideal for this, reducing waste and creating a high-end curb appeal detail.