Features
- Chisel point to reduce splitting of material
- Coated finish suitable for interior use only
- Collated for use with cordless and pneumatic 18‑gauge brad nailers
- Compatible with most 18‑gauge brad nailer models
Specifications
| Fastener Type / Gauge | 18 Gauge Brad Nails |
| Product Length (In) | 2 |
| Finish | Coated |
| Head / Point Type | Chisel Point (T‑style head) |
| Quantity Per Pack | 2,500 |
| Material | Steel |
| Shank Style | Smooth |
| Intended Use | Interior finishing (moldings, casing, baseboards, shoe molding) |

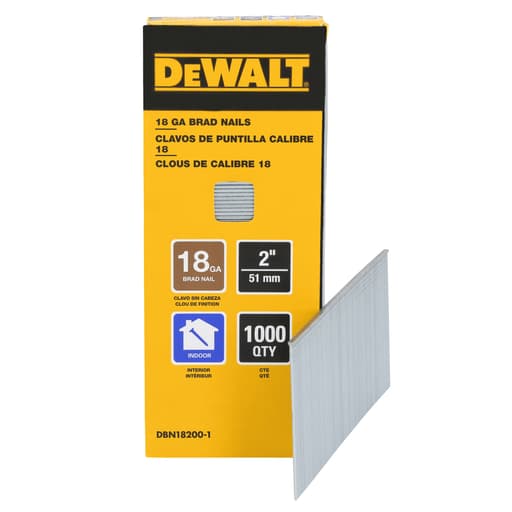
Collated 18-gauge brad nails, 2 inches long, intended for use with 18‑gauge cordless or pneumatic brad nailers. They have a coated finish for interior applications and a chisel point to help reduce splitting during installation. Packaged quantity: 2,500 nails.
DeWalt 18 Gauge Brad Nails Review
First impressions
A box of fasteners isn’t glamorous, but good brads can quietly make or break a trim job. I ran these 2-inch 18‑ga brads through several interior projects—poplar casing, MDF base, and oak stair trim—using both a cordless and a pneumatic nailer to see how they fed, how they set, and how well they held. The short version: they’re consistent, compatible, and kind to delicate stock, with a few expected limitations tied to their length and interior-only coating.
What they are
These are collated, coated steel 18‑gauge brads with a T‑style head and a chisel point. The 2-inch length puts them at the upper end for 18‑ga work, aimed at interior finishing like moldings, casing, baseboards, and shoe. The pack comes with 2,500 nails—enough for a couple of full rooms of trim or a medium jobsite rotation.
Compatibility and feeding
I cycled multiple strips through a DeWalt 18‑ga cordless brad nailer and a Senco pneumatic. The strips were uniformly straight, the wire size was consistent, and the collation glue was well applied without the messy squeeze-out that sometimes fouls magazines. Both nailers latched onto the strips easily; no trimming or re-bundling needed.
Across a few hundred shots in each tool, feeding was uneventful—which is exactly what you want. The brads advanced smoothly with no tendency to hang up at the seam where one strip meets the next. Magazine windows stayed clear of glue dust, and driver blades didn’t show buildup. That’s a small but meaningful detail; gummy adhesive can cause premature misfires and maintenance.
Drive quality and depth control
With the cordless nailer set to a moderate depth and a 2.0–2.5 setting on the pneumatic regulator (about 90–100 PSI), the brads set just below flush in pine, poplar, and MDF. In white oak, I needed a touch more pressure and a slightly deeper dial-in to avoid proud heads. The T‑style head is small enough to disappear with a quick pass of filler but large enough that it didn’t pull through MDF face edges, provided the tool was square.
The chisel point is the headline feature here, and it behaves as intended: it opens the fibers gently and reduces splitting in thin or brittle moldings. I purposely shot close to edges on 1/2-inch MDF and on narrow quarter-round. In both cases, edge blowout was rare as long as I watched grain direction and kept the nose firmly planted. As with any chisel-point fastener, orientation matters; nails tend to deflect perpendicular to the chisel. If your nailer’s nose shows grain or fastener orientation, use it to keep the chisel parallel to the long grain when shooting near edges.
Material-specific behavior
- Softwood (pine studs and hemlock trim): Fast driving with very little fiber lift. Holes were clean, and the coating appeared to lubricate on the way in, helping the driver keep up in bump-fire mode.
- Poplar and paint-grade hardwood trim: Consistent set depth, minimal splitting, even when toe-nailing returns on casing. This is a sweet spot for 18‑ga 2-inch brads.
- MDF base and crown: The small head kept surface damage in check. I prefer 18‑ga over 16‑ga here to avoid mushrooming the face. For attaching heavier MDF crown into drywall and studs, I supplemented with construction adhesive, as expected.
- Oak and maple: No problem penetrating, but I saw a bit more deflection when shooting around knots or switching grain. Cross-nailing (a pair of angled brads) tightened joints nicely, but for very heavy oak casings, a 16‑ga finish nail remains my default.
Holding power and length choice
At 2 inches, these brads offer solid bite when you need to catch studs through 3/4-inch trim, or when you want a little extra reach to cross-nail at opposing angles. Withdrawal resistance was on par with other coated brads I use; I couldn’t back them out cleanly without head snap-off, which is a good sign for staying power.
There’s a trade-off: longer brads have a higher chance of following grain and wandering. I noticed this most when shooting near knots or into end grain on narrow trim returns. Angling the tool slightly and using two shorter brads from opposite directions can mitigate that, but if your project doesn’t truly require the 2-inch length, keep some 1-1/4 or 1-1/2 inch brads in the kit. Matching the fastener length to the job will reduce deflection and surface surprises.
Finish quality
Holes were tiny and uniform. I didn’t see the tear-out or “volcano” around the head that softer or poorly heat-treated wire can produce. After priming, a quick fill with lightweight spackle disappeared under paint. On clear-finished oak, I used tinted putty; the T‑style head left a mark small enough to blend without telegraphing.
The coated finish is meant for interior use, and it behaves that way—smooth driving and a bit of extra bite once set. I wouldn’t use these where moisture is a concern (bath surrounds without good ventilation, mudrooms that see slush, or anywhere near exterior doors prone to condensation). They’re not stainless or hot-dipped, and you can coax black staining out of tannin-rich woods if moisture gets in. For interior, climate-controlled spaces, that’s not an issue.
Reliability and jams
Across the test runs—roughly a thousand shots—I experienced one jam in the pneumatic nailer that traced to a slightly bent brad at the end of a dropped strip. Clearing was routine and didn’t recur. The rest of the time, the driver stayed clean, and the noses of both nailers showed minimal marring around the tip after repeated shots. That speaks to consistent wire hardness and head formation.
One note: if you’re running sequential mode and moving fast, let the driver return fully before the next shot. With 2-inch brads, short-stroking is more likely to leave a proud head, creating the perception of inconsistency when it’s really a timing issue.
Compatibility observations
These brads seated well in all the 18‑ga magazines I tried, with no overlength that would bottom out prematurely. The strips are flexible enough not to shatter if you need to bend one slightly during loading, but stiff enough to remain straight over a full magazine. That balance helps when you’re swapping tools or working overhead.
Where they shine and where they don’t
They shine in typical interior trim scenarios: baseboards into studs, casing into jambs and framing, shoe molding, light carpentry, and cabinet facings where you want a small head and reduced risk of splitting. The chisel point and smooth shank are a good match for delicate profiles and MDF.
They’re less ideal for:
- Exterior or damp environments where corrosion protection matters.
- Very heavy trim packages in dense hardwoods where 16‑ga or 15‑ga fasteners provide better structural insurance.
- Tight edge work in highly figured hardwood; the 2-inch length increases the risk of unintended exits if you’re not mindful of grain.
Practical tips with these brads
- Orient the nailer so the chisel point runs parallel to grain near edges to minimize deflection.
- Use cross-nailing to lock miters and eliminate seasonal gaps in wider casings.
- If you’re getting proud heads in hardwoods, bump pressure or depth, or slow your firing cadence to let the driver recover fully.
- Keep a shorter length on hand for fragile returns; save the 2-inch brads for stud-finding or angled shots.
Bottom line and recommendation
These 2-inch 18‑ga brads are consistent, easy-feeding, and gentle on trim—exactly what I want for interior finishing. The chisel point reduces splitting in the materials I care about (MDF, poplar, softwoods), and the coating aids both driving and holding without leaving the magazine a gummy mess. They play nicely with common cordless and pneumatic nailers, and the 2,500-count box is a practical size for real project throughput.
I recommend them for interior trim carpenters, remodelers, and DIYers who need a reliable 2-inch 18‑ga option for base, casing, and shoe. They’re not a one-size-fits-all fastener—keep shorter lengths and heavier gauges for specific cases—but within their lane, these brads do their job cleanly and consistently, which is the highest praise I can give a fastener.
Project Ideas
Business
Trim and Molding Punch-List Service
Offer a mobile trim service specializing in baseboards, casing, crown returns, and shoe molding touch-ups. 18-gauge brads are perfect for fast, clean installations in finished homes. Market to realtors and contractors who need quick, tidy completion work before listings or inspections.
Custom Slat Wall Installations
Provide turnkey accent wall installs for residential and boutique retail spaces. Use 2-inch 18-gauge brads to rapidly fasten narrow slats with minimal fill work, enabling one-day transformations. Offer packages (wood species, spacing, finish options) and upsell integrated lighting and acoustic backing.
On-Site Gallery Wall & Framing
Combine custom frame building with on-site gallery wall layout and installation. Build simple hardwood frames in the shop, assemble with glue and 18-gauge brads, then deliver and install with precise spacing. Offer art consulting and matting for additional revenue.
Rental Turnover Trim Refresh
Specialize in fast interior refreshes between tenants: replace damaged baseboards, add shoe molding to hide gaps, fix loose casings, and install door stop molding. 18-gauge brads ensure quick, clean attachment with tiny holes, minimizing prep and paint time for rapid turnovers.
DIY Feature-Wall Kits
Sell packaged board-and-batten or slat-wall kits that include pre-cut trim, layout guide, paint schedule, and a strip of 18-gauge brads. Customers follow simple instructions, and you can upsell tool rental (nailer), color consultations, or pro installation for an extra fee.
Creative
Slat Accent Wall
Create a modern slat accent wall using 1x2 or ripped plywood slats over a painted or felt-lined backing. Use the 2-inch 18-gauge brads to tack each slat to studs and to intermediate furring strips. The chisel point reduces splitting in narrow slats, and the small heads leave minimal fill marks for a clean, contemporary look.
Gallery-Quality Picture Frames
Build custom picture frames and shadow boxes from delicate hardwoods (maple, oak, walnut). Assemble miters with glue and clamp, then pin from the back and sides with 18-gauge brads to avoid splitting and to keep the face clean. Add a thin backer panel and hanging hardware for a polished home gallery.
Board-and-Batten Feature Wall
Transform a plain room with MDF or pine battens and a simple top rail. Set battens over a painted wall or smooth sheet paneling, then fasten with 18-gauge brads along studs. The coated brads hold well for interior trim while keeping holes tiny, making caulking and paint touch-ups fast.
Built-In Window Casing Upgrade
Add depth to standard window trim by installing a backband and apron detail. The 2-inch brads are ideal for fastening thin casing profiles without splitting, and their smooth shank slides cleanly through primed MDF or softwood for a crisp, tight fit around windows.
Faux Beam or Coffered Ceiling
Construct lightweight hollow beams or simple coffered grids from plywood/MDF and fasten covers to cleats with 18-gauge brads. The small heads are easy to conceal, keeping the look seamless after caulk and paint, while the chisel point minimizes splits in thin edge banding.