Features
- WORKS FOR DRAWER & DOOR: Knob and Pulls with 3" (76mm), 3-3/4" (96mm), 5-" (128mm) hole center
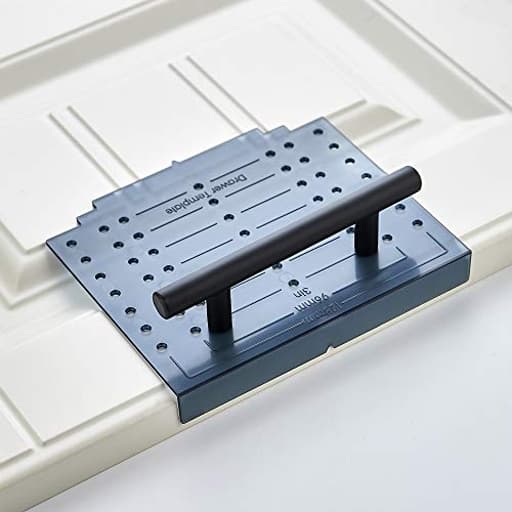
- Kit Includes: (1) Door Drilling Template, (1)Drawer Drilling Template, (1) 3/16'' Drill Bit
- Attention: Please refer to the images of measurement and installation guide before your order. And please attention that our template can be used up to 5" hole center handles.
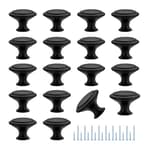
- Designed for use with any knob and for common pull sizes
- CLEAR: Clear Platic can see through the template
Specifications
| Color | Black |
| Size | Align Sizes: 3'' / 3.75'' / 5'' |
| Unit Count | 1 |
Cabinet door and drawer hardware installation kit contains a door template, a drawer template, and a 3/16" drill bit for locating and drilling mounting holes. Clear plastic templates accommodate knobs and pulls with 3" (76 mm), 3-3/4" (96 mm), and 5" (128 mm) hole centers and allow through-view alignment for installations up to a 5" hole center.
Ravinte Cabinet Door & Drawer Hardware Installation Template Kit Include Drill Bit Mounting Template for Cabinet Knob, Cabinet Pulls Review
Why this little template kit earned a spot in my drawer
Installing cabinet knobs and pulls can be surprisingly unforgiving. A millimeter off, and your eye catches it every time you walk into the room. I’ve used everything from cardboard mockups to adjustable aluminum jigs, but on a recent kitchen-and-bath refresh I used the Ravinte template kit and found it hits a sweet spot for cost, simplicity, and repeatable accuracy—provided you work within its limits and follow a couple of best practices.
For clarity, I’ll refer to it as the Ravinte template kit.
What’s in the box and how it’s built
The kit includes:
- A door template
- A drawer template
- A 3/16-inch drill bit
Both templates are clear plastic with well-marked hole locations for common pull sizes: 3 inches (76 mm), 3-3/4 inches (96 mm), and 5 inches (128 mm). The clear material is a real advantage—it lets you see stile edges, panel reveals, and centerlines as you set up. The plastic is sturdy enough for a full kitchen’s worth of hardware, but like most plastic jigs, it’s not something I’d use as a permanent drill bushing. Treat it as a guide to mark holes, not a sacrificial part you drill through repeatedly.
The 3/16-inch bit is matched to standard #8-32 hardware. It works, but it’s a basic twist bit. If you care about perfectly clean holes, a brad-point or split-point bit cuts cleaner and wanders less, especially on painted MDF or veneered plywood faces.
Setup and workflow that actually saves time
My workflow with the Ravinte kit is straightforward:
Plan your layout. Decide your knob height or pull location and stick to it across all doors and drawers. For pulls, choose one of the three supported hole centers (3", 3-3/4", or 5"). If your hardware is longer than 5 inches (128 mm center-to-center), this isn’t the right jig.
Use the drawer template for drawers. Find the drawer’s horizontal centerline and height line. The template registers off an edge, so it’s quick to repeat. I mark the holes with a fine-tip pencil or an awl through the jig.
Use the door template—carefully—or repurpose the drawer template for doors. This is where attention matters. The door template indexes off the edge of the door. Depending on your door style (Shaker vs. slab) and your preferred knob position, you might find the stock offset puts the knob lower than you want. The workaround is simple: use the drawer template on doors, referencing your chosen height. It’s just as fast and gives you full control over placement.
Mark, then drill—don’t drill through the plastic. I mark through the template, remove it, and drill using a brad-point bit from the face side to reduce tear-out. For solid wood, I’ll back-drill from the rear once the point peeks through. On painted or veneered surfaces, painter’s tape over the exit point also helps avoid chipping.
Using this approach, I installed a mix of 5-inch pulls on drawers and round knobs on doors with consistent results across the room.
Accuracy and repeatability
The biggest advantage of this kit is how quickly it turns careful measuring into repeatable results. The clear plastic, printed guides, and fixed hole centers reduce “mental math” on every cabinet. Once you establish your reference edge and height point, placement is efficient and reliable.
The rigidity is adequate. If you try to use it as a drill guide, the holes will wear and introduce play, but for marking, the holes are tight and true. I also like that the kit splits the tasks: the drawer template is naturally suited to centered pulls, while the door template is set up for edge-referenced placement.
On a full kitchen with 25+ pieces, my holes lined up without surprises. The only time I had to rethink was on a set of doors where the stock door template location would have put the knob too close to the rail. Switching to the drawer template for those doors solved it.
Where it falls short
- Limited to 5-inch (128 mm) pulls: If your design uses 6-inch, 160 mm, or longer pulls, you’ll need a different jig or a custom layout method.
- The included bit is serviceable but not premium: It drills, but a brad-point or higher-quality twist bit cuts cleaner and faster, especially on painted MDF or melamine.
- Door template positioning is not universal: Depending on your door style and taste, you may find the default offsets low. The workaround is easy, but it’s something to plan for before you start drilling.
- Plastic will wear if used as a drill bushing: As with any plastic template, don’t drive the bit through it repeatedly. Mark first, then drill.
None of these are dealbreakers for typical DIY cabinet hardware installs; they’re trade-offs that come with the kit’s price and simplicity.
Practical tips for best results
- Mark unused holes: The templates have multiple holes; cover the ones you’re not using with painter’s tape so you don’t accidentally mark the wrong location.
- Center punch: Use an awl or a fine nail set to create a tiny dimple at your marks to prevent bit wander.
- Support the exit: Tape the back of the door or drawer, or use a backer block, to reduce tear-out.
- Keep orientation consistent: Always reference the same cabinet edge (top for drawers, opening edge for doors) to maintain uniform placement.
- Check hardware screw length: Drawer fronts vary in thickness. You may need longer or break-away screws for thicker fronts, and shorter screws for thin doors.
- Dry fit the first few: Install one or two knobs/pulls and step back before committing to the rest.
Who this kit suits best
- DIYers installing common-size knobs and pulls who want repeatable results without a steep learning curve.
- Pros who need a lightweight, quick solution for standard 3", 3-3/4", and 5" pulls on a smaller job.
- Anyone working on painted or stained cabinets who values through-view alignment to manage reveals and stile widths.
If you’re consistently installing longer pulls (160 mm and up) or want micro-adjustability to the millimeter for nonstandard layouts, a more advanced metal jig with adjustable fences is a better fit.
Durability and value
For a plastic template set, durability is good. Mine handled a full kitchen and a bathroom without any meaningful wear because I marked through it rather than drilling through it. The clear plastic shows scuffs over time, but that doesn’t affect accuracy. Given the time it saves and the reduction in mistakes, the value is easy to justify on even a single project.
The included bit is a nice touch for anyone starting from scratch, but upgrading to a brad-point bit is an inexpensive improvement that pays off immediately in cleaner holes.
The bottom line
The Ravinte template kit is a practical, low-stress way to install cabinet hardware at common sizes with consistent, professional-looking results. It streamlines layout, preserves alignment across a room, and takes away the fear of drilling in the wrong spot. Its main limitations—support only up to 5-inch pulls and a door template that won’t suit every placement preference—are easy to work around if you plan ahead.
Recommendation: I recommend the Ravinte template kit for DIYers and pros tackling standard-size cabinet hardware. It’s clear, simple, and fast, and with a few small habits—marking through the template, using a better drill bit, and double-checking door knob height—it delivers accurate, repeatable installs without fuss. If your project uses longer pulls or requires fully custom spacing, look for an adjustable metal jig; otherwise, this kit gets the job done cleanly and efficiently.
Project Ideas
Business
Cabinet Hardware Installation Service
Offer a local service to replace or install cabinet knobs and pulls using the template for fast, accurate placements. Market to homeowners doing kitchen refreshes, realtors staging homes, and landlords between rentals.
Pre-Drilled Face Plates for Makers/DIYers
Produce and sell pre-drilled cabinet and drawer face plates or door fronts (with holes placed at standard 3", 3.75", 5") to Etsy/Shopify customers who want plug-and-play installs. Include the template and 3/16" bit as a premium bundle.
Hands-On Workshops / Pop-Up Classes
Run small classes teaching hardware selection and precision installation using the template. Charge per attendee and upsell kits (template + drill bit + sample hardware) so participants leave with a finished project.
Contractor/Handyman Efficiency Kit
Create a branded installer kit (clear templates, drill bit, instructions, quick-measure guides) and sell in bulk to contractors and handymen who do cabinet refits. Emphasize time savings and error reduction in marketing.
Niche Product Bundles for Remodelers
Partner with cabinetry/hardware suppliers to offer coordinated bundles (hardware sets + template + installation guide/video). Position bundles for kitchen refresh packages sold through interior designers or remodel shops.
Creative
Upcycled Cabinet Makeover
Refinish an old dresser or kitchen cabinet and swap the original hardware for a mix of new knobs and pulls. Use the clear template to lay out consistent hole centers (3", 3.75", 5") for a professional look, then paint and distress for a boutique, upcycled piece.
Knob-and-Pull Wall Art
Create 3D wall art by mounting an array of decorative knobs and small pulls to a painted wood panel. The template ensures perfectly even spacing and alignment for geometric patterns or a logo made from hardware pieces.
Custom Jewelry & Scarf Organizer
Build a framed organizer using cabinet pulls as hooks for necklaces and scarves. The drawer template helps place pulls at consistent centers so different hook sizes line up neatly and look retail-ready.
Theme Kid’s Play Kitchen Upgrade
Turn a plain play kitchen into a themed set (farmhouse, retro diner, wizard lab) by installing coordinated knobs and pulls at the right heights. The clear template speeds placement so handles line up across doors and drawers.
Functional Entryway Hookboard
Make a hallway hookboard by mounting a row of pulls and knobs to a stained plank for keys, leashes, and hats. Use the template to set even 3"–5" spacing so it looks custom-made and balanced.