Features
- Heavy Duty: This 12V bus bar can handle voltage max 48V DC and continuous current max 250A
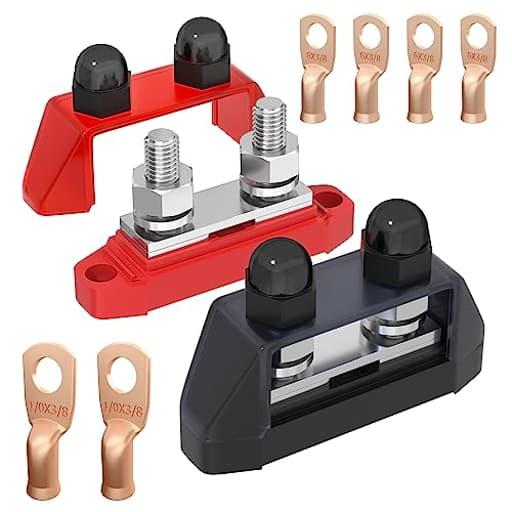
- Product Information: Each 250A power distribution block contains 2 x 3/8" (M10) studs. All the studs on our busbars are made of 304 stainless steel to protect against corrosion
- What You Get: 1 x positive 12 volt bus bar, 1 x ground 12 volt bus bar, 2 x 1/0 AWG copper lug and 4 x 6 AWG copper lug
- Protective Cover: The marine bus bar comes with a protective cover made of tough polycarbonate plastic for excellent strength and durability, preventing short circuits and making the circuit safer
- Wide Application: Using the battery bus bar for wiring can keep the circuit neat and tidy, reducing the possibility of short circuit. Suitable for car, caravan, boat, yacht, solar system, etc
Specifications
| Color | Red and Black |
| Unit Count | 2 |
Related Tools


A 12V DC power distribution bus bar set (one positive, one ground) for consolidating battery and accessory wiring in cars, boats, caravans and solar systems. Each bus bar has two 3/8" (M10) 304 stainless steel studs, is rated up to 48V DC and 250A continuous, includes polycarbonate protective covers, and ships with 2 x 1/0 AWG and 4 x 6 AWG copper lugs; units are color-coded red and black.
RVBOATPAT Marine Bus Bar 12V 250A Power Distribution Block 12 Volt DC Busbar 3/8" Dual Studs Battery Bus Bar for Boat Automotive Solar System Review
Why I reached for this bus bar
Tidying up a 12V system is one of those upgrades that pays off every time you open the electrical bay. I used the RVBOATPAT bus bar set during a recent refit where I needed to consolidate multiple battery and accessory leads for a small boat and a DC winch. I also tied in a couple of add-ons—lighting and a chartplotter—so I wanted something compact, clearly labeled, and robust enough to handle cranking and winch loads without getting warm or fussy. This set checked the right boxes on paper: 250A continuous rating, 3/8-inch studs, stainless hardware, protective covers, and a sensible red/black pairing.
What’s in the box
- Two bus bars: one red (positive), one black (ground)
- Dual 3/8-inch (M10) studs on each bar
- Stainless hardware with flat and lock washers
- Polycarbonate snap-on covers
- Copper lugs: 2 x 1/0 AWG and 4 x 6 AWG
The included lugs are a nice touch if you’re wiring immediately. For marine use, I still prefer tinned lugs, but for automotive or RV use the supplied copper lugs get you moving quickly.
Design and build quality
The core of the system is simple: each bar provides two heavy 3/8-inch studs you can stack with ring terminals. The studs are 304 stainless steel, which resist corrosion and galling better than basic plated hardware. The base is a rigid insulating body, and the clear polycarbonate covers snap on positively with enough strength that they won’t pop off when you tug on adjacent cables.
A few design details stand out:
- The studs are long enough to accept a practical stack of ring terminals without running out of thread. In my setup I had 5–6 lugs per stud and still got the cover on.
- The lock washers bite well and hold torque. Stainless-on-stainless can be tricky; I lightly dabbed anti-seize to avoid galling and had no issues.
- Color coding is clear, and the covers make it easy to spot polarity at a glance, which is helpful in cramped spaces.
Fit and finish are clean with no stray molding flash, and the hardware threads smoothly. Nothing about the unit feels flimsy.
Installation notes
I mounted the bars on a bulkhead near the battery switch, leaving a gentle service loop for the main leads. The footprint is compact enough to fit between other gear, but give yourself room above the studs so you can stack terminals and still remove the cover.
A few practical tips from the install:
- Choose the correct ring size. The studs are 3/8-inch, so make sure all your rings match or use proper step-down rings for smaller cables.
- Plan your stack order. Put the highest current devices (e.g., winch, inverter feed) at the bottom of the stack for the lowest resistance path, then work outward to smaller loads.
- Use proper strain relief. Heavy 1/0 and 2 AWG cables can lever on the studs if unsupported. A clamp or P-clip near the bar keeps stress off the hardware.
- Tighten to snug plus a quarter turn, flattening the lock washer. Don’t reef on stainless threads—firm, even torque is key.
- Fuse at the source. This is a bus bar, not a fuse block. Every feed should have a fuse or breaker as close to the battery as practical.
The covers cleared my tallest stacks, but if you’re pushing seven or more thick lugs on one stud, test-fit the cover before final tightening. Routing the cables to exit parallel with the studs keeps the cover contour happy.
Performance and current handling
The headline rating is 250A continuous up to 48V DC. In practice, I ran a DC winch pulling between 120–160A for short bursts and held a steady 120A load for a 15-minute test (combination of winch idling under tension and house loads). The bus bars stayed comfortably warm to the touch, with no signs of softening covers or hardware loosening. Voltage drop across the bar was negligible compared to cable losses, which is exactly what you want—the bar shouldn’t be the bottleneck.
I wouldn’t design for 250A continuous at 12V for hours on end without ensuring ample airflow and minimal lug stacking, but for typical marine and automotive loads—starters, windlasses, car audio amplifiers, and inverter feeds up to roughly 1500–2000W at 12V—the bars are right-sized.
Because the system is rated to 48V, it’s also a fit for 24V and 36V banks. Electrically, the bus bar doesn’t care about voltage as much as the total current and connection quality; just ensure your ring terminals and cable are sized appropriately.
Marine, RV, and automotive use
- Marine: The 304 stainless studs and covered design make sense in a damp environment. For saltwater use, I strongly recommend swapping the included copper lugs for tinned copper and sealing crimps with adhesive heat shrink. A light smear of corrosion inhibitor on the stacks goes a long way. Placement away from direct bilge spray is ideal.
- RV and van: The simplicity is welcome when combining a house battery bank with DC-DC chargers, solar charge controllers, and loads. The protective covers reduce the “stray tool” short risk in cramped cabinets.
- Automotive/car audio: The 3/8-inch studs accommodate beefy amplifier feeds, and having two studs per bar keeps power left and right distribution tidy.
In all cases, remember this is a distribution point, not a protection device. Pair it with appropriate ANL/MRBF fuses or breakers near the source.
Limitations and quirks
- Only two studs per bar: If you’re trying to land a lot of small accessory circuits, you’ll either stack deeply or want a separate terminal block with multiple small posts. This bus bar excels at handling a few big connections, not dozens of tiny ones.
- Included lugs are bare copper: Fine for many applications, but I’d replace them with tinned lugs in marine installs to minimize corrosion.
- Cover clearance can get tight: Heavy stacks with tall ring terminals and thick heat shrink may crowd the cover. Careful routing solves it, but it’s worth planning.
- No torque spec provided: Common for products like this, but it puts the onus on the installer to tighten correctly. Flattening the lock washer and rechecking after a shakedown run is good practice.
None of these are deal-breakers; they’re simply boundaries of a straightforward design.
Value and alternatives
For the price, you get two solid bus bars with stainless studs, protective covers, and starter lugs. Competing marine-branded bars with similar ratings often cost more and don’t always include hardware. If you need screw-down terminals for many small circuits, a hybrid bus bar/terminal strip or a fused distribution block might suit you better. If you need 300–600A continuous for a big inverter bank, step up to a heavier-spec bar with a thicker copper bus and larger studs.
Best practices to get the most from it
- Keep high-current leads on the same stud to minimize parallel path resistance.
- Don’t mix ring sizes on the same stud without proper hardware; step rings or reducers avoid weird contact patches.
- Periodically check tightness after the first few cycles of high load; stainless stacks settle slightly.
- Label your connections before you cover them; it saves time later.
- Use anti-seize on stainless hardware to prevent galling, especially in humid or salty environments.
Final recommendation
I recommend the RVBOATPAT bus bar for anyone who needs a clean, heavy-duty way to consolidate 12–48V DC connections in a boat, RV, or vehicle. It’s well built, the stainless studs and polycarbonate covers inspire confidence, and the 250A continuous rating is well matched to common high-draw DC gear. The design favors a handful of substantial connections rather than dozens of tiny ones, so pair it with a proper fuse block or terminal strip if you’re distributing to many small loads. Swap the included copper lugs for tinned ones in marine environments, and you’ll have a tidy, reliable distribution point that doesn’t get in your way.
Project Ideas
Business
Marine & RV Electrical Retrofit Service
Offer a niche service replacing tangled accessory wiring on boats, RVs, and classic cars with tidy bus-bar-based distribution panels. Services include on-site assessment, supply & install of the dual bus bars, labelling, fuse integration, corrosion-proofing, and a safety checklist. Charge per job or by circuit; upsell premium stainless lugs, battery monitors, and annual inspection/maintenance contracts for recurring revenue.
Prewired 12V Power Kit Product Line
Create and sell prebuilt 12V kits targeted to campers, boat owners, and DIYers: 'Starter' (battery + bus bars + fused outputs), 'Solar Ready' (adds MPPT controller + panel connection), and 'Pro' (larger capacity and multiple fused circuits). Package with clear wiring diagrams and branded polycarbonate covers. Sell through Etsy/Shopify, Amazon, or specialty marine/RV stores; bundle installation videos to reduce support calls.
Installer Supply & Certification Program
Develop a B2B program supplying bus bar kits in bulk to electricians and boat/RV installers. Offer tiered pricing, branded kits, technical spec sheets, and short certification workshops (virtual or local) on best practices. Certified installers get marketing assets and a listing on your site. Revenue streams: kit margins, training fees, and repeat parts sales (lugs, covers, fuses).
Paid DIY Courses, Plans, and Affiliate Store
Package your expertise into monetizable digital products: step-by-step course on building safe 12V systems using bus bars, downloadable wiring templates for common vehicles, and video troubleshooting clinics. Monetize through course fees, one-off plan purchases, and affiliate links to the bus bars, batteries, controllers, and tools. Offer a low-cost sample plan to capture emails, then upsell premium bundles and personalized wiring reviews.
Creative
Custom Boat Electrical Upgrade
Replace a messy, spread-out wiring setup on a small boat with a neat dual-bus distribution module: mount the red (positive) and black (ground) bus bars in a waterproof compartment, run battery feed lugs to the 3/8" studs, and route each accessory (bilge pump, nav lights, stereo) to lugs with labeled shrink-tubeled leads and inline fuses. The stainless studs resist corrosion and the polycarbonate covers keep terminals safe. Result: cleaner panel, easier troubleshooting, improved safety — a satisfying retrofit weekend project.
Portable Solar Camping Power Pack
Build a compact 12V portable power box for camping: include a deep-cycle battery, MPPT charge controller, the red/black bus bars for organized fused outputs (fridge, lights, USB inverter), and quick-connect solar input. Use the included lugs for secure battery connections and mount the bus bars on an insulated panel under the lid. Add a removable polycarbonate cover to show the wiring while keeping it protected. Great for weekend gear, tailgating, or emergency use.
Tiny House / Vanlife Power Hub
Design and build a switchable power distribution hub for a tiny house or van conversion. Mount the bus bars inside the main electrical cabinet as the backbone for the 12V circuits: lighting, pump, water heater controller, and fridge. Add a battery monitor shunt on the ground bus, grouped fused blocks on the positive bus, and labeled terminals for modular add-ons. This creates a professional-looking electrical center that’s easy to expand or hand off to future owners.
Industrial-Style Accent Lighting Sculpture
Turn the bus bars into a piece of functional industrial art: mount the red and black bars on a reclaimed wood or metal board, use the studs as visible bus terminals feeding copper wire loops and LED strips, and place the polycarbonate covers as diffusers. Wire a small battery bank behind the board and create mood lighting controlled by a dimmer. It’s a conversation piece that highlights the hardware aesthetics while being a practical lamp or charger station.