Features
- ⭐【Unique Advantages】- In order to avoid drilling directly with an electric drill will cause the jig to shake, we provide an "Automatic Center Punch". Use jig finded the location, you just need to use the "hole punch" to directly punch the small holes, and then use the electric drill to punch the big holes on have already been punched small holes. It is a very ingenious way.
- ⭐【Metric + Imperial Scale】- Contains metric + imperial double sizes. Super high-definition tick board marks made of ABS, and the ruler is made from stainless steel. Ensure the jig’s premium durability, high corrosion resistance, high strength.
- ⭐【Detachable & Portable】- Cabinet hardware installation template quick-release '' drill guide'' sliders can be split into small parts by taking a small Space to easily carry. The storage bag we present will solve all your troubles of carrying.
- ⭐【Time Saver Quick Drilling】- Cabinet hardware template tool a full day of measuring and re-measuring. Set it up once and use it repeatedly with no further measurements, A good accessory, and helper for woodwork or DIY. The installation efficiency is greatly improved.
- ⭐【Jig Widely Application】- Cabinet hardware jig is ideal for installing pulls or handles and knobs on DRAWERS, CABINETS, DOOR and so on. Works on any cabinet door stile and rails including shaker doors & recessed drawer fronts. The product size is 16 inches, please confirm your cabinet/door size before purchasing
Related Tools

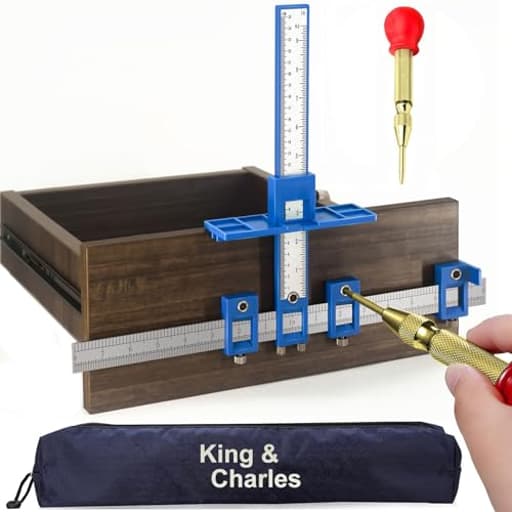
This 16-inch cabinet hardware jig is a drilling template for installing handles, pulls, and knobs on drawers, cabinets, and doors, with metric and imperial scales printed on an ABS guide and a stainless steel ruler. It includes a detachable quick-release drill guide and an automatic center punch to mark starter holes and reduce jig movement before drilling, and comes with a storage bag for portability.
King&Charles Cabinet Hardware Jig, King&Charles Cabinet Handle Jig with Automatic Center Punch, Avoid Jitter Caused by Direct Drilling. Use for Handles and Pulls on Drawers/Doors, Perfect Set. Review
Why this jig earned a spot in my cabinet kit
I spend a lot of time laying out cabinet hardware, and I’ve tried everything from homemade templates to premium, all-metal jigs with drill bushings. The King&Charles jig sits in a sweet spot for DIYers and light pro work: it’s fast to set up, accurate once dialed in, and portable. It’s not a tank, but it doesn’t need to be for most jobs.
I tested the ABS-bodied version with a stainless steel ruler and quick-release drill guide sliders. The headline feature is an included automatic center punch, which changes the workflow for the better: you mark through the jig, set the jig aside, and then drill. That means you’re never trying to hold a door, a jig, and a spinning drill all at once—a common source of misalignment with through-jig drilling.
Design and build
- Body: ABS guide with a stainless steel ruler, both metric and imperial scales printed clearly.
- Sliders: Detachable, quick-release guides lock down firmly and repeat positions accurately.
- Punch: Spring-loaded automatic center punch sized to fit the guide holes.
- Length: 16 inches, which covers typical drawer widths and long handle placements.
- Storage: Comes with a soft pouch that keeps the pieces together and protects the scales.
The ABS frame keeps weight down and makes the tool comfortable to hold across a long day. The stainless ruler is rigid, precise, and easy to read. The sliders have enough friction and clamping force to stay put without gouging. It’s not a lifetime, drop-it-off-the-van kind of tool, but it’s sturdier than you might expect from a mostly plastic body.
Note: Listings for this jig sometimes mention “aluminum” versions. Mine was the ABS variant with a stainless rule; if you care about all-metal construction, double-check the specific model you’re buying.
Setup and calibration
Initial setup took me a few minutes. The scales are crisp, and I appreciate having both metric and imperial—especially useful when hardware is spec’d in millimeters. The process I used:
- Identify the reference edge (door stile edge or drawer top).
- Set the vertical placement on the ruler using the main fence.
- Adjust the hole-spacing sliders to match your handle center-to-center distance.
- Lock everything down and test on a scrap board or a piece of tape on a cabinet.
Once I had settings dialed for a 96 mm pull, I could move from door to door without further measuring. For odd or nonstandard hole patterns (like three-screw pulls), the sliders accommodate multiple points easily, and you can lock them in place so the pattern stays consistent.
The instructions are present but rough. Fortunately, the jig is intuitive. If you’re methodical, you’ll be marking your first door in under 10 minutes.
In use: doors and drawers
On doors, the fence registered reliably against the stile, and the jig’s length made it easy to mirror positions left-to-right. On drawers, the 16-inch span was enough for everything from narrow top drawers to wider base drawers. The jig sits flat, but like most fence-style jigs, it can rock if you push or pull while marking. Maintain hand pressure squarely against your reference edge, and it stays stable.
The automatic center punch is the key to consistent results. I used it to mark each hole, pulled the jig off, and then drilled. This avoids wear on the jig’s guide holes and eliminates the “three hands” problem of drilling through the jig. The punch marks were visible and deep enough to keep my pilot bit from wandering.
One caution: you can cock the punch at an angle if you aren’t careful. Keep it perpendicular to the surface and centered in the guide hole. I got best results by placing the punch, applying light pressure to seat it squarely, then firing it.
Accuracy and repeatability
The jig’s strength is repeatability. Once set, I could go cabinet-to-cabinet and get identical results. Hardware lined up level across long runs of doors, and drawer banks matched cleanly.
A few technique notes that improved accuracy:
- Use a small pilot bit first. I used a 3/32-inch pilot, then stepped up to the final size. The pilot bit locks into the punch divot and stays true.
- Back up thin drawer fronts with sacrificial wood to prevent blowout.
- For painted cabinets, lay painter’s tape where you’ll drill; it reduces chipping and gives you a place to mark notes.
- If you’re matching or covering existing holes, set one slider using a screw inserted through the jig to register hole spacing, then lock the rest to that reference. It’s faster and eliminates math mistakes.
The center punch: helpful, with caveats
The included punch is convenient and, more importantly, properly sized for the jig’s guide holes. It made quick work of marking dozens of positions. However, it’s not a premium punch. The spring force and tip hardness are adequate, not exceptional. If you’re doing an entire kitchen, it will get you through. If you install hardware professionally, you might want a higher-end punch as a backup.
Durability and portability
The ABS body and stainless rule handled a full kitchen refresh without flex or scale wear. The sliders didn’t drift once tightened, and the markings remained legible. The storage bag is a nice touch—no digging through a toolbox for loose parts. I wouldn’t toss it into a bin with heavy tools; store it in the pouch and it should last.
If you prefer metal-on-metal stability and you drill through bushings, an all-metal bushing-style jig is still the gold standard for heavy-duty work. This jig’s workflow is different—mark, then drill—and it favors speed and ease over through-jig drilling.
Limitations and quirks
- Instructions: Functional but poorly translated. Expect to rely more on common sense than the booklet.
- Potential rocking: Like many fence-style jigs, it can rock forward/back. Keep even pressure against the reference edge while marking.
- Punch sensitivity: Keep the punch square, or it can glance off and leave a faint or misplaced mark.
- Listing ambiguity: Some buyers expect an all-metal build. Confirm whether you’re getting the ABS or aluminum variant.
None of these are deal-breakers, but they’re worth knowing so you can adjust your technique.
Tips for best results
- Always identify a consistent reference edge and stick to it for the whole project.
- Make a test board: mark and drill a scrap to verify measurements before touching your doors.
- Blue tape under the fence protects delicate finishes and keeps pencil marks off the surface.
- For mirrored doors, flip the jig rather than re-measuring; the symmetric scales make this easy.
- Pilot first, then drill to size, and consider a drill guide block if you struggle to keep holes plumb.
Who it’s for
- DIYers updating kitchens and baths who want reliable, repeatable placement without buying a pro-only jig.
- Light-duty pros or handypeople who need a fast, portable solution for occasional hardware installs.
- Anyone who prefers marking then drilling, rather than drilling through a jig.
If you install hundreds of pulls each month, an all-metal, bushing-style jig will be more durable and tolerant of rough handling. For everyone else, this strikes a good balance of speed, accuracy, and cost.
Recommendation
I recommend the King&Charles jig. It’s quick to set up, precise enough for clean, professional-looking results, and the center-punch-first workflow reduces the juggling act that causes most mistakes. The ABS/stainless construction keeps it lightweight and portable while remaining sturdy for typical kitchen and bath projects.
Buy it if you want an affordable, repeatable solution that saves time and avoids rework. Pass only if you require an all-metal, bushing-equipped jig for heavy daily use, or if you won’t adjust your technique to use the punch properly. For most users, it’s a smart, frustration-free way to get perfectly aligned hardware without overcomplicating the job.
Project Ideas
Business
Mobile Handle Installation Service
Offer a fast on-site handle/pull installation service for homeowners, realtors and small contractors. The jig cuts measuring time dramatically and the automatic center punch reduces re-drills, so you can do dozens of doors/drawers per job. Market as a one-day upgrade package (kitchen refresh, bathroom touch-up) and include optional hardware supply. Charge per-handle or flat-rate room price; advertise turnaround speed and precision alignment.
DIY Hardware Kits (Template + Hardware)
Sell ready-to-use kits that pair the cabinet hardware jig with curated handle sets (modern, vintage, farmhouse). Include printed layout guides, starter drill bits, and a short video tutorial. Because the jig is portable and uses both metric and imperial measurements, it appeals to international buyers and prosumers. Offer tiered bundles (basic jig + handles, pro kit with extra drill guides) and white-label the storage bag for brand cohesion.
Workshops & Online Courses
Host hands-on weekend workshops teaching precise hardware installation using the jig: topics include layout theory, handling recessed drawer fronts, and retrofitting old furniture. Record video modules to sell online (beginner to pro). Sell class packages that include a jig rental or discount on a jig purchase. Workshops build trust and generate recurring revenue from students who return for advanced classes or buy kits.
Cabinet Staging & Flipper Add-On Service
Partner with house flippers and home staging companies to offer a low-cost, high-impact cabinet hardware refresh. Use the jig to rapidly update entire kitchens and bathrooms, improving listing photos and buyer impressions. Offer volume pricing and a quick-install option where you pre-measure and pre-punch on-site to finish installs same-day. Promote case studies showing ROI: faster sales and higher offers after hardware upgrades.
Custom Template & Layout Design Service
Create and sell customized layout plans for designers and contractors who need non-standard handle placements (asymmetrical designs, mixed pull patterns, integrated accessory holes). Use the jig to prototype layouts and include a printable plan and step-by-step installation guide. Offer digital templates sized to the customer's doors/drawers and an optional mailed jig+template kit for clients who want a turnkey installation solution.
Creative
Custom Handle Grid Chest
Build a small multi-drawer chest where every handle lines up in a precise grid. Use the 16" jig's metric/imperial scales to lay out consistent center-to-center spacing across all faces. The automatic center punch lets you mark starter holes quickly and keeps the jig from slipping when you start drilling. Play with mixed finishes (brass, black, leather pulls) for a gallery look — the jig makes repeatable positioning fast so you can produce several identical units or scale the idea to different sizes.
Upcycled Dresser Makeover
Give an old dresser new life by reconfiguring handle patterns (single center pulls, double symmetrical pulls, or staggered layouts). Use the quick-release drill guide to adapt to different drawer heights and the stainless steel ruler for exact offsets from edges. The detachable parts make it easy to carry between pieces in a workshop or on-site. Document before/after photos to create a portfolio or social posts showing how precise hardware placement transforms furniture.
Modular Jewelry & Key Organizer
Create wall-mounted panels with perfectly spaced knobs, hooks and pegs for jewelry, keys, or belts. The jig's high-definition ticks ensure uniform rows; use the automatic center punch to lightly mark holes so thin hardware doesn't split the panel. Design panels in modular sizes (6", 12", 16") that can be mixed on a foyer wall. This project is great for selling in craft fairs — the consistent, clean spacing looks professional and is easy to replicate.
Kids' Play Kitchen Hardware Kit
Make a scaled-down set of realistic cabinet doors and drawers for a play kitchen with authentic-looking hardware. The jig prevents mistakes on small faces where tiny offsets are obvious; metric and imperial marks are handy if you’re matching existing miniature hardware. Pre-punch holes to avoid chipping delicate plywood or MDF used for toys. Package several small doors together as a themed nursery or playroom decor item.
Decorative Slat Wall with Uniform Pulls
Design a decorative slat wall or headboard with integrated pulls or knobs used as hooks. The 16" length is ideal for laying out runs of uniform attachment points; use the automatic punch to start holes in hardwood slats before drilling to keep edges clean. Combine with LED strips or paint accents to create a premium, functional accent wall perfect for boutique retail displays or interior commissions.