Features
- Used for hanging screens on wood window frames
- Heavy-duty stamped steel construction in a zinc finish
- Can be installed with a few simple tools
- 2 sets of top mount screen holders and #6 x 5/8 sheet metal, Phillips, pan head, zinc screws
- Please refer to the line art drawing for dimensions and compare with your original item before purchasing
Specifications
| Color | Steel |
| Size | 2 Pack |
| Unit Count | 2 |
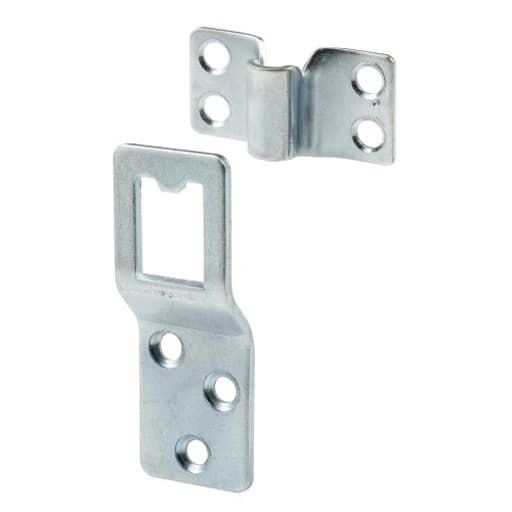
Heavy-duty stamped steel top-mount hangers in a zinc finish for securing storm or screen panels to wood window frames. Each pack includes two hangers and matching #6 x 5/8" Phillips pan-head zinc screws and can be installed with basic hand tools; verify dimensions against your original before purchasing.
PRIME-LINE L 5777 Stamped Steel Heavy Duty Storm or Screen Window Panel Hangers, Zinc Review
Why I reached for these hangers
Old wood windows and seasonal panels are a great pairing—until you need hardware that actually holds the panels securely without turning a simple swap into an hour on a ladder. I installed these Prime-Line top-mount screen/storm hangers on two wood window frames in a 1910s house to make seasonal changeovers faster and safer. After a winter of holding storm panels and a summer of screen duty, I’ve got a good handle on how they install, how they hold up, and where they come up short.
What these hangers are (and aren’t)
These are heavy-duty, stamped-steel, top-mount hangers with a zinc finish. Each pack I used included two hangers and #6 x 5/8-inch Phillips pan-head screws. The design is simple: the hanger mounts on the head of the window frame, and the top rail of your screen or storm panel hooks into it. You then secure the bottom of the panel with separate retainers (turn buttons, spring clips, or screws), which are not included.
They’re purpose-built for wooden window frames and wooden storm/screen panels. If your setup is aluminum storms with proprietary tracks or a vinyl window system, this isn’t the right style of hardware.
Build quality and finish
The first impression is confidence-inspiring. The steel is noticeably thicker and stiffer than the generic clip hardware you find in bulk bins. The zinc plating is even and free of burrs, and edges were clean enough that I didn’t need to file anything before install. I prefer stainless for coastal jobs, but in a temperate, non-marine climate, zinc-plated steel balances strength and corrosion resistance well.
After one full winter of freeze/thaw cycles and a summer of afternoon sun, I don’t see red rust or flaking. The finish dulled slightly where the panel edge rubs during install, but it’s cosmetic. The hangers haven’t deformed or loosened.
Fit and sizing
Top-mount hangers are unforgiving about placement. It’s crucial to confirm your panel’s top rail thickness and the setback you need over the head jamb. The included line-art dimensions (check them before buying) matched what I measured on the hangers I received. On my older window frames, I had to shim the hanger 1–2 mm in a couple of spots to accommodate a slight bow in the header and to keep the panel face plane with the casing. A thin cedar shim or a double layer of exterior-grade tape did the trick.
If your panels are significantly out of square or your frame is wavy, plan to fine-tune the mounting positions. These hangers don’t have built-in adjustability—what you place is what you get.
Installation notes
Installation is straightforward with basic hand tools, but the small details make the difference:
- Dry-fit the panel first. I set the panel in place and used painter’s tape to mark the top-line and centerlines.
- Locate the hangers so the panel’s top edge fully nests without binding, leaving a touch of clearance to account for paint buildup later.
- Pre-drill pilot holes. For the #6 screws into old, dense wood, I used a 7/64-inch bit; into softer pine, 3/32 inch is fine. A dab of paste wax on the screws keeps them from snapping or stripping.
- Use the panel itself as your template. Hold the panel in position, mark the hanger positions, then mount the hangers where the panel naturally wants to sit.
- Check that your bottom retainers (not included) will land on solid wood, and that you can operate them from inside if that’s your routine.
I installed both hangers in under 15 minutes per window once I had the marks, and I appreciated that the included screws bite well and sit flush in the pan head recess without cam-out.
In use
This is where the design shines. With the hangers set, I can lift a storm panel on a ladder, hook the top into the hangers, and then let the panel hang while I swing the bottom into place and set the retainers. For tall windows, that “third hand” effect is gold. On the next changeover, I could do most of the process from inside with the sash open: lift the panel slightly, engage/disengage the top hooks, then deal with the bottom retainers. It’s still a two-hand job, but it’s controlled and repeatable.
There’s zero rattle. The panel sits tight against the frame once the bottom latches are engaged. I didn’t hear telltale buzz on windy nights, which is a common complaint with lighter, clip-style hardware. The hangers don’t telegraph through the interior as vibration either.
Durability and weather resistance
Through a wet, windy winter, the hangers didn’t sag or pull out. The #6 x 5/8-inch screws are adequate for most frames, though if your head jamb is punky or you’re dealing with old-growth, rock-hard trim, consider longer or stainless replacements. The zinc finish has resisted corrosion so far. In salty air or coastal conditions, I’d proactively switch to stainless screws and keep a small bottle of clear metal protectant on hand; the hangers themselves are steel, not stainless, so long-term coastal exposure will eventually win.
Paint build-up is another seasonal reality. After repainting the frame, I had to score the edges of the paint at the hanger slots with a utility knife once; the clearances are close enough that excessive paint can make the first rehang tight. That’s not a flaw, just something to anticipate.
Limitations and nitpicks
- No bottom hardware included. You’ll need separate turn buttons or spring clips to secure the bottom of the panel. Plan and budget accordingly.
- Limited adjustability. Unlike slotted brackets, these give you one shot at placement. Measure twice, mark carefully, and dry-fit.
- Screw length. The supplied 5/8-inch screws are fine for solid wood, but on soft or weathered material I prefer 3/4–1 inch to bite deeper. Swap them if needed.
- Not ideal for non-wood systems. If you’re mixing materials—aluminum frames or vinyl jambs—look for hardware designed for those systems.
None of these are deal-breakers, but they’re worth knowing before you climb the ladder.
Tips for success
- Confirm your panel thickness and the hanger throat depth against the manufacturer’s drawing before ordering.
- Pre-drill and wax screws to avoid snapping, especially in old painted trim.
- Use a small square to align both hangers on the same plane; a misaligned pair makes panels bind.
- If your header is out of plane, shim behind the hanger rather than forcing the panel to twist.
- Label panels and windows. Consistency matters; once you dial in a fit, keep that pairing together.
Value
For the cost of a small hardware set, you get reliable, repeatable hangs and a smoother seasonal workflow. I’ve used cheaper turn-button-only setups and they can work, but they don’t offer the same one-person install confidence—especially at the top of a ladder. Compared to more complex track systems, these are simpler, more robust, and friendlier to historic frames.
Who will appreciate these
- Owners of older homes with wood storm or screen panels who want a secure, tidy top mount.
- Anyone swapping panels seasonally who values a controlled, one-person lift-and-hook process.
- DIYers restoring or replicating vintage hardware who prefer steel over flimsy stamped alternatives.
If your windows are modern units with integrated storms, or you need tool-free removal from inside only, this style isn’t for you.
Recommendation
I recommend these hangers. They’re strong, straightforward to install with basic tools, and they make seasonal panel swaps safer and faster. The zinc-plated steel has held up well in typical weather, they don’t rattle, and the included screws are usable out of the box. Just plan for separate bottom retainers, measure carefully before mounting, and consider longer or stainless screws if your conditions warrant. For wood-frame storm and screen panels, this is a dependable, no-drama solution that respects both your time and your windows.
Project Ideas
Business
Seasonal Screen & Storm Panel Service
Offer a neighborhood service to install, remove, inspect and store storm/screen panels seasonally. Use the hangers for secure top-mount installs; advertise convenience, safe storage, and minor repairs (patching screens, replacing hangers/screws) as add-on revenue streams.
DIY Window Panel Kits
Assemble and sell small DIY kits that include stamped steel hangers, matching screws, pre-cut plywood or screen material, and simple instructions for homeowners to build decorative or privacy inserts. Target historic-window owners and DIYers on marketplaces like Etsy or local hardware stores.
Mobile Window Repair Pop-Up
Run a mobile repair/pop-up that offers quick screen and window panel fixes at farmers markets or community events. Carry packs of hangers and small hardware to perform on-site replacements and sell hanger packs and replacement screws to walk-up customers.
Workshops & Classes
Teach hands-on micro-classes on building removable panels, fold-down shelves, and planter walls using these hangers. Charge per attendee and offer a kit (including hangers) as part of the ticket price. Great for makerspaces, community centers, and craft stores.
Custom Hospitality Retrofit Service
Target small inns, B&Bs and rental properties with a service to retrofit windows with removable decorative or privacy panels using these hangers. Offer design options (fabric-covered panels, sound-dampening inserts) and maintenance contracts for seasonal changes.
Creative
Removable Picture Panel System
Use the top-mount hangers to create a removable panel frame that snaps into a wooden window or alcove. Mount matching hangers on a thin plywood or slatted panel, paint or cover the panel with fabric or artwork, and you have a lightweight, easily-changeable decorative insert that slides in and out for seasonal displays.
Magnetic Herb & Seedling Rack
Attach hangers to the underside of a shallow wooden shelf and screw small galvanized trays or repurposed metal tins onto matching hangers. The system makes a removable shallow tray rack ideal for starting seedlings or holding small pots — pull trays out for watering or sunlight.
Slim Drop-Down Work Shelf
Build a narrow, fold-down shelf for craft or laptop use that hooks into a pair of hangers mounted near waist height. The shelf top rests on the hangers when in use and lifts out/removes for storage. Use the included screws to secure hangers for reliable support of light loads.
Interchangeable Garden Screen Wall
Create a framed wall of interchangeable screen/panel sections to block wind or sun on a patio. Use several hangers spaced across a frame so individual screen panels can be removed and swapped for planter panels, decorative inserts, or privacy slats.
Custom Sliding Panel Organizer
Make a narrow organizer for tools, craft supplies, or jewelry: attach hangers to a wooden track and fit small panels with pockets or hooks that hang in the track. Panels slide or lift out for access — good for small workshops or craft booths.