Features
- Made from durable concrete for long-lasting use.
- Features a slight overlap for seamless connection between stones.
- Perfect for decorative lawn edging and creating tree rings.
- Unique natural-looking design that is easy to install.
- Can be installed in a straight line or along curves; each piece is 12 in. L, with a net length of 11 in. when connected.
Specifications
| Color | Multi-Colored |
| Unit Count | 10 |
Related Tools

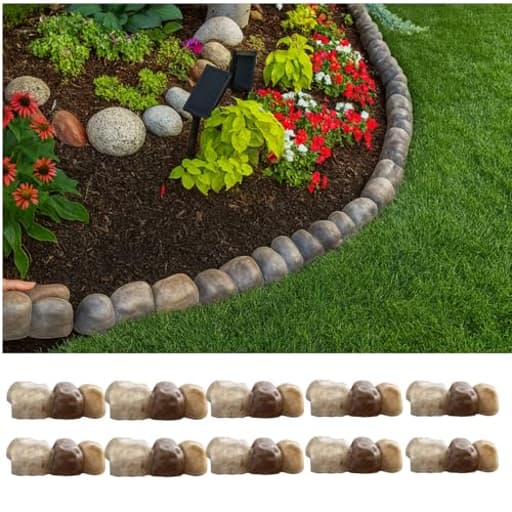
Ten 12 × 4 × 3 inch faux stone concrete edging pieces (multi-colored) sold as a 10-pack for landscaping. Each piece has a slight overlap that yields an 11-inch net length when connected and can be installed in straight lines or along curves for lawn borders and tree rings.
AERIPULSE 10 Pack Faux Stone Edging for Landscaping, 12 x 4 x 3 Inch Multi-Colored Concrete River Rock Border with Overlapping Design for Garden, Lawn, and Tree Ring Edging Review
What this edging is—and isn’t
I used AERIPULSE’s faux stone edging to frame a small planting bed and build a tree ring around a young maple. It’s a 10‑piece set of molded concrete blocks that mimic river rock, each nominally 12 inches long, 4 inches deep, and 3 inches high. The pieces overlap at the ends so they sit tight against one another without a visible joint; that overlap reduces the net run to about 11 inches per piece. In practical terms, a single box gives you roughly 9 feet of border or a tree ring with a centerline diameter of about 35 inches.
This is a simple, modular system: no hidden stakes, no pins, no connectors. The overlap helps alignment and hides seams, but there’s no lock. The pieces rely on weight, a level base, and good prep to stay put.
Build quality and appearance
These are solid concrete, not resin. They feel substantial and hold their place once set. Edges are clean enough for a convincing stacked‑stone look from a few feet away, and the overlapping ends reduce visual breaks from piece to piece.
Color was the first surprise. While the product images suggest a varied, multi‑stone palette, the set I installed skewed toward a uniform gray with only subtle tonal shifts. If you’re counting on high contrast or pronounced browns/tans, temper your expectations. The texture is pleasant—slightly variegated with a sandblasted feel—but the palette reads more “fresh concrete” than “river rock.” Over time, concrete tends to mellow with exposure and pick up natural patina; mine has started to soften slightly after a month outdoors, but it’s still largely gray.
Because they’re concrete, they’re also susceptible to the usual realities: chipping if dropped or hit with a mower, hairline surface crazing in harsh freeze‑thaw conditions, and occasional efflorescence (whitish salt bloom). None of that is unique to this brand, but it’s worth planning for.
Installation experience
The install is straightforward, provided you treat it like masonry and not plastic edging. Here’s what worked well for me:
- Base prep matters. I cut a shallow trench and laid 1 to 1.5 inches of compacted screenings (stone dust) over compacted soil. Sand also works, but screenings resist washout better. This keeps the pieces level and helps them resist frost heave.
- Rubber mallet and straightedge. I tapped the pieces down into the base and checked for level span‑to‑span. The overlap makes it easy to align faces, but if the base is uneven, the joints will telegraph the inconsistencies.
- Curves are easy within reason. With an 11‑inch net per piece, you can form gentle to moderate curves. Tight radiuses will read as a polygon rather than a smooth arc. For a tree ring, 10 pieces form a roughly 35‑inch diameter circle. For larger trees, plan on two boxes.
- Mind the height. At 3 inches high, these are visible edging, not a “mow‑over” paver. I set them about 0.5 inch proud of the surrounding turf and still needed a trimmer pass to keep the grass tidy along the edge.
Two notes of caution:
- The overlap is purely cosmetic and alignment‑helping; it doesn’t lock pieces together. On sloped ground or in areas with foot traffic, consider a dab of landscape block adhesive between pieces to resist creeping.
- If you set them directly on soil, they’ll wander with seasons. A compacted granular base is the difference between an edging that stays true for years and one you’re re‑setting every spring.
Working time for a single 9‑foot border, including base prep, was about an afternoon for one person with basic hand tools.
Performance in the yard
Once installed on a proper base, the edging stayed put through rain and a couple of lawn mowings. The pieces didn’t shift, and the overlap kept joints from gapping. Grass encroachment was minimal in the first month, but like any shallow edging, it’s not a root barrier; aggressive grasses will eventually creep under unless you install fabric or maintain a clean edge.
The 4‑inch depth gives them decent stability without feeling bulky. They’re substantial enough that a stray soccer ball or dog traffic won’t budge them, but a riding mower wheel brushing the edge can scuff or chip the top corners. I learned quickly to keep mower wheels off the concrete and rely on a string trimmer to finish the edge.
Drainage is a non-issue. The small gaps between pieces let water pass, and the concrete doesn’t warp in heat like resin alternatives.
Fit, finish, and consistency
Piece‑to‑piece dimensions were consistent enough to maintain a straight sight line. The overlaps matched up cleanly, and the faces were aligned without fuss. A couple of pieces had minor molding marks on the back faces, which are hidden after installation. I didn’t encounter any major chips out of the box, but given the material, it’s worth inspecting before you start and placing any imperfect faces toward the bed side.
The finish reads as “factory concrete” rather than hand‑hewn stone. That’s expected at this price point and format, but it’s something to know if you’re aiming for a high‑end, natural stone look.
Planning your coverage
- Net length per piece: ~11 inches once overlapped
- Coverage per box: ~110 inches (about 9.2 feet)
- Tree ring with 10 pieces: ~35 inches diameter (centerline)
If you want a 3‑foot tree ring, a single box is about right. For a 6‑foot ring, plan on two boxes. For borders, sketch your layout and add 10–15% extra for waste and to give yourself flexibility on where you start and end.
Maintenance
Maintenance is minimal:
- Re‑level check after the first freeze–thaw season; tap any proud sections back down.
- Keep mower wheels off the top edge to avoid chipping.
- A quick pass with a trimmer keeps the grass line tidy.
- If efflorescence appears, a light scrub with a stiff nylon brush usually clears it; avoid harsh acids on the surface.
Over time, a light patina actually helps the faux stone appearance; bright, clean concrete tends to look less natural than a weathered surface.
How it compares
- Versus plastic edging: This looks better and holds shape far longer, with no warping or heaving from sun. It’s also heavier and takes more prep.
- Versus resin faux stone kits: Concrete feels more substantial and resists UV better, but it lacks the “click‑together” convenience of some resin systems and may chip under impact.
- Versus real stone: Natural stone offers unmatched authenticity and color variation, and can be dry‑stacked in organic curves. It’s usually pricier, heavier to handle, and slower to install uniformly.
Who it’s for
- Homeowners who want a quick, durable border with a clean, consistent look and don’t mind doing proper base prep.
- DIYers who prefer concrete over plastic for longevity and don’t need a tight, intricate curve radius.
- Gardeners building small tree rings and short runs where a couple of boxes will complete the job.
Who should look elsewhere:
- Anyone seeking a richly variegated, multicolor stone appearance. The colorway here trends largely gray.
- Those who need a mow‑over edge or a low‑profile restraint hidden at turf level.
- Sites with extreme freeze–thaw movement unless you’re committed to a well‑compacted base and occasional re‑leveling.
Tips to get the best result
- Use compacted stone dust as a base, not just soil.
- Dry‑fit the full run before final setting to see where the overlaps land.
- For long slopes, add a bead of landscape block adhesive at the overlaps.
- If curves look segmented, alternate the overlap direction or break the run into two arcs with a small straight between to smooth the sight line.
Recommendation
I can recommend the AERIPULSE faux stone edging with caveats. It’s sturdy, easy to install with basic site prep, and the overlapping design produces tidy, consistent runs and serviceable curves. For small borders and tree rings, one or two boxes transform a bed in an afternoon and will outlast plastic alternatives.
However, the color reads much more uniform gray than “multi‑colored,” and the overlap doesn’t mechanically lock pieces. If your priority is a richly variegated, natural‑stone look or you want a system that clicks together without a prepared base, this won’t hit the mark. If you value straightforward installation, concrete durability, and a clean, understated border—and you’re comfortable doing a proper base—this is a solid, practical choice.
Project Ideas
Business
Seasonal Color-Painted Edging Kits
Buy the 10-pack in bulk and offer custom-painted kits for holidays and seasons (spring pastels, autumn tones, festive holiday palettes). Each kit includes 10 pre-painted stones, installation clips, and quick-start instructions. Sell online (Etsy, Shopify) and at farmers markets to homeowners who want an instant seasonal refresh without landscaping work.
Small-Job Landscaping Add-On Service
Offer an affordable installation service specializing in quick edging jobs: tree rings, garden borders, and small retaining walls using these pieces. Market to busy homeowners and realtors staging homes. Price per 10-piece kit installed (materials + labor) and upsell mulching, planting, or low-voltage lighting.
DIY Workshop & Kit Business
Host weekend hands-on classes teaching customers how to design and install edging projects (paths, tree rings, raised beds). Sell take-home kits that include a 10-pack, adhesive, sand, and a how-to guide. Partner with community centers, nurseries, or garden stores to run recurring classes and generate retail kit sales.
Event & Photo-Set Rentals
Create a rental inventory of pre-installed faux stone borders and modular pieces for wedding venues, pop-up markets, and photo shoots. The stones are lightweight for set dressing and can be arranged to create charming garden vignettes, aisle borders, or booth frames. Charge per-event rental plus delivery and setup.
Wholesale Bundles for Property Managers
Assemble value bundles (e.g., 30–50 pieces) and sell wholesale to HOA managers, small landscape contractors, and apartment complexes for recurring maintenance projects. Offer optional white-labeling or bulk-price tiers, and provide quick-install training videos to reduce their labor time and position yourself as a reliable supplier.
Creative
Modular Mini Retaining Wall
Stack the faux stone edging pieces on their sides to build low, curved retaining tiers for a sloped garden bed or a raised herb spiral. Use landscape adhesive and gravel backfill for stability. The overlapping design makes it easy to create smooth curves and short straight runs; paint or stain accent edges for a two-tone, reclaimed-stone look.
Patterned Garden Path Infill
Lay the edging pieces face-up as repeating pavers to form a narrow garden path or stepping zone. Trim a few pieces to vary widths for a rustic mosaic effect. Press into a compacted base of sand/stone dust and grout joints with polymeric sand for a durable, low-cost pathway that mimics river rock.
Tree Ring + Fairy Garden Combo
Use a ring of the stones to create a decorative tree collar, then convert the inner ring into a whimsical fairy garden—moss, miniature furniture, and succulents. The stones’ natural look provides a believable miniature landscape; glue a few pieces together to form little retaining ledges and terraces for plants and tiny figurines.
Outdoor Table or Bench Trim
Incorporate the edging pieces as a decorative skirt around a DIY concrete or wooden outdoor table base or bench seat. Attach the stones with construction adhesive and fill gaps with matching grout. The faux stone band adds texture and durability to furniture for patios or potting benches.
Upcycled Vertical Garden Panels
Mount several pieces onto plywood panels to create modular vertical planters. Cut drainage holes, line with landscape fabric, add soil pockets and trailing plants. Hang several panels in a staggered layout to make a living wall with a natural stone appearance—great for balconies or small yard partitions.