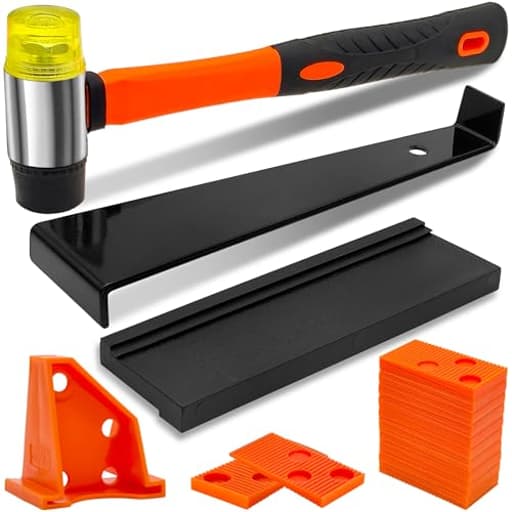
Features
- 【Solid double head rubber mallet】: The double faced non marking solid head of rubber mallet made of high carbon steel with bright chrome plating is securely fastened to non slip rubber grip handle,deliver soft and positive strikes,one side of rubber mallet is one rubber,head which prevent damage to the floor,other side of rubber mallet is a plastic head,rubber grip handle absorb vibration.Easy to use and no risk of falling apart and being bent
- 【6 flooring spacer of stable triangle design】: Made from chemical resistant plastic,easy to meet different gap requirements and make a 1/4 inch,1/3 inch gap from the wall to floor,no need to be pressed to wall,to be taped to wall,it will stand tightly to wall,won’t tilt or fall down,assure less damage on floor with specified spacing
- 【40 wedge flooring spacer with non slip slot】: 40 solid plastic flooring spacer in package,slope design and non-slip design spacer have serrated edge lock spacer into proper position when floor lies against soacer,easy to be placed and taken out,spacer have same size 2-3/8 x 1-1/8 inch
- 【Enhanced heavy pull bar】:Pull bar in laminate flooring tool kit is made from high density metal,ideal for use by wall,corner,lose,tight space,adopt quenching process to treat,corrosion resistant and solid enough for long term use,will not deform at all,felt pad on pull bar protect floor from damage and scratch
- 【Tapping block for different type of floor】:Tapping block with 3 different edge thickness is made from solid polypropylene, complete task of high strength laminate,hardwood,vinyl floor installation without problem,suit tongue&groove floor,click lock floor,1.5mm edge for 3.5mm~5.5mm floor thickness,2.5mm edge for 6mm~3/8in floor thickness,3.5mm edge for 10mm~12mm floor thickness,1.5mm edge with an inclined angle keep floor unmoved while knocking
Specifications
| Color | orange |
| Unit Count | 49 |
A 49-piece flooring installation kit containing the tools needed to install laminate, vinyl plank and click-lock flooring: a double-headed non-marking rubber/plastic mallet with a non-slip handle, a heavy metal pull bar with felt pad, a multi-edge tapping block, 40 wedge spacers and 6 triangular spacers. The tapping block offers three edge thicknesses to match different floor thicknesses (1.5 mm, 2.5 mm, 3.5 mm), the triangular spacers create consistent wall gaps (about 1/4" and 1/3"), and the wedge spacers feature a serrated, non-slip design for secure placement.
Scartink 49 Pack Laminate,Vinyl Flooring Installation Kit,Flooring Tools,Tapping Block for Vinyl Plank Flooring,Pull Bar,Floor Spacers, Rubber Mallet Review
Why I reached for this kit
I tackled two weekend projects with this 49-piece flooring installation kit: about 120 square feet of 5 mm SPC vinyl in a laundry/mudroom and a smaller section of 8 mm click-lock laminate in a bedroom. I wanted a single bundle that covered the essentials—mallet, tapping block, pull bar, and spacers—without overthinking component choices. The Scartink kit did the job, with a few caveats that matter if you’re rough on tools or installing more than a room or two.
What you get and how it fits together
- Double-headed mallet (one rubber face, one plastic), with a non-slip handle
- Heavy steel pull bar with a felt pad on the underside
- Multi-edge polypropylene tapping block (1.5 mm, 2.5 mm, 3.5 mm profiles)
- 40 serrated wedge spacers
- 6 free-standing triangular spacers
The mix is smart: wedges for long walls, triangles for corners or spots where you don’t want to tape spacers to the drywall, and a tapping block that actually matches the profile of common floor thicknesses. I used the 1.5 mm edge on the 5 mm vinyl and the 2.5 mm edge on the 8 mm laminate; both felt snug enough to transmit force without chewing tongues.
Mallet: solid where it counts
The mallet’s dual faces are well chosen. The rubber head is forgiving on LVP and keeps scuffs at bay. The plastic face hits a bit harder, which I preferred with the thicker laminate. The handle has enough texture to stay put when your hands get dusty, and it dampens vibration better than the no-name mallets that often come in budget sets.
A couple of practical notes:
- The head stayed tight—no wobble or creeping out of the collar after several hours.
- The balance is a touch top-heavy, which I actually like for controlled taps.
- Use the rubber side until a joint is nearly closed, then switch to plastic for a firm finish if needed. Overstriking any of these components is a shortcut to damage.
Tapping block: useful profiles, modest durability
The profile options are the highlight. Being able to match the block’s edge to your flooring thickness means fewer crushed tongues and more energy delivered through the plank. The 1.5 mm edge with a slight incline kept my plank from walking as I worked down each seam.
Durability is decent for DIY use. After the laminate room, the block’s corners showed some mushrooming and light chipping—nothing catastrophic, but enough that I’d avoid high-angle, heavy blows. Polypropylene isn’t meant to be abused like hardwood or UHMW blocks; use it as intended and it lasts. If you run into a stubborn board, step up force gradually rather than jumping straight to “full send.”
Pro tip: keep the block parallel to the seam and move along the full length with lighter taps instead of pounding one spot. You’ll close joints more cleanly and extend the block’s life.
Pull bar: effective, with limits
The pull bar is heavy, slim enough to sneak behind baseboards, and the felt pad is a thoughtful touch to prevent scuffs. It shines for the last row and under door jambs. I used the plastic face of the mallet on the bar and got consistent results.
Where it falls short is the metallurgy compared to pro-grade bars. After a day on laminate, the striking end showed slight peening and the hook picked up minor scuffs—not bent out of shape, but you can tell it isn’t hardened to the same level as premium bars. It’s fine for a couple of rooms if you use clean, square hits. If you try to muscle misaligned planks with wild swings, you’ll accelerate wear or risk bending.
Two tips:
- Keep grit off the felt. Grit is sandpaper; it will scratch your floor. A quick wipe before each use paid off.
- If the felt adhesive starts to lift after repeated hits, a strip of strong tape or a dab of contact cement keeps it in place.
Spacers: plenty of wedges, clever triangles
I really liked the wedge spacers. The serrations lock against the plank edge so they don’t shoot out when the floor shifts, and you get enough of them to run multiple stretches at once. A few had a bit of molding flash; a quick cleanup with a utility knife made them consistent.
The triangular spacers are underappreciated. They stand on their own and maintain a consistent gap without needing tape. They’re particularly good in corners where three surfaces meet. They provide approximately 1/4 inch and 1/3 inch offsets, which covers most manufacturer expansion requirements. The 1/3 inch side is a bit generous for thin baseboards, so I mainly used wedges to dial in exactly 1/4 inch along long runs, and parked the triangles in corners.
Real-world performance and workflow
- Vinyl install: Light taps with the rubber mallet and the 1.5 mm block closed seams cleanly. The block’s slight incline helped prevent the plank from creeping. The wedges stayed put while I worked the length of each row.
- Laminate install: Slightly more force was needed, and the plastic mallet face helped. The pull bar was essential on the last row; no marring thanks to the felt, though I did check for grit religiously. After finishing, the tapping block’s working faces showed wear but still usable for another small job.
I didn’t experience any catastrophic failures, but this kit does not forgive bad technique. If you try to correct big misalignments with brute force, you’ll chew edges or deform parts. Measured taps and proper sequencing go a long way.
Build quality, ergonomics, and omissions
- Ergonomics: The mallet handle is comfortable and non-fatiguing for a few hours. The pull bar’s length gives reasonable leverage without feeling unwieldy in tight spots.
- Materials: Good for DIY duty cycles. Expect cosmetic wear on the metal and plastic parts over time; it’s normal at this price point.
- Nice-to-have that’s missing: a storage pouch. You’ll likely end up rubber-banding spacers and tossing everything into a toolbox.
Tips to get the most from the kit
- Prep the subfloor: Flat, clean, and dry makes every tool more effective.
- Start gentle: Close gaps with multiple light taps across the seam rather than hammering one spot.
- Keep the block flush: Any angle invites chipping and tongue damage.
- Protect finishes: Wipe the pull bar’s felt frequently, and consider a scrap of underlayment under it on delicate floors.
- Mind expansion: Use wedges for long runs and triangles in corners; confirm the gap your flooring manufacturer calls for.
- Safety: Wear eye protection. Even mild chipping from the block can send fragments flying.
Who this kit suits
- Ideal: Homeowners and DIYers installing a room or two of LVP, laminate, or click-lock flooring who want a complete, functional set without hunting for individual pieces.
- Less ideal: Full-time installers or anyone tackling a whole-house project. If you’re on your knees with a pull bar all week, you’ll want heavier-duty components.
The bottom line
The Scartink kit covers the essentials and works as intended when used with reasonable care. The mallet is better than expected, the multi-edge tapping block is genuinely useful, the pull bar is effective with measured strikes, and the spacer assortment is practical. Durability is DIY-grade: components show wear if you push them hard, but they’ll comfortably see you through a couple of rooms.
Recommendation: I recommend this kit for homeowners tackling small to medium flooring projects who value convenience and a sensible tool mix. If you’re a pro or plan on repeated, heavy use, invest in a higher-spec pull bar and a beefier block, but for weekend installations, this set delivers what you need without fuss.
Project Ideas
Business
Small-Job Flooring Specialist
Offer a niche service for small installs and repairs (single room replacements, patch repairs, rental turnovers). The 49-piece kit is portable and covers the core needs—tapping block for snug seams, pull bar for tight end joints, and spacers for consistent gaps—letting you turn jobs quickly and reduce overhead. Market to landlords, Airbnb hosts, and busy homeowners who need fast, affordable fixes.
DIY Installation Workshops
Run hands-on classes teaching homeowners how to install click-lock laminate/vinyl flooring. Use the kit in every student station so attendees learn proper tapping, pull-bar techniques, and spacer placement. Monetize through ticket sales, sell starter kits at the class, and upsell installation-grade materials or follow-up on-site consultations.
Flooring Repair & Emergency Service for Property Managers
Create a subscription or on-call service for property managers and short-term rental operators to handle quick flooring repairs between tenants. A compact kit lets a technician fix loose planks, replace damaged boards, and maintain expansion gaps without large crews. Offer bundled pricing for recurring maintenance contracts to generate steady revenue.
Custom Upcycled Décor Line
Collect leftover or discontinued vinyl/laminate planks and turn them into small decor products—coasters, framed mosaics, shelf faces, or accent trays. The tapping block and mallet aid in precise assembly; spacers can be repurposed as design elements. Sell online, at craft fairs, or wholesale to boutique home stores as sustainable, room-matching accessories.
Tool Rental + Training Package
Offer short-term rentals of a pro-grade flooring kit plus an optional 1-hour on-site walkthrough for DIY customers. Many homeowners want to save by installing themselves but lack confidence in technique; pairing the kit rental with a quick training session (how to use the tapping block, pull bar, and spacers correctly) increases customer success and reduces call-backs. Charge rental fees plus a refundable security deposit and optional damage waiver.
Creative
Reclaimed-plank Accent Wall
Use click-lock vinyl or laminate planks (new or reclaimed) to build a floating accent wall. The tapping block and rubber/plastic mallet let you snug panels together without marring the surface; triangular spacers keep a consistent reveal at the ceiling and baseboard for a finished look. Cut and stagger plank lengths for a weathered, shiplap effect and finish with trim or a thin metal edge for a modern touch.
Interlocking Play/Workout Mat
Create a removable, attractive playroom or garage workout mat from vinyl plank pieces joined as a floating floor. The wedge spacers maintain consistent gaps for expansion, while the pull bar and tapping block ensure tight seams. Make modular sections that lock together and can be disassembled for storage or transport—add foam backing or adhesive dots for slip resistance.
Decorative Wall Panels & Headboard
Cut vinyl or laminate planks into patterns (herringbone, chevrons, geometric tiles) to cover a headboard or decorative wall panels. The three-edge tapping block helps assemble pieces precisely without damaging edges; spacers provide consistent grout-like reveals if you want visible separations. Seal or coat the finished panel for durability and hang as lightweight art.
Floating Shelves & Bench Tops from Offcuts
Glue and clamp plank offcuts together to make small floating shelves, an entryway bench top, or a console surface. Use the tapping block to align tongue-and-groove edges during dry-fit assembly and the mallet for gentle tapping when joining pieces. Finish edges with trim or routed hardwood for a polished look—ideal for matching flooring in a room.
Mosaic Flooring Art Panels
Design small mosaic panels or framed art from varied-color vinyl plank offcuts (mixed thicknesses). The kit’s tapping block and mallet let you fit pieces tightly into a substrate panel; spacers can be used to create even spacing for a grouted appearance or to intentionally offset tiles. Sell as custom, room-matching wall art or use as accent pieces in kitchens and bathrooms.