Features
- Sturdy Construction: These leg mounting plates are made of heavy-duty metal for industrial-strength durability and stability.
- Versatile Design: With a 12-degree angled design, these plates can be used for mounting table or furniture legs at various angles.
- Easy Installation: The simple hardware design allows for quick and hassle-free attachment of legs to furniture pieces.
- Multi-Purpose: Suitable for mounting legs on tables, chairs, cabinets, and other furniture items.
- Dimensions: Each plate measures 2.7 inches in length and 2.6 inches in width
Specifications
| Color | Silver |
| Size | 4 Pack |
| Unit Count | 4 |
Related Tools
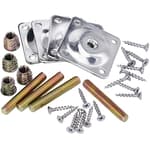
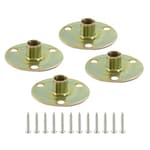
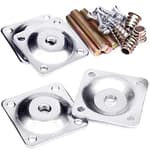
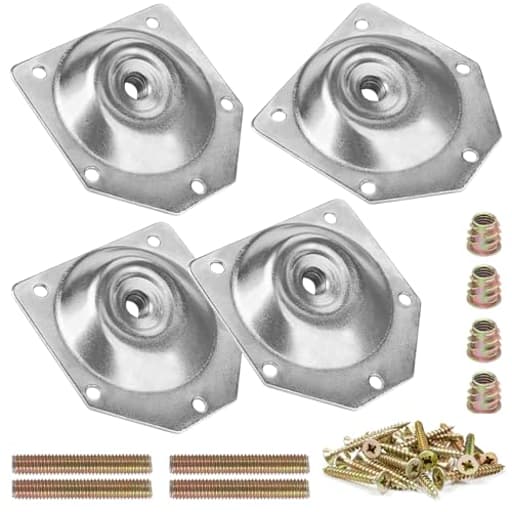
Heavy-duty metal leg mounting plates for attaching furniture legs to tables, chairs, cabinets and other pieces. Each 2.7" × 2.6" T-plate has a 12° angle for mounting legs at an incline, providing a durable, stable connection and allowing straightforward installation.
HUTLON 4 Pack Leg Mounting Plates, Furniture Leg Attachment Plates, 12 Degree Angled Metal Table Leg Mounting Hardware, Furniture Leg Mounting Brackets Industrial Strength T-Plate Review
Why I reached for these mounting plates
I picked up the HUTLON mounting plates to solve two common shop problems: rescuing a mid-century side table with missing hardware and adding splayed legs to a small storage cabinet without building a full apron. The promise here is straightforward: a compact, metal plate with a fixed 12° angle that lets you mount legs cleanly and repeatably. After using the full four-pack across those two projects, I’ve got a good read on what these plates do well, where you’ll want to be cautious, and a few practical tips to get the best results.
What’s in the kit
Each kit includes four silver plates, matching wood screws, and a set of threaded rods and inserts for attaching legs that don’t already have hanger bolts. The plates themselves are small—about 2.7 by 2.6 inches—so they disappear under most furniture without crowding your layout. Each plate has multiple screw holes (five on mine), which gives decent holding power even in plywood and MDF. The hardware felt appropriately sized for typical cabinet and furniture substrates; I didn’t have issues with screws poking through 3/4-inch material.
Worth noting: the included threaded studs and inserts are metric (M8). If your legs already have imperial 5/16"-18 bolts installed, plan to either use the supplied hardware (install inserts in the legs) or source bolts to match your legs and tap. More on that in the compatibility section.
Build quality and finish
These are marketed as heavy-duty, and while I wouldn’t call them indestructible, they are thicker and stiffer than the flimsy plates you often find in hardware bins. I couldn’t flex them by hand, and they didn’t deform under the typical torque of tightening the leg bolts. The edges were clean with no burrs, the finish was even, and the angled boss (the part that creates the 12° tilt) is machined or formed consistently across the pack. That consistency matters—you want the same tilt on all four legs or your piece will sit awkwardly. In my set, angle consistency checked out.
Installation experience
Setup is straightforward if you follow a couple of rules:
Choose orientation first. Rotate the plate so the 12° tilt points the way you want the leg to splay. For a cabinet, I oriented the plates so front and back legs splayed outward from the centerline; for a corner placement on a small table, rotating the plate 45° gave a nice, even mid-century look.
Mark and drill pilots. These plates have enough screw holes to hold firmly; pilot holes prevent splitting and help keep the plate seated. I drove the included screws by hand to avoid stripping in softer woods.
Decide how you’re attaching the legs. If your legs don’t have bolts, install the supplied threaded insert into the top of the leg, not into the furniture base. Because the stud enters the leg at an angle, putting the insert in the base won’t line up. Pre-drill accurately, use a dab of paste wax on the insert, and drive it straight to avoid blowout.
Dry-fit before final assembly. Thread in the stud, check that the leg seats flush to the plate without wobble, then commit. The 12° angle makes tiny misalignments more obvious, so the dry-fit step saves headaches.
Everything went smoothly on both projects. The plates registered flat, screws bit cleanly, and the angled interface pulled the legs snug without gaps. If you’ve worked with “universal” plates that require shims or cheats to get the right tilt, the fixed-angle design here eliminates that fuss.
The 12° angle in practice
Twelve degrees is a Goldilocks angle for most mid-century or modern builds: enough splay to look intentional and increase footprint, not so much that the legs stick out and catch toes. With four legs set to that angle, both pieces felt planted and resisted racking. The tilt also lets a shorter leg feel visually lighter while maintaining stability—a plus for low coffee tables and stools.
A tip for repeatability: make a simple cardboard template that shows the plate’s rotation for each corner. Transfer the same rotation to every corner, and your leg splay will match perfectly.
Stability and load handling
On my side table and cabinet, the plates felt solid. They didn’t creep or loosen under use, and there was no hint of bending under typical loads. The multiple screw points distribute stress nicely across the base material. That said, there are limits inherent to compact plates and angled studs:
If you’re mounting very heavy legs (thick hardwood blanks) under a hefty solid-wood top, these plates become the weak point before the wood does. I’d call them light- to medium-duty for tables, excellent for cabinets, small benches, stools, and side tables.
For big dining tables or live-edge slabs with long legs, consider larger plates, a proper apron with mortise-and-tenon joinery, or supplemental corner blocks to share the load.
Use common sense: the more leverage a long, heavy leg can apply to a small plate, the more robust your attachment strategy needs to be.
Compatibility and thread considerations
Out of the box, the supplied studs and inserts are metric M8. That’s ideal if you’re starting with bare legs or purchasing new legs that ship with M8 hardware. If your legs already have 5/16"-18 hanger bolts, you have three options:
1) Swap to the included M8 system by removing the old bolt and installing the provided insert.
2) Source M8-to-5/16" adapters or matching bolts that suit your legs’ existing thread.
3) Tap the plate to match your bolt—doable, but only if you’re set up to do it cleanly.
I stuck with the provided M8 hardware for fresh legs and had zero issues. Just confirm thread compatibility before you start; mixing pitches will feel like a tight fit at first but can damage threads.
Practical tips for a cleaner install
- Pre-drill for inserts carefully and use a depth stop; angled entry into the leg can magnify small alignment errors.
- Wax screws and inserts—it reduces tear-out and helps parts seat fully.
- If you’re mounting to plywood, place screw holes so they cross plies, not run parallel to a veneer, for better bite.
- On softwoods or MDF, consider upgrading to slightly longer or thicker screws if your substrate is thicker than 3/4 inch, but maintain clearance to avoid blow-through.
- For very tall legs, add discreet corner braces inside the case to reduce racking forces on the plates.
Where these plates shine
- Restorations where original angled brackets are missing
- Quick bases for cabinets and credenzas
- Coffee tables, side tables, plant stands, and footstools
- Prototyping modern designs without committing to permanent joinery
They’re compact, predictable, and the 12° angle yields a professional-looking stance with minimal layout time.
What could be better
- Clearer labeling on thread spec and a note about inserting into the leg would save confusion.
- A heavier-gauge option for large, heavy tables would round out the line.
- Slotting one or two screw holes could allow micro-adjustments to square the leg after initial placement.
Bottom line
The HUTLON mounting plates did exactly what I needed: provide a sturdy, clean, and repeatable way to mount angled legs without building complex joinery or fussing with shims. The plates are well-made for their size, the angle is consistent, and installation is straightforward if you pay attention to orientation and thread compatibility. They’re a smart, time-saving solution for light- and medium-duty furniture builds and restorations.
Recommendation: I recommend these for DIYers and pros working on cabinets, small tables, stools, and mid-century-style projects where a 12° splay is desired. They deliver solid stability, tidy installs, and good value, provided you match the thread spec and don’t ask them to carry oversized, heavy legs under massive tops. For that class of project, step up to larger plates or traditional joinery. For everything else in the small-to-midsize category, these plates are a dependable, easy win.
Project Ideas
Business
Splayed‑Leg Furniture Line
Launch a small furniture collection (coffee tables, benches, nightstands) that uses the 12° plates as a signature detail. Emphasize consistent craftsmanship, premium woods, and customizable finishes. Market on Instagram, Etsy, and local design markets; start with limited runs and scale by offering made‑to‑order options.
DIY Leg Replacement Kit
Create and sell retrofit kits: 4 plates, pre‑cut tapered legs (various wood species/lengths), screws, and a drilling jig with step‑by‑step instructions or video. Target makers, thrift upcyclers, and homeowners. Sell kits online, bundled with tutorial videos and templates.
Refurb & Retrofit Service
Offer a local service to repair and modernize customer furniture by replacing legs with angled mounts. Pitch to landlords, cafes, and boutique shops that want refreshed furnishings fast. Charge per piece with optional pickup/delivery and upsell refinishing or upholstery.
Hands‑On Workshop Series
Run paid weekend workshops teaching participants how to build a splayed‑leg table or bench using the plates. Include a kit fee covering hardware and materials. Workshops are revenue generators and marketing opportunities—students often post finished pieces on social media, driving referrals.
Bulk Supply & Installation for Commercial Projects
Sell plates and pre‑assembled leg modules to interior designers, boutique hotels, cafes and coworking spaces building custom furniture at scale. Offer volume discounts, custom powder‑coating of plates, and on‑site installation or assembly services for contractor clients.
Creative
Mid‑Century Splayed Coffee Table
Build a low coffee table with a walnut or oak top and four splayed legs mounted at 12°. The plates guarantee identical angles for a classic mid‑century look. Use tapered round or square legs, hidden pocket screws for a clean underside, and finish with Danish oil or lacquer.
Angled Plant Stand Tier
Make a tiered plant stand with staggered platforms and splayed legs for a stable, sculptural piece. The 12° plates ensure the legs flare outward consistently, increasing weight distribution for heavy pots. Great for indoor/outdoor use with treated lumber or cedar.
Retro Chair Refit
Give old chairs a modern revival by replacing damaged legs with new ones attached using the 12° plates. Because the plates are compact and robust, you can retrofit bent or missing legs without rebuilding the seat—fast way to upcycle thrift-store finds into stylish seating.
Slanted Bedside Nightstand
Design a small nightstand with an angled leg aesthetic—slightly flared legs and a drawer set into a minimalist box. The plates make aligning the legs easy and keep the piece stable even with the lighter footprint of a bedside table.
Angled Bench for Entryway
Craft an entryway bench with a long solid-wood top and four splayed legs mounted with the plates. Add a lower shelf for shoes. The 12° flare lends mid‑century character while the heavy-duty plates handle daily load from sitting and storage.