Features
- PLEASE PROVIDE THE MODEL AND SERIAL NUMBER OF YOUR WATER HEATER TO CONFIRM THAT THIS IS THE CORRECT GAS VALVE AND WILL FIT YOUR UNIT PROPERLY.
Specifications
| Energy Efficiency Class | Efficient |
| Color | White |
| Size | Pack of 1 |
| Unit Count | 1 |
Related Tools
Replacement natural gas control valve and thermostat assembly for residential water heaters. It regulates gas flow to the burner and provides temperature control and safety shutoff; verify your water heater’s model and serial number to ensure correct fit.
Reliance Water Heater Natural Gas Control Valve 100112336 Thermostat Compatible with A.O. Smith, Reliance, State, and American Branded Water Heaters Review
Why I replaced the control valve—and what happened next
A blinking status light on my aging, but otherwise healthy, water heater was the nudge I needed. Five flashes, pause, repeat: temperature sensor fault. The burner would light, then shut down. I’d already verified a strong pilot and decent draft, so the next suspect was the gas control valve/thermostat assembly. I swapped in the Reliance gas control valve and was back to steady hot water the same afternoon.
This review walks through what I found installing and living with the new control, where it shines, and what to watch out for before you buy.
What it is and who it fits
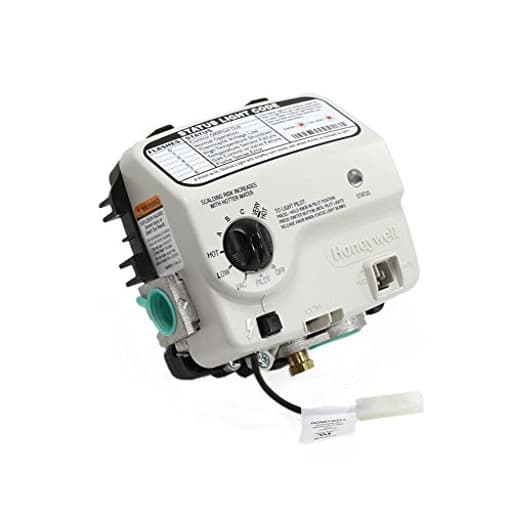
This is a natural gas control valve and thermostat assembly commonly used on residential tanks branded A. O. Smith, State, American, and Reliance. It’s the white-top electronic control with LED diagnostics, temperature knob, and built-in safety cutoffs. It replaces the 100112336-style controls found on many 40–50 gallon atmospheric-vent heaters.
Compatibility is the biggest variable here. Even within the same brand and capacity, there are multiple valve variants. Do not buy on looks alone. Use the model and serial number printed on your water heater’s data plate to confirm the exact match before ordering. If you’re working with a supplier or support line, have those numbers ready; they can verify whether this is the correct natural gas version for your tank. Also note: this is natural gas only—if you have propane (LP), you need the LP-specific control.
Installation: straightforward if you’re comfortable with gas and plumbing
If you’ve replaced one of these before, the process is familiar; if not, it’s very doable with patience and the right precautions. My steps:
- Shut off the gas at the appliance valve and at the control.
- Turn off the cold supply and drain the tank to just below the control’s tapping. Draining a few gallons is typically enough, but I confirmed by loosening the old valve a quarter turn to see if water weeped—then drained a bit more.
- Label and disconnect the burner tube, pilot tube, and thermopile/thermistor leads. A pair of open-end wrenches helps prevent twisting the soft tubing.
- Back out the old control with a large adjustable or pipe wrench.
- Apply a thin, even coat of gas-rated pipe thread sealant (not standard Teflon tape) to the new valve’s threads.
- Thread the new control in by hand, then snug with a wrench. Don’t over-torque; you’re sealing threads, not pressing a flange.
- Reconnect lines and wires, taking care not to cross-thread the compression fittings. Replace any brittle grommets or gaskets at the burner compartment.
- Turn gas back on, leak-test all joints with a soapy solution (look for bubbles) or a gas leak detector, then follow the lighting instructions on the control to establish a pilot and main burner.
- Set the temperature to 120°F (the “hot” mark on most dials), then give the tank time to recover.
From shutoff to flame, I spent about 30 minutes, most of it draining and cleaning up. If you’re unsure at any step—especially gas leak testing—bring in a licensed pro. Combustion safety is not the place to wing it.
Performance and behavior after the swap
The new control lit the pilot immediately and brought the burner online without hesitation. Diagnostics are clear: a single green flash for normal operation, identifiable multi-flash codes for faults. After a week of showers, laundry, and dishwashing, the temperature regulation was consistent. On my unit, the “hot” setting measured around 122–124°F at the tap, which is right where it should be. Recovery times were in line with the tank’s specs—no change there, nor should there be, since this control doesn’t alter BTU input.
Noise and cycling were normal. Burner on-times were more predictable than with the failing control; short-cycling disappeared. I also appreciate the integrated safety ECO (energy cut-off) functionality and lockout logic. If the control senses an overheat condition, it locks for safety—annoying when you’re mid-shower, but exactly what you want from a safety device.
A note on the flame arrestor and combustion air: if your heater lives in a dusty space, take the opportunity to vacuum the intake screen and chamber while you’re in there. A starved burner can mimic control issues. With a clean arrestor plate, the flame pattern was steady and blue.
Build and ergonomics
The housing is the familiar white polymer top with a textured temperature knob. The LED is bright enough to read status codes even under a dim basement bulb, and the printed legend on the control is legible. The wiring connectors are keyed; pilot and burner tubes seat securely without fuss. It’s an OEM-style fit—the alignment with the tank tapping and burner manifold was exact on my heater.
Is it rugged? As rugged as these controls get. They’re not meant to be abused, but the enclosure shrugs off the occasional bump during installation. If there’s a weak link across the category, it’s that the electronics live in a warm, sometimes humid environment; failures do happen as heaters age. This replacement brought my tank back to life with no rework needed.
What I liked
- Compatibility with common AO Smith/State/American/Reliance tanks, provided you verify your model and serial number first.
- Clear LED diagnostics that make it easier to separate pilot, thermopile, and sensor faults.
- Predictable temperature control; it held a safe and steady 120°F setting.
- Installation is straightforward with basic tools and careful leak testing.
- An easy way to extend the life of a sound tank without jumping to full replacement.
What could be better
- Out-of-box failures do occur with gas controls in general. I didn’t hit one, but I recommend buying from a source with a no-hassle return policy in case yours is DOA.
- Documentation can be generic. It covers lighting and codes well, but a few models have small routing differences for pilot/burner tubing that new installers might appreciate seeing illustrated.
- This is NG-specific; if you have LP, you’ll need to be extra careful to source the correct version. Mixing them is unsafe.
Diagnosis tips before you replace
- Read the status LED code with the original control. Five flashes commonly indicates a temperature sensor fault inside the control; no flame signal points more toward a pilot/thermopile issue.
- Check the thermopile output with a millivolt meter if you can. A healthy pilot should give you a few hundred millivolts; if it’s weak, clean the pilot orifice before blaming the control.
- Inspect the combustion air path and arrestor. Restricted airflow can cause weak flame and nuisance shutdowns.
- If the tank itself is leaking or heavily corroded, don’t bother. A new control won’t save a failing vessel.
Buying and compatibility advice
Have your heater’s model and serial number in hand before you order. Use those to confirm that this Reliance gas control valve is the correct match for your specific tank. Natural gas versus LP matters, as do subtle revisions between production runs. If you’re purchasing online, choose a seller that will verify fitment and stand behind returns. It’s also worth ordering a new burner door gasket if yours looks compressed or brittle—you’ll need a clean seal to maintain FVIR safety.
Who it’s for (and who it’s not for)
- For: Homeowners or pros dealing with a failed control on a compatible natural-gas atmospheric water heater, where the tank is otherwise sound. If you’re comfortable with gas piping, leak testing, and following lighting procedures, this is a practical repair.
- Not for: Conversions (NG to LP), sealed-combustion or power-vent models that use different controls, or tanks showing signs of vessel failure. Call a pro if you’re unsure about gas safety.
Final recommendation
I recommend the Reliance gas control valve as a reliable, OEM-style replacement for compatible natural gas tanks from A. O. Smith, State, American, and Reliance. In my case, it solved an intermittent shutdown with clean installation, accurate temperature control, and clear diagnostics—exactly what you want from a replacement part. Just make sure you confirm compatibility with your heater’s model and serial number before buying, and source it from a seller who supports returns in the rare event of an out-of-box failure. If your tank is in good shape, this control is a sensible, cost-effective way to restore safe, consistent hot water without replacing the entire heater.
Project Ideas
Business
Refurbish & Resell Parts
Source replacement valves from service calls and retired units, test and refurbish them (replace seals, verify thermocouple ports), and resell with clear compatibility listings and a short warranty. Offer an online compatibility lookup where customers enter their water heater model and serial number to confirm fit.
Same-Day Emergency Replacement Service
Stock common valve models and partner with local plumbers/HVAC techs to offer rapid on-site replacement for failed water heater gas valves. Market to property managers and landlords who need minimal downtime. Provide professional installation and safety certification—always emphasize compliance and professional installation.
Upcycled Home-Decor Product Line
Develop a branded line of lamps, clocks, and wall art made from permanently decommissioned valves and thermostat components. Sell via Etsy, local markets, and boutique home stores. Include product backstories and a safety/disclaimer card explaining that pieces are non-functional and gas fittings have been sealed.
Workshops & DIY Art Kits
Run hands-on workshops teaching people how to safely convert decommissioned valves into decor (lamps, clocks). Sell DIY kits that include a sealed valve, mounting hardware, a clock movement or lamp kit, and step-by-step instructions. Offer separate professional training modules for technicians on valve identification, testing, and safe disposal.
Creative
Steampunk Thermostat Lamp
Turn the valve body into an industrial lamp base: seal all gas ports, remove internal gas components or use a permanently decommissioned valve, mount a pendant or Edison-style bulb on top, and reuse the thermostat dial and knobs as decorative controls. Finish with brass/antique patina and a cloth-covered cord for a boutique steampunk look. (Safety: do not reconnect to gas; use only properly decommissioned parts.)
Industrial Wall Clock
Use the valve face as a unique clock dial. Fit a battery quartz clock movement through the center, repurpose the thermostat dial markings as hour indicators, and attach the original knob as a decorative center. Seal/blank any gas fittings and mount on a reclaimed wood backer for a rugged, HVAC-themed wall piece.
Safe HVAC Demo Unit
Create a classroom/demo model to show how a gas control valve and thermostat work, using a cleaned, permanently decommissioned valve. Replace gas internals with low-voltage sensors, LEDs, and a small microcontroller to simulate ignition sequence and safety shutoff. Ideal for trade-school demos—include clear labeling and a plexiglass cover so students can see internal parts without risk.
Modular Industrial Sculpture / Hooks
Assemble multiple valves into a modular art piece or functional coat rack. Weld or bolt valves to a metal frame, add patina or powder-coat accents, and use valve handles as hanging points. This yields durable, conversation-starting decor for cafes, studios, or retail spaces.