Features
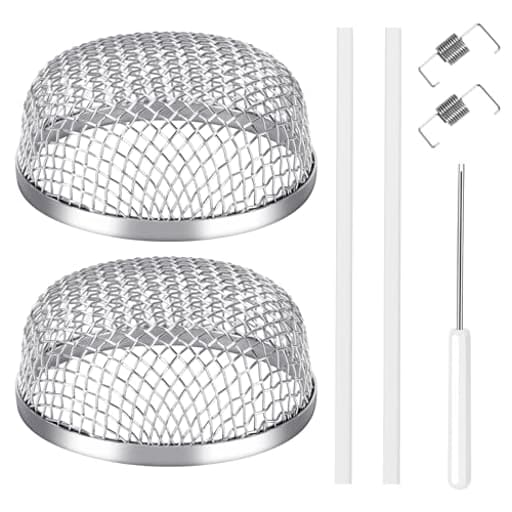
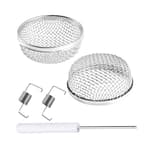
- Hassle-Free Installation: Our package includes 2 stainless steel mesh screens, 2 spring hooks, 2 silicone rubber strips, and 1 installation tool for easy installation
- High-Quality and Versatile: Our stainless steel screens promise durability and adaptability, fitting most Duo-therm and Suburban furnace vents. The 2.8-inch diameter and 1.3-inch depth aims to keep out the smallest insects with a 0.12-inch mesh size
- Reliable Protection from Insects and Vermin: Safeguard your RV from roaches, mice, wasps, and birds with our RV Furnace Vent Screen. It prevents flying insects from invading your living space, keeping your RV clean and your outdoor adventures comfortable
- Optimal Airflow with Scientifically Designed Mesh - Our transparent and breathable metal mesh allows for excellent airflow while effectively preventing bugs from entering. Enjoy fresh air in your RV without worrying about unwanted guests
- Rust and Corrosion-Resistant - Built with premium stainless steel mesh, our RV Furnace Vent Screen guarantees optimal protection against rust and corrosion. Invest in long-lasting and dependable defense for your RV heating vents with TONDA
Specifications
| Color | Round |
| Unit Count | 2 |
Related Tools
Stainless-steel mesh furnace vent screens for RVs (2-pack) that cover exterior heater vents to block insects and small vermin while permitting airflow. Each 2.8-inch diameter, 1.3-inch deep screen with 0.12-inch mesh includes spring hooks, silicone rubber strips and an installation tool, and is designed to fit most common RV furnace vents.
TONDA RV Furnace Vent Screen, Bug Screens Heater Vent Cover for Camper with Installation Tool and Silicone Rubber, 2.8 x 1.3 Inch, 2 Pack Review
Why I added vent screens to my RV
A tiny circle of mesh can be the difference between a peaceful shoulder season and a furnace packed with wasps, stink bugs, or nesting debris. After one spring of evicting pests from my RV furnace exhaust, I decided to install a pair of TONDA vent screens. They’re simple stainless-steel guards designed to keep insects and small vermin out while letting the furnace breathe. After several trips—including a long highway run and a couple of wet weekends—I’ve got a good sense of how they install, how they hold up, and if they affect furnace performance.
What’s in the kit
The kit includes:
- Two stainless-steel mesh screens (about 2.8 inches in diameter, 1.3 inches deep)
- Two spring hooks to secure the screens to the vent crossbars
- Two silicone rubber strips that serve as protective edging
- A small installation tool for tensioning the springs
The parts are straightforward, and the mesh is a sensible size (roughly 0.12-inch openings) that blocks insects without obviously choking airflow. The silicone edging is more than a nicety—it protects the RV’s exterior from scuffs and helps the screens grip securely.
Build quality and design
The stainless mesh feels appropriately rigid without being brittle. The edge is clean, and once the silicone strip is fitted, it looks tidy and deliberate rather than like an afterthought. The springs have enough tension to seat the screens firmly against the vent without deforming the mesh. After rain, highway spray, and a coastal stop, I haven’t seen any rust blooms or discoloration on the mesh.
Because the screens are round and fairly shallow, they tuck in close and don’t shout “aftermarket add-on.” The profile is low enough that I’ve had no snags with covers or brush.
Installation: simple, not mindless
The process is conceptually simple: wrap the silicone edge around the rim of the screen, thread a small spring through the mesh, and hook the other end of the spring to the “X” crossbars inside the furnace vent. The included hook tool helps you grab those crossbars without shredding your knuckles.
A few practical tips from my install:
- Test-fit the screen first to confirm orientation and ensure the silicone edge is fully seated all the way around.
- Thread the spring through the mesh with the open end of the coil facing the screen. That keeps the coil centered and reduces the chance of it popping free during tensioning.
- Use the tool through the screen and coil to grab the vent crossbar. Seat the coil roughly in the center of the screen as you tension it.
- Keep gentle, steady tension on the spring as you engage the crossbar; jerky pulls are what bend mesh.
- If your vent has thicker or oddly positioned crossbars, you might need to slightly pinch the hook end of the spring with pliers for a snugger bite.
On my Suburban furnace vent, the fit was spot on. The first screen took a few minutes of trial and error, mostly to get the spring tension right without over-tightening. The second went on in under a minute once I had the technique down. I did appreciate the silicone edge—besides protecting paint, it helps the screen stay put and prevents the metal-on-metal squeak you sometimes get with bare mesh.
My only complaint is that the kit doesn’t include printed instructions. A quick reference card with a diagram would eliminate most of the fumbling.
Fit and compatibility
These are designed to fit common round RV furnace vents—think many Duo-Therm and Suburban models. At 2.8 inches in diameter and 1.3 inches deep, they matched my application exactly. If your vent is shallower or has an oblong housing, double-check measurements before you commit. While the screens can also physically fit some other round vents on an RV (like certain appliance vents), I stuck to the furnace exhaust/intake assemblies they’re intended for.
The springs connect to the vent’s internal crossbars, so you do need those to be accessible and appropriately oriented. If your vent’s geometry is unusual, be prepared to adjust the hook or consider a different attachment method. I did a dry run and confirmed clearance around the opening so that the screen doesn’t interfere with any moving covers.
Airflow and furnace performance
I was wary of anything that might restrict combustion air or exhaust. After installation, I ran the furnace through multiple cycles. I didn’t observe longer run times, short cycling, or ignition hiccups. On the road, including a roughly 1,000-mile trip with elevation changes and gusty crosswinds, operation remained normal. There were no rattles, no whistling, and no carbon monoxide alarms. I also checked the exterior vent for signs of sooting or backdraft stains after a few long burns and found none.
The mesh is open enough to pass exhaust gases and draw make-up air while still blocking the bigger offenders—paper wasps, stink bugs, ladybugs, and windblown debris. If you let leaves or pet hair accumulate on the screen, you can create your own restriction, so a quick glance during walk-arounds is sensible.
On-the-road durability
After multiple rainstorms and two highway stints, the screens stayed tight. The springs didn’t stretch or slip, and the silicone edging didn’t creep off the rim. I checked them after a particularly rough, washboarded campground road and found no change in tension. The mesh will “ring” if you flick it, but I haven’t heard any vibration or jingling under normal driving or furnace operation.
As with any exterior accessory, periodic inspection is smart. A soft brush or a quick shot of compressed air clears dust. I’d avoid pressure washing directly at the mesh to keep from deforming it.
Safety notes
- Don’t stack aftermarket accessories over the screen (like caps or guards) that could create backpressure.
- Keep the mesh clear of cobwebs and lint, especially if you travel with pets.
- If you suspect any furnace performance issues after installation—delayed ignition, soot, or unusual odors—remove the screens and re-test, then consult a technician.
The screens themselves don’t change the furnace’s clearances, but they do add an extra surface where debris can settle, so “inspect and clean” becomes part of your routine.
What I’d improve
- Include a one-page instruction sheet. The learning curve is short, but clear guidance would prevent frustration.
- Slightly narrower spring tips would make hooking certain crossbars easier.
- An extra spring in the box would be welcome insurance for those of us who launch one into the gravel now and then.
None of these are dealbreakers, and the included installation tool is a thoughtful touch that reduces the need to improvise.
Value
As a two-pack, the TONDA vent screens are a cost-effective preventative measure. Compare that to the time and money of removing nests, dealing with blocked exhaust errors, or repairing heat damage, and the math is easy. The stainless build and silicone edge make them feel more premium than some bare-wire alternatives I’ve used in the past.
Who they’re for
- RV owners storing or camping in insect-heavy regions
- Anyone who has dealt with wasp or stink bug infestations around furnace vents
- People comfortable with a five-minute DIY install and periodic visual checks
If your vent design is atypical or rectangular, you’ll want a different style of guard. And if you’re not comfortable assessing furnace performance after modifications, have a tech take a look.
Final take
The TONDA vent screens do exactly what I hoped: keep pests out without compromising furnace operation. They’re sturdy, low-profile, and weather-resistant, and once you get the hang of the spring tool, installation is straightforward. The silicone edging elevates the fit and finish and helps protect your rig’s exterior.
Recommendation: I recommend these screens. They’re an inexpensive, durable safeguard against a common and costly nuisance, with solid build quality and user-friendly touches. A simple instruction sheet would make the first install smoother, and the spring hooks could be slightly refined, but those are minor quibbles. If your furnace vents match the dimensions and style, these are easy insurance for your next season on the road.
Project Ideas
Business
On‑site RV vent replacement & inspection service
Offer a mobile service at campgrounds and RV parks that inspects exterior furnace vents, installs these stainless‑steel screens, replaces old silicone seals, and performs seasonal maintenance. Charge a service fee plus parts and offer subscription inspections (spring/fall). Market via campground bulletin boards, Facebook RV groups, and partnerships with park managers.
Branded retrofit kits and customization
Create premium retrofit kits that include the screens, colored silicone gaskets, upgraded spring hooks, and step‑by‑step installation guides. Offer customization like engraved stainless rims or color coordinated silicone for different RV brands. Sell on Etsy, Amazon, and RV parts stores at a healthy markup vs. generic packs.
DIY craft kits & online workshops
Package the screens with a few extra craft supplies (twine, mini glass jars, mounting hardware) and sell as DIY kits to make lanterns, planters, or spice infusers. Host short online workshops or a YouTube series demonstrating projects, then monetize via kit sales, ad revenue, and affiliate links to tools.
Wholesale supply to RV dealers and service centers
Negotiate bulk deals to supply RV dealerships, service shops, and mobile mechanics with replacement vent screens and silicone seals. Position the product as an OEM‑compatible retrofit: provide volume discounts, co‑branded packaging, and simple installation tools to make it an easy add‑on sale during routine service.
Seasonal maintenance subscription & replacement mailers
Sell a subscription that mails replacement silicone strips and an inspection checklist each season (spring/fall) plus discounted new screens when needed. Add value with short how‑to videos and a roadside troubleshooting hotline. Subscriptions increase recurring revenue and build customer loyalty among traveling RV owners.
Creative
Mini campsite lanterns
Turn the stainless-steel mesh into small, spark‑arresting lantern shades for tea lights or battery tealights. Use the spring hooks to hang the shade inside a glass jar or around a cylindrical light, seal the rim with the supplied silicone strip for a finished look, and suspend from a tent pole or picnic hook. Durable, rust‑resistant shades are safe for outdoor use and make an atmospheric campsite centerpiece.
Portable spice sifter / tea infuser
Form the mesh into a small cone or pouch to create a reusable spice sifter or loose‑leaf tea infuser for cooking in tight RV kitchens. Use the silicone strip as a heat‑resistant rim or handle attachment so the infuser sits securely on cups or bowls. Compact, easy to clean, and perfect for travel cooks who want to avoid single‑use filters.
Air‑plant & mini‑terrarium hanger
Use the 2.8" mesh pieces as breathable backing for small air‑plant displays or open terrariums. Attach plants with twine or glue, use the spring hooks to hang the display, and the stainless mesh provides airflow and a rustic metal aesthetic. Great for decorating an RV interior where ventilation and low weight matter.
Soap‑saver pouch / shower scrubber
Fold and stitch a mesh piece into a small pouch to hold soap scraps or act as a gentle scrubber. The mesh exfoliates and dries quickly between uses so soap lasts longer—ideal for conserving supplies during long trips. Use a length of silicone strip as a loop to hang it in the shower.
Seed starter / mini‑drain trays
Cut and layer the mesh over shallow trays or repurposed lids to create breathable seed starter bottoms or small plant drains. The 0.12" mesh keeps soil in while allowing water to drain and air‑prune roots—handy for starting herbs on an RV windowsill or building lightweight vertical planters.