Features
- Spiral balance pivot bar
- Fits onto bottom of hung sash window
- Stamped steel design
- Zinc plated finish
- Please refer to the line art drawing for dimensions and compare with your needs before ordering
Specifications
| Color | Steel |
| Size | 5/8 in. |
| Unit Count | 2 |
Related Tools
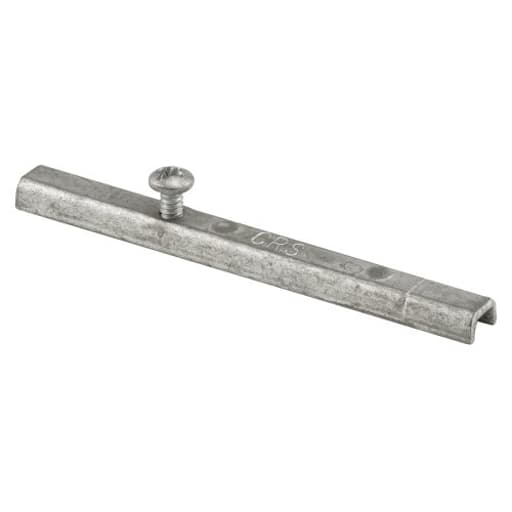
A 5/8-inch spiral balance pivot bar designed to mount on the bottom of a hung sash in tilt windows, providing the connection between the sash and the spiral balance. Stamped steel construction with a zinc-plated finish; sold as a two-piece pack—verify dimensions against your window before ordering.
PRIME-LINE H 3758 Spiral Balance Pivot Bar, 5/8 In., Tilt Window Review
A small part that can save a window
I didn’t expect a small piece of stamped steel to rescue a sagging tilt window, but that’s exactly what this pivot bar did. If you’ve got a double-hung tilt sash with spiral balances and the sash won’t stay put, won’t tilt, or keeps slipping out of the jamb, there’s a good chance the original pivot bar is bent, stripped, or missing. Swapping it with this 5/8-inch pivot bar from Prime-Line brought an older vinyl window back to life in my shop with minimal fuss and very little money.
What it is and who it’s for
This is a spiral balance pivot bar—a short, zinc-plated, stamped steel blade that mounts at the bottom corner of a tilt sash. It provides the hard connection point for the balance shoe in the jamb channel, letting the sash tilt in and also slide up and down under spring tension. This version is sized for 5/8-inch spiral balance systems, which are common on heavier sashes. It’s sold in a two-pack, which is practical: repair both sides for even wear or keep a spare in the kit.
If you’re maintaining vinyl or aluminum tilt windows that use spiral balances (as opposed to constant-force coils), this is the kind of part that keeps the whole system honest. It’s not universal, though. Fit is everything here.
Build and finish
The bar is stamped steel with a zinc plating. The finish is utilitarian—no burrs or sharp edges on mine—and the plating gives basic corrosion resistance that’s appropriate for indoor residential use. The steel is stiff enough that it won’t mushroom easily when the sash is twisted under load, which is exactly what you want at the pivot. I’ve seen softer aftermarket bars deform where the shoe cam bears on them; this one has held its shape through repeated tilt-ins and a couple of intentionally rough tests.
The pre-punched holes are clean, with a profile that accepts common pan-head screws. It doesn’t ship with fasteners in my experience, so bring your own. I had good results with #8 x 3/8-inch stainless pan-heads for vinyl sashes, and #8 x 1/2-inch for wood. The steel is hard enough that if you plan to change hole spacing on the bar itself, use a sharp cobalt bit and go slow with cutting fluid—you can drill it, but you’ll burn up cheap bits.
Fit and compatibility
Before ordering, measure and compare. The critical dimensions to verify:
- Overall length and tip width of the bar (needs to seat fully in the shoe cam).
- Hole spacing relative to your sash’s screw bosses.
- Offset thickness if your sash requires the bar to sit proud of the frame.
- Whether your balances are actually 5/8-inch spiral units.
On my vinyl sash, the hole spacing was close but not perfect. I chose to drill new pilot holes in the sash (not the bar) to match the bar’s pattern, which is usually the cleaner option. If your vinyl screw bosses are cracked or stripped, plan on adding a small aluminum backer plate inside the sash cavity or using thread-inserts designed for PVC. That extra step makes the repair far more durable.
One more compatibility note: in some systems, the shoe cam has a narrow throat. The bar’s tip thickness here was fine; it seated without filing. If your shoe is unusually tight, a couple of passes with a file on the bar’s edges will let it engage smoothly.
Installation experience
If you’ve never worked on tilt sashes with spiral balances, this is a very DIY-friendly repair with the right approach. Here’s the process I used:
- Remove the sash and secure the balance shoes. Tilt the sash 90 degrees and lift it out. Using a flat screwdriver, rotate the shoe cams to the “locked” position so they don’t slide.
- Release and re-tension the spirals if needed. If your sash was dropping, your spirals may need a reset. A spiral charging tool or a small pair of locking pliers works: hook the spiral, rotate two to three turns to add tension, and re-seat.
- Remove the old pivot bars. Most are held by two screws. If they’re corroded, apply penetrating oil and give the bar a light tap to break the bond before backing the screws out.
- Dry-fit the new bar. Align the tip with the shoe and check hole alignment on the sash. Mark and pre-drill if needed. For vinyl, a 1/16-inch pilot prevents cracking.
- Fasten and test. Install with snug—not over-tight—torque. Overdriving can crush vinyl threads. Reinstall the sash by aligning both pivot bars with the shoes, tilt up to engage, then slide the sash to verify smooth travel.
Total time on my repair was under 30 minutes once the sash was out. The only hiccup was snugging the screws into older vinyl: lubricating the threads with a dab of soap helps them seat without galling.
Safety tip: those spirals hold surprising energy. Keep your face clear and wear eye protection when charging them.
Performance
The payoff is immediate. With the new pivot bar installed, the sash engaged the shoe cams positively and tracked straight. Tilting in and setting back into the jamb felt precise—no slop at the corners, no “pop” as the bar slips past the cam. After multiple tilt cycles and a week of regular use, the connection remained tight. The 5/8-inch balance system had plenty of control over a heavier lower sash, and the bar showed no sign of torsional fatigue.
Durability and corrosion resistance
Indoors, zinc-plated steel is more than adequate. In a coastal environment or in bathrooms with frequent condensation, I still recommend a light dab of anti-corrosion paste on the screw heads and the exposed edges of the bar. Mechanically, the stamped section is robust. If a pivot bar fails in service, it’s usually due to misalignment or a bent shoe cam—not the bar itself. This piece handled mild abuse without deforming.
Value
It’s hard to argue with the economics. You’re paying a small price for a two-pack that can prevent an unnecessary sash or window replacement. The only “hidden cost” is your time and any auxiliary hardware you might need (screws, reinforcement plates for damaged sashes). Given the simplicity and the result, it’s excellent value.
Downsides and small gotchas
- Not universal fit. Hole spacing and tip geometry vary across window brands. Measure before you buy.
- May require drilling. Either the sash or the bar might need new holes. Use quality bits if you modify the bar.
- Vinyl weakness is the limiting factor. If your sash’s screw bosses are cracked, plan on reinforcement; the best bar won’t hold in damaged plastic alone.
- Fastener feel can be stiff. Thread-forming screws in zinc-plated holes can feel tight; pre-tapping or lubricating helps.
None of these are deal-breakers, but they’re worth planning for to keep the job smooth.
Tips for success
- Verify your balance type and diameter. This bar is for 5/8-inch spiral systems; 3/8-inch systems use different hardware.
- Check the shoe cam orientation. The tip needs to fully seat and the cam must lock/unlock cleanly.
- Replace in pairs. Even if only one side failed, swapping both pivot bars keeps wear and alignment balanced.
- Don’t overtension spirals. Two to three turns past neutral is usually enough; over-tension can stress both the shoe and the bar.
Bottom line
This pivot bar is a straightforward, durable replacement for 5/8-inch spiral balance tilt windows. The stamped steel body and zinc finish are appropriate for the environment, the two-pack is practical, and the installation is well within reach for a careful DIYer. The only real caveat is fitment—measure your existing bar and hole spacing, and be ready to adjust your sash or fastener approach if your original hardware doesn’t match perfectly.
Recommendation: I recommend this pivot bar for anyone maintaining or repairing tilt sashes with 5/8-inch spiral balances. It’s a small, well-made part that restores a critical connection point, and it does so with predictable results and minimal cost. If your window uses a different balance type or your sash’s screw bosses are compromised, look for a bar that matches your exact geometry or plan for reinforcement. But for standard 5/8-inch spiral systems, this is the right fix at the right price.
Project Ideas
Business
Window Repair Starter Kit
Assemble and sell small replacement kits for common tilt-window issues that include the H 3758 pivot bars plus compatible screws, balance springs, installation instructions, and a short how-to video. Market to DIY homeowners and real-estate flippers as an affordable quick-fix.
Niche Replacement Parts Shop
Create an online storefront (Etsy, Shopify, or niche website) focused on hard-to-find window hardware. Offer single- and multi-packs, clear dimensional photos, compatibility guides, and search tags for window sash types to attract contractors and homeowners searching by part number.
DIY Workshop & Class
Host in-person or virtual workshops teaching basic window repair and upcycling techniques using pivot bars and other hardware. Charge per attendee and sell take-home kits (including H 3758 bars) so participants leave with the skills and parts to fix or repurpose items themselves.
Upcycled Hardware Art Brand
Build a small brand selling industrial-style home decor made from reclaimed window hardware—items like coat racks, framed mobiles, or mixed-media wall art featuring pivot bars as design elements. Sell through craft fairs, Instagram, and local boutiques; offer custom commissions for interior designers.
Creative
Steampunk Mini Sculpture
Use the spiral balance pivot bar as an armature or mechanical detail in small steampunk sculptures. The stamped steel and zinc finish add authentic industrial texture—combine with gears, watch parts, and brass tubes to make tabletop art or fridge magnets. Two bars per pack are enough for matching pairs on a single piece.
Hinged Jewelry or Locket
Repurpose the pivot bar as a tiny hinge or decorative accent on handmade lockets or fold-over bracelets. Its pivot-friendly shape lets you create a working hinge on thin metal, wood, or acrylic pieces for a rugged, industrial jewelry line.
Miniature Functional Window Models
For dollhouses, architectural models, or educational displays, use the pivot bar to build realistic tilt-window mechanisms. At 5/8 in. size it's ideal for scale models and demonstrates actual window motion—great for architects, hobbyists, or classroom projects.
Upcycled Wind Chime Connector
Use the bars as durable connectors in a wind chime or mobile. The metal will withstand outdoor exposure and provides a clean, modern look when paired with reclaimed metal tubes, glass pieces, or wooden slats—hang two per strand for balanced movement.