Features
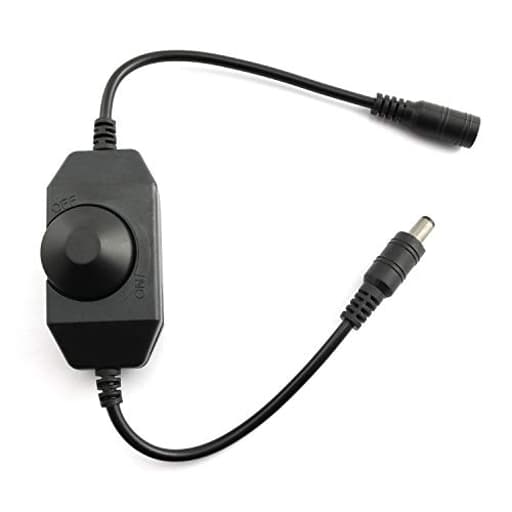
- Function: The 1-channel inline dimmer is a kind of controller which can realize stepless dimming. Knob operation design can adjust the light brightness according to the actual needs.
- Knob Operation Control: Rotate the knob to turn on/off the light brightness gradually to the appropriate light intensity. Easy to use.
- DC Standard Plug: 5.5x2.1mm male / female power plug connector, professional appearance for power cabling, save time and more secure cable connection.
- Wide Application: Mainly Used To Adjust The Brightness Of Single Color LED Lights, Such as 3528, 5050, 5630 Strip LED lights for urban lighting, holiday atmosphere, KTV, gym, car lights and so on.
- Package content: 1 piece LED Dimmer Switch with DC Female Male Adapter
Specifications
| Color | Black |
| Unit Count | 1 |
Related Tools
A 1-channel inline dimmer for 12V/24V DC single-color LED strips that provides stepless brightness control via a manual rotary knob. It uses standard 5.5×2.1 mm male/female DC connectors for inline power connection and is compatible with 3528, 5050, and 5630 LED strip lights; one dimmer unit is included.
RuiLing 1-Pack Black DC 12V 24V LED Strip Dimmer Switch with DC Female Male Adapter Brightness Adjustable Controller Manual Knob Dimmer Switch Mini LED Lamp Lighting Parts Review
A simple inline way to tame LED strips
I’m a fan of uncomplicated solutions, and the RuiLing inline LED dimmer lands squarely in that category. It’s a small black in-line unit with a rotary knob and standard 5.5×2.1 mm DC barrel plugs on each end. You drop it between a DC power supply and a single-color LED strip, twist the knob, and the brightness changes smoothly. No apps, no remotes, no learning curve.
I used it with a few common setups: a 12V 5050 warm white strip for task lighting under a shelf, a shorter 3528 accent run in a display cabinet, and a longer 24V single-color strip along a workbench. Across those scenarios, the dimmer did what it says on the tin—provide quick, stepless control—while exposing a few limitations you’ll want to know about.
Setup and compatibility
Installation couldn’t be more straightforward. The male barrel jack connects to the power supply, the female side to your strip (or to a short adapter pigtail if your strip uses screw terminals), and you’re done. The standard 5.5×2.1 mm plugs matched my 12V and 24V supplies without drama, and polarity passed through as expected. If your power supply or strip uses 5.5×2.5 mm connectors, you’ll need an adapter.
Important caveats:
- It’s for single-color, constant-voltage LED strips only. Not for addressable (WS2812, etc.) or RGB/RGBW setups.
- Stick to 12V or 24V DC. No AC, no low-voltage halogen, and definitely not mains.
- Make sure your supply and wiring can handle the current your strip draws. Give yourself headroom; a cool-running system is a reliable one.
Because the control is an analog-style knob, the dimmer “remembers” its last setting after power is cut and restored—the knob position is the setting. That’s handy for installations tied to a wall switch or smart plug.
Dimming performance
The RuiLing dimmer uses PWM (pulse-width modulation), which is the norm for LED strip dimming. On 12V strips, dimming was smooth and flicker-free to the eye across most of the range. I used it for everything from full brightness task lighting to late-night ambient glow without noticing stepping or pulse artifacts.
On my 24V strip, the experience was similar for most of the range, but I did notice two quirks:
- A faint, high-pitched whine at certain mid-level settings when the load was higher. This kind of coil or switching noise is common with PWM control, especially at certain frequencies and with longer runs. In my case, moving the knob slightly—or changing where the dimmer sat in the chain—mitigated it.
- At the very bottom of the range, the dimmer didn’t always bring the strip down to an ultra-low nightlight level. Below a certain point the output would cut off rather than continue to dim gracefully. More on that next.
Low-end range and “off” behavior
If you want a true 1% or 5% nightlight on every setup, temper expectations. On my 12V 5050 strip, the dimmer reached a pleasing low level, but not “barely on.” On the 24V strip, the low end was more limited; as I approached the minimum, the light snapped off rather than trickling down, leaving what felt like a 20–30% usable range before full off.
Also worth noting: in one of my 24V configurations, turning the knob fully counter-clockwise didn’t extinguish the strip entirely; there was a faint residual glow. That’s likely due to tiny leakage inherent to the circuit combined with the characteristics of the strip. Two easy fixes worked for me:
- Add a simple inline on/off switch upstream from the dimmer to guarantee a hard cut.
- Add a small dummy load in parallel with the strip (a resistor or a tiny accessory LED) to bleed the residual trickle if it bothers you.
With the 12V setups I tested, “off” was clean and complete via the knob alone.
Thermal behavior and reliability
PWM dimmers tend to run warmest at mid-level settings because they’re switching current rapidly. The RuiLing is no exception. With a modest 12V, ~2–3A load, the housing got warm to the touch but never concerning. With a longer 24V run and higher current, it ran noticeably warmer, especially when tucked behind a backsplash.
My recommendations:
- Don’t enclose the dimmer in foam or tight cabinetry without ventilation.
- Keep current within sensible limits for the strip and cabling; leave at least 20–30% capacity margin on the power supply.
- If you notice flicker at a fixed setting after a period of time, check for loose connectors, undersized adapters, or heat buildup; moving the dimmer to a spot with airflow solved one intermittent issue for me.
I can’t speak to long-term, years-long reliability yet, but after extended sessions over a few weeks, nothing failed. The warmth is normal for this class of device, but you do need to respect thermal realities with higher loads.
Build and ergonomics
The housing is compact and light, with strain-relieved DC connectors and a knurled knob that’s easy to grip. There’s no detented “click” at the off position on the unit I tested; it’s a continuous rotation from off to full. That keeps operation simple but does make it easier to bump slightly on in a dark room. The finish and connectors feel acceptable for the price—nothing premium, nothing flimsy.
Because it’s inline, plan where you want the knob to live. For under-cabinet runs, I used adhesive clips to secure the dimmer under the lip for quick access. For a workbench, I mounted it with double-sided tape on the power strip’s metal tray.
Where it shines
- Quick retrofits: Replacing a failed controller on a single-color strip takes seconds. This dimmer is plug-and-play.
- Task lighting: I liked it for dialing in brightness on a shelf or desk where a full-sized wall dimmer would be overkill.
- Photography/video surfaces: As a poor man’s dimmer for a single backlight, it did the job with predictable output—useful when you don’t need color or remote control.
- Automotive and hobby projects: 12V systems with barrel adapters become trivially adjustable without cutting wires.
Limitations and workarounds
- Not for RGB/addressable: If you need color mixing or scenes, look elsewhere. This is brightness-only.
- Limited ultra-low output: If you need a true sub-10% nightlight on every setup, especially at 24V, you may find the low end drops out early.
- Possible audible whine at mid levels: More likely on 24V and longer runs. Slight adjustments or better mounting often help.
- “Off” may not be absolute in some 24V configurations: Add a simple inline switch or ensure a proper load to guarantee black-out.
- No remote, no memory logic: The knob is the interface. If you want smartphone control, a wall dimmer, or scheduled scenes, this isn’t it.
Tips for best results
- Match connectors properly; avoid daisy-chaining loose adapters that introduce resistance.
- Keep cable runs short between supply, dimmer, and strip to reduce voltage drop and potential noise.
- Give the unit airflow, especially with higher current 24V strips.
- If your strip glows faintly at “off,” add an upstream switch or a small parallel load.
- Size your power supply generously; running at 60–70% of its rated output improves stability and longevity.
The bottom line
The RuiLing dimmer is exactly what many single-color LED strip projects need: a compact, inexpensive, and straightforward way to set brightness without overcomplicating the build. In my testing, it delivered smooth, flicker-free control on 12V strips and mostly similar results on 24V, with the caveats of a limited low-end range and the occasional bit of switching whine at certain settings.
Would I recommend it? Yes—with context. If you want a no-frills, manual dimmer for single-color 12V or 24V strips, and you’re comfortable with a basic inline unit that prioritizes simplicity over features, this is a solid pick. It’s easy to install, works reliably when thermals are respected, and keeps costs down. If you need ultra-low-level dimming, absolute silence at every setting, or guaranteed hard-off behavior on every 24V setup, pair it with an upstream switch or consider a higher-spec PWM dimmer with a defined off detent and better filtering. For the majority of straightforward, single-color strip installs, the RuiLing dimmer gets the job done with minimal fuss.
Project Ideas
Business
Airbnb & Short-Term Rental Lighting Packages
Offer turnkey ambient lighting kits (strip + dimmer + mounting + instructions) specifically tuned for Airbnb hosts to improve listing photos and guest experience. Package tiers: budget, premium (higher-CRI strips, diffusers), and install service. Upsell ideas: branded knobs, remote control retrofit, and seasonal decor swaps. Pricing: kit $30–$120, install $50–$200 depending on scope.
Bar & Restaurant Mood Retrofit Service
Provide a B2B service installing dimmable strip lighting in bars, cafes, and restaurants to allow staff to change ambiance between day and night. Sell monthly maintenance and seasonal re-tuning packages. Differentiate by offering lighting scenes consulting and quick-access knob placement for staff. Revenue: project fees + recurring maintenance contracts.
DIY Kits Sold Online (Etsy/Shopify)
Create themed DIY kits (TV-bias lighting kit, closet/wardrobe kit, shelving highlight kit) that include pre-cut strip lengths, connectors, the inline dimmer, and simple instructions. Target DIYers who want easy, attractive solutions without fiddly wiring. Offer add-ons like trim channels, adhesive upgrades, or branded knobs. Margins are good on bundled kits; market with clear before/after photos and short setup videos.
Content + Affiliate + Product Combo
Produce step-by-step video tutorials and short projects showcasing the inline dimmer (YouTube, Instagram, TikTok) and monetize via ads, sponsorships, and affiliate links to kits. Complement content with a small product line—custom-labeled dimmer kits sold directly. Use the content to funnel customers to your store and offer digital plans or printable templates for a small fee.
Creative
Mood Headboard Lighting
Mount a single-color LED strip behind a bedroom headboard and install the inline dimmer where it's easy to reach. Use the knob to create soft warm glow for sleeping, brighter light for reading, or complete off. Materials: LED strip (12V/24V), power supply, dimmer, adhesive channel or diffuser. Variation: add a small recessed pocket so the knob is flush and looks built-in.
Adjustable Illuminated Wall Art
Build a shallow framed panel or shadowbox with a backlit LED strip and use the dimmer to change contrast and atmosphere around the artwork or print. Dimming lets you highlight texture, silhouette, or create subtle night effects. Materials: plywood or frame, frosted acrylic diffuser, LED strip, dimmer and power connector. Tip: make a series of frames with different diffusion levels for a gallery wall product.
Under-Cabinet Task Light Kit
Create a practical under-cabinet lighting solution for kitchens or workbenches with the dimmer installed near counter level for quick adjustments. Offer warm and cool strip options; knob allows immediate brightness tuning for food prep vs. ambient lighting. Materials: LED strips, aluminium profile for heat dissipation, DC connectors, inline dimmer. Make a plug-and-play version so non-technical users can install in minutes.
Camper & Automotive Ambient Lighting
Use the inline dimmer to build adjustable ambient lighting in camper vans, RVs, or car interiors (12V systems). Mount strips under cabinets, along ceiling coves, or in sleeping alcoves and place the knob in a central panel. Materials: 12V LED strip, automotive-grade connectors, inline dimmer, mounting channels. Add a locking knob or recessed mount to prevent accidental changes while driving.