Features
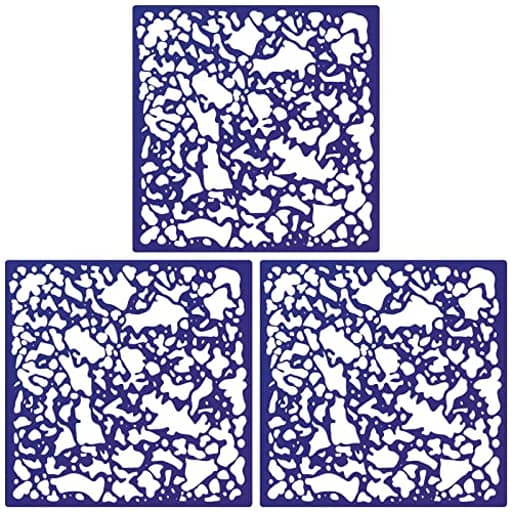
- Product Description: the size of wall texture tools is about 8 x 8 inches/ 20 x 20 cm, the package comes with 3 pieces in total; Sufficient quantity to meet your daily replacement needs; The right size is convenient for you to store, will not take up too much space
- Ideal Tools: if you are still struggling with your old wall, this drywall mud tools can solve the problem for homeowners and professionals alike; The wall of your home will become full of art and new
- Rugged and Serviceable: this wall texture panels are made of a quality plastic material, reliable and sturdy, you can apply it for a long time; And it's easy to clean, so you don't have to spend a long time cleaning it for your next use
- Where to Apply: drywall tools are easily adapted for walls, ceilings, floors, you can apply it to various flat surfaces in your home and create beautiful patterns on them; Your home will become elegant and attractive to the eyes
- Easy to Use: the drywall texture stencil is quick and easy to finish a wall in just over several steps; Attach the drywall to the part of the wall you want to refinish, then start painting the material in a good position, then remove the drywall texture template and finish the wall
Specifications
| Color | as the picture shown |
| Unit Count | 3 |
Related Tools
Three 8 × 8 inch plastic knockdown texture stencils for applying or repairing drywall and plaster textures on walls, ceilings, and other flat surfaces. Made of durable, easy-to-clean plastic for repeated use; use by holding or attaching the stencil, applying joint compound or texture material, then removing to leave a knockdown pattern.
Geyee 3 Pieces Knockdown Texture Spray Stencil Drywall Repair Tool Knockdown Texture Sponge Art Plastic Drywall Tools 8 x 8 Inch Plaster Wall Panels for Wood Wall Profession DIY Supplies Review
Why I reached for these knockdown stencils
After years of relying on aerosol texture cans for small drywall repairs, I wanted more control and less mess. I’ve got a house full of light-to-medium knockdown, and matching it after patching nail pops and the occasional doorknob ding has always been the part I dread. The Geyee knockdown stencils promised a reusable, low-waste way to build texture exactly where I need it. I took them through several repairs—wall patches, a drywall seam touch-up, and a small ceiling blend—to see how they stack up.
What you get
The set includes three 8 x 8 inch plastic panels. They’re thin, flexible, and easy to rinse clean. Each panel has an abstract cut-out pattern that, when used with joint compound, creates the “islands” you later knock down with a knife. The compact size is a blessing for spot repairs and working around obstacles, though it does mean larger areas will take time.
There’s no handle or frame; you hold them in place or tape them to the wall. That simplicity is part of the appeal—the panels are feather-light and you can rotate them between passes to avoid repeating the exact same pattern.
Build and durability
They’re plastic, not metal, and that’s both a strength and a weakness. On the plus side, the panels flex slightly to sit flush on subtly uneven surfaces, and they don’t rust or warp if you rinse them. After multiple uses, mine show light scuffing but no cracks or tears. The downside is that if you bear down too hard with your knife or hawk against the stencil, it can flex and smear compound under the edges. A light touch and painter’s tape at two corners kept things crisp for me.
For longevity, I rinse immediately after use, wipe them dry, and store flat. They’ve held up fine so far.
Setup and materials
Here’s what worked best for me:
- Pre-mixed all-purpose joint compound thinned slightly with water to about a creamy peanut butter consistency. Too thin and it bleeds; too thick and it bridges the cutouts and pulls up.
- A 4–6 inch taping knife for application through the stencil.
- A 10–12 inch knife (or a knockdown knife) for the knockdown pass.
- Blue tape to secure the stencil, and a damp sponge to clean edges and knives between passes.
For primed, previously textured surfaces, I had the easiest time getting crisp islands and a clean knockdown. Bare drywall or unsealed patches can pull moisture too quickly and lead to ragged edges; I recommend a quick coat of primer-sealer over fresh compound before texturing.
Using the stencils
My workflow looked like this:
1. Lightly sand and dust the repair.
2. Spot-prime if the area was fresh mud or raw paper.
3. Tape two corners of the stencil to the wall, pressing along the edges with my free hand.
4. Load the knife and draw compound across the stencil at a shallow angle, just enough to fill the openings without flooding them. Two light passes beat one heavy pass.
5. Lift the stencil straight off. If I needed to tile the pattern, I rotated the panel 90 degrees and overlapped edges slightly, avoiding any obvious seams.
6. Wait until the compound lost its wet sheen—typically 3–8 minutes depending on humidity—then knock it down with a clean, nearly flat blade, minimal pressure. Wipe the knife after every stroke.
That timing window matters. Knock down too soon and you get smears; too late and you end up with crunchy chips and drag marks. Once I dialed in the compound consistency and wait time, the process felt predictable.
The results
On a lightly textured living room wall, the match was good enough that I had to catch it at an angle in raking light to spot the repair before paint. After two coats of primer and finish paint, the patches blended convincingly. On a ceiling with a slightly heavier knockdown, I needed to make a second pass to build more height before the knockdown step, and even then the result was a hair lighter than the surrounding texture—but well within “no one will ever notice” territory.
Where these stencils shine is in targeted, repeatable texture building. I appreciated being able to place texture only where the patch had been feathered smooth, rather than misting an area with a can and hoping overspray didn’t land outside the repair. The ability to rotate the stencil and vary coverage helped avoid any visible tiling.
Limitations and learning curve
- Size: At 8 x 8 inches, they’re designed for spot repairs, not full walls. You can tile them across larger areas, but it’s slow and can introduce repetition if you’re not attentive.
- Pattern style: The cutouts generate a light-to-medium knockdown look. If your home has very heavy, chunky knockdown or a skip-trowel finish, you’ll need to layer carefully or use a different approach.
- Flex and bleed: Press too hard during application and compound sneaks under the edges. Tape helps, but this tool rewards a light hand.
- Corners and edges: Getting into inside corners requires some finesse. I found it easier to texture up to the corner, then freehand a couple of small islands with a brush tip and knock them down gently to blend.
The first couple of patches I did were just okay; by the third, I was getting reliable blends. Expect a short learning curve to dial in your mud thickness, pressure, and timing.
Where they outperform spray cans
- Control: No aerosol plume to manage, and you can avoid overspray on adjacent finishes.
- Cost per patch: Once you own the stencils, you’re just using a few tablespoons of mud. For frequent small repairs, that adds up.
- Cleanup and reuse: A quick rinse and they’re ready for the next job. No clogged nozzles or half-used cans going to waste.
- Mess containment: It’s easier to keep material where you want it. Less masking, less sanding afterward.
Where I still reach for other methods
- Large blends: Feathering a long seam or retexturing a full wall is faster with a hopper gun or a wide knockdown knife, depending on the style.
- Non-knockdown textures: Orange peel, sand finishes, or skip-trowel patterns are better served with their respective techniques.
- Very heavy knockdown: If your texture is pronounced, a double-application with the stencil can work, but a knockdown blade over a rolled-on layer may be more efficient.
Practical tips
- Prime before texturing if the substrate is thirsty. It keeps edges crisp.
- Keep your knives spotless. Residue causes drag lines in the knockdown pass.
- Rotate and offset the stencil between placements to avoid repeating signatures.
- Err on the side of less material in the stencil and add a second pass if needed.
- Practice on a scrap board to nail your timing before stepping onto a ceiling.
Value and audience
For homeowners and pros who frequently tackle small drywall repairs, these stencils hit a sweet spot: low cost, minimal waste, and solid results after a little practice. They won’t replace a full texture rig, but they fill the gap between “good enough” aerosol patches and pulling out the big guns for a small job.
Recommendation
I recommend the Geyee knockdown stencils for small to medium spot repairs on light-to-medium knockdown surfaces. They’re inexpensive, easy to clean, and provide better control than aerosol texture for targeted patches. Expect a short learning curve and be realistic about scope—these are best for localized fixes, not full-wall retextures. If your home’s knockdown is extremely heavy or you need to cover large areas quickly, consider other methods. For the everyday dings and repairs most homes require, these stencils have earned a permanent place in my drywall kit.
Project Ideas
Business
Quick Knockdown Repair Service
Offer a local service specializing in fast knockdown texture repairs for landlords, property managers, and Airbnb hosts. Package options: single-spot repair, room refresh, or full-wall retexture. Market quick turnaround and clean-up, price per square foot or per panel, and upsell a paint match service. Promote via local Facebook groups, real estate agents, and rental platforms.
Pop-up DIY Texture Workshops
Host small-group workshops teaching homeowners how to use the stencil kit for accent walls and furniture makeovers. Charge per attendee and include a starter kit (stencil set, trowel, small bag of joint compound). Teach layout, application, knockdown timing, and finishing paint techniques. Sell takeaway kits and recorded tutorials as follow-ons.
Handmade Textured Panels for Sale
Produce and sell finished 8x8 or larger textured wall panels (primed/painted or raw) on marketplaces like Etsy, Shopify, or at craft fairs. Offer custom color and finish options, and bundle as multi-panel sets for feature walls. Price tiers: raw panels for DIYers, pre-finished for immediate installation, and premium custom-painted statement pieces.
Staging & Refresh Service for Real Estate
Partner with real estate agents and home stagers to provide targeted textured wall upgrades that boost listing photos and open-house appeal. Offer quick-install textured accent walls or panels and coordinate with painters to ensure cohesive finishes. Market the ROI (faster sales/better photos) and offer package pricing for multiple rooms.
Kits + Online Course Bundle
Create a branded kit (the 3-piece stencil set plus tools and a small bag of compound) paired with a step-by-step online video course and downloadable templates for layout and color schemes. Sell the bundle through an ecommerce site and use short social clips (before/after, time-lapse) on Instagram/TikTok and paid ads to drive sales. Include digital templates and a troubleshooting FAQ to reduce support time.
Creative
Repeating Accent Tile Wall
Use the three 8x8 stencils to create a large-scale knockdown tile pattern across a single accent wall. Plan a grid, mark studs/lines, then apply joint compound with a trowel or hopper gun through the stencil, wait until leather-hard, and knock down with a drywall knife for that soft flattened texture. Vary the paint finish (matte background + satin highlights) or use two-tone glazing to emphasize pattern depth. Ideal for living rooms, entryways, or behind a TV.
Textured Furniture Faces
Upgrade plain cabinet doors, dresser fronts or tabletops by adhering thin drywall mud over the stencil on MDF or primed wood, then knocking down for a plastered, artisan look. After drying, sand lightly, prime, and finish with chalk paint, metallic rubs, or color washes. Great for upcycling thrift finds into boutique home-decor pieces.
Faux Coffered/Ceiling Panels
Create faux coffered ceilings or decorative ceiling panels without heavy carpentry: stencil repeating knockdown textures inside framed ceiling sections or on 8x8 primed panels that you then mount to the ceiling. Use lightweight foam or plywood panels as substrate; texture with joint compound, knock down, prime and paint. The result looks like custom plaster work with less weight and cost.
Modular Wall Art Panels
Make a set of modular textured wall art pieces by applying texture to 8x8 or larger wood/plywood squares using the stencils. After drying, seal and paint each panel differently (monochrome, gradient, metallic accents) and hang in a grid or staggered arrangement as contemporary art for home or office.
Headboard Backdrop / Accent Bed Wall
Build a dramatic bedroom focal point by applying a repeated knockdown texture directly to drywall behind the bed or on large MDF panels mounted behind the bed. Use soft, neutral tones with a subtle glaze to create a spa-like, tactile backdrop that reads as high-end plaster work.