Keeping track of your tools at home doesn’t have to be a hassle. Whether you’re tackling DIY projects or managing a growing collection, an organized tool inventory system saves time, reduces stress, and prevents lost items. Here’s a quick breakdown of how to do it:
- Gather and Sort: Collect all your tools and organize them into categories like hand tools, power tools, and seasonal items.
- Document Details: Record tool information such as name, brand, model, purchase date, cost, and location. Use a spreadsheet or app for easy management.
- Label Tools: Use permanent markings, QR codes, or Asset ID Tags to make tools identifiable and secure.
- Digital Tracking: Apps like Toolstash simplify inventory management with features like AI Snap for quick cataloging, smart categorization, and tool lending tracking.
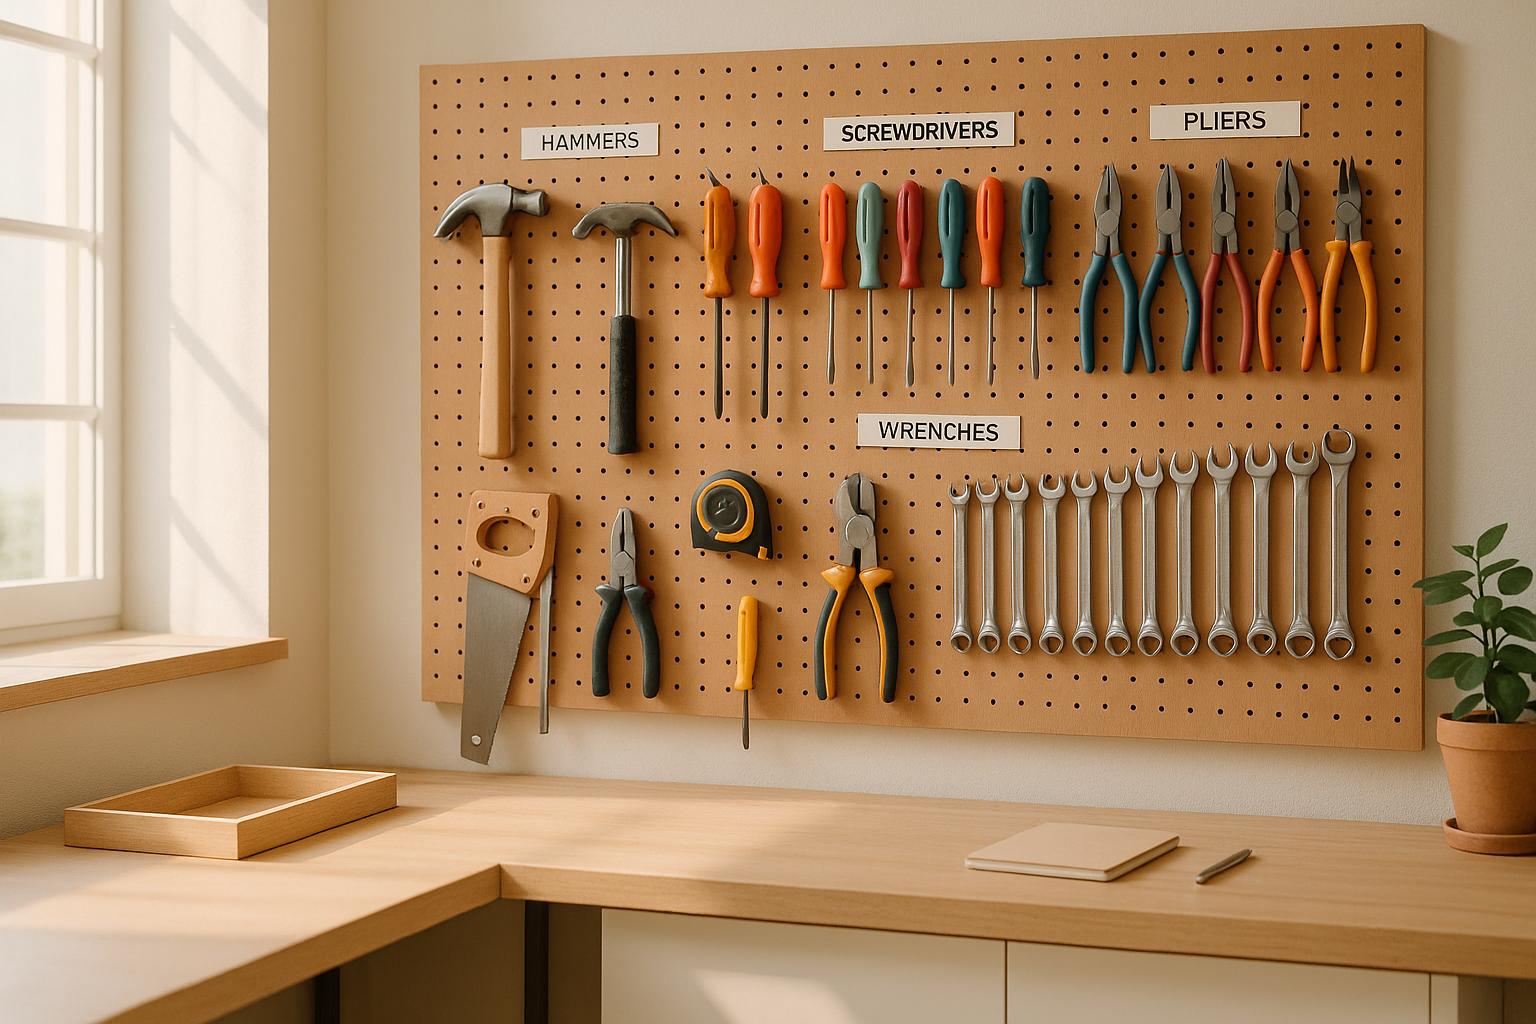
- Organize Storage: Group tools by type and use labeled drawers, shelves, or pegboards. Secure high-value tools with lockable cabinets or safes.
- Regular Audits: Periodically check your inventory and update records to ensure accuracy and track maintenance or warranties.
For a modern approach, Toolstash offers free and paid options to streamline tool tracking, making it easier to stay on top of your collection. It’s a practical way to boost efficiency and keep your tools in check.
Create an INVENTORY System in Google Sheets With QR Codes 📦 | Automated Input & Output Tracking
Setting Up Your Tool Inventory
Getting your tools in order starts with gathering, organizing, and documenting them to match your space and how you work.
Gather and Sort Your Tools
Begin by taking stock of every tool you own. Check all the usual places - your garage, kitchen, car toolbox, or any other storage areas where tools might be hiding. Don't overlook those stray items tucked away in random drawers or corners. [1]
Once you've collected everything, it's time to sort. A simple method works best, as suggested by Page:
"It's not a bad idea to begin by sorting everything into a few different categories. Put all the hand tools in one spot, all the power tools in another and anything you consider a seasonal tool in its own pile. Once you've done this, you'll be off to a great start." [1]
Think about categories that make sense for your collection. Hand tools might include items like hammers and screwdrivers, while power tools could cover drills and sanders. Seasonal tools might be things like lawn mowers or snow shovels. Don’t forget about accessories - keep drill bits with drills, sockets with ratchets, and saw blades with saws. The goal is to create an organization system that feels logical and easy to maintain.
Record Tool Information
Documenting your tools is key for tracking, valuation, and maintenance. Start by noting the important details of each item.
For every tool, include its name, brand, model, purchase date, cost, and storage location. For instance, instead of just listing "drill", write something like "DeWalt 20V MAX Cordless Drill, Model DCD771C2." This level of detail can be invaluable if you need to file an insurance claim or replace a tool.
Add purchase details, like where and when you bought the item, and its original cost. If you’re unsure of the price, estimate the current replacement value. Be sure to record serial numbers for power tools and electronics - they’re essential for warranty claims and theft recovery.
Consider using a spreadsheet or digital tool to keep everything organized. This makes it easy to sort your inventory by purchase date, cost, or type of tool. To go a step further, take clear photos of each tool, capturing unique features or serial numbers. If you’re recording video, narrate important details like brand names and purchase dates. Keep supporting documents - receipts, warranties, and appraisals - stored safely alongside your records.
Once your records are complete, you can move on to labeling your tools to connect them seamlessly with your digital system.
Label Your Tools
Labels make it easy to match your tools with your records while also improving security and maintenance tracking.
For permanent marking, use metal stamps or engraving. These methods deter theft and make recovery easier. If you prefer digital tracking, consider using scannable labels like QR codes or heavy-duty Asset ID Tags. These are especially helpful in busy environments where quick identification is a must.
Clear and visible markings are essential for security. Tools that are easily identifiable are less attractive to thieves and simpler to recover if misplaced. Some people even use bright neon spray paint, sealed with a clear topcoat, to make their tools stand out without affecting their function. For high-value items, small GPS trackers can add an extra layer of security, helping with recovery even if they don’t prevent theft.
Using Toolstash for Digital Tool Management
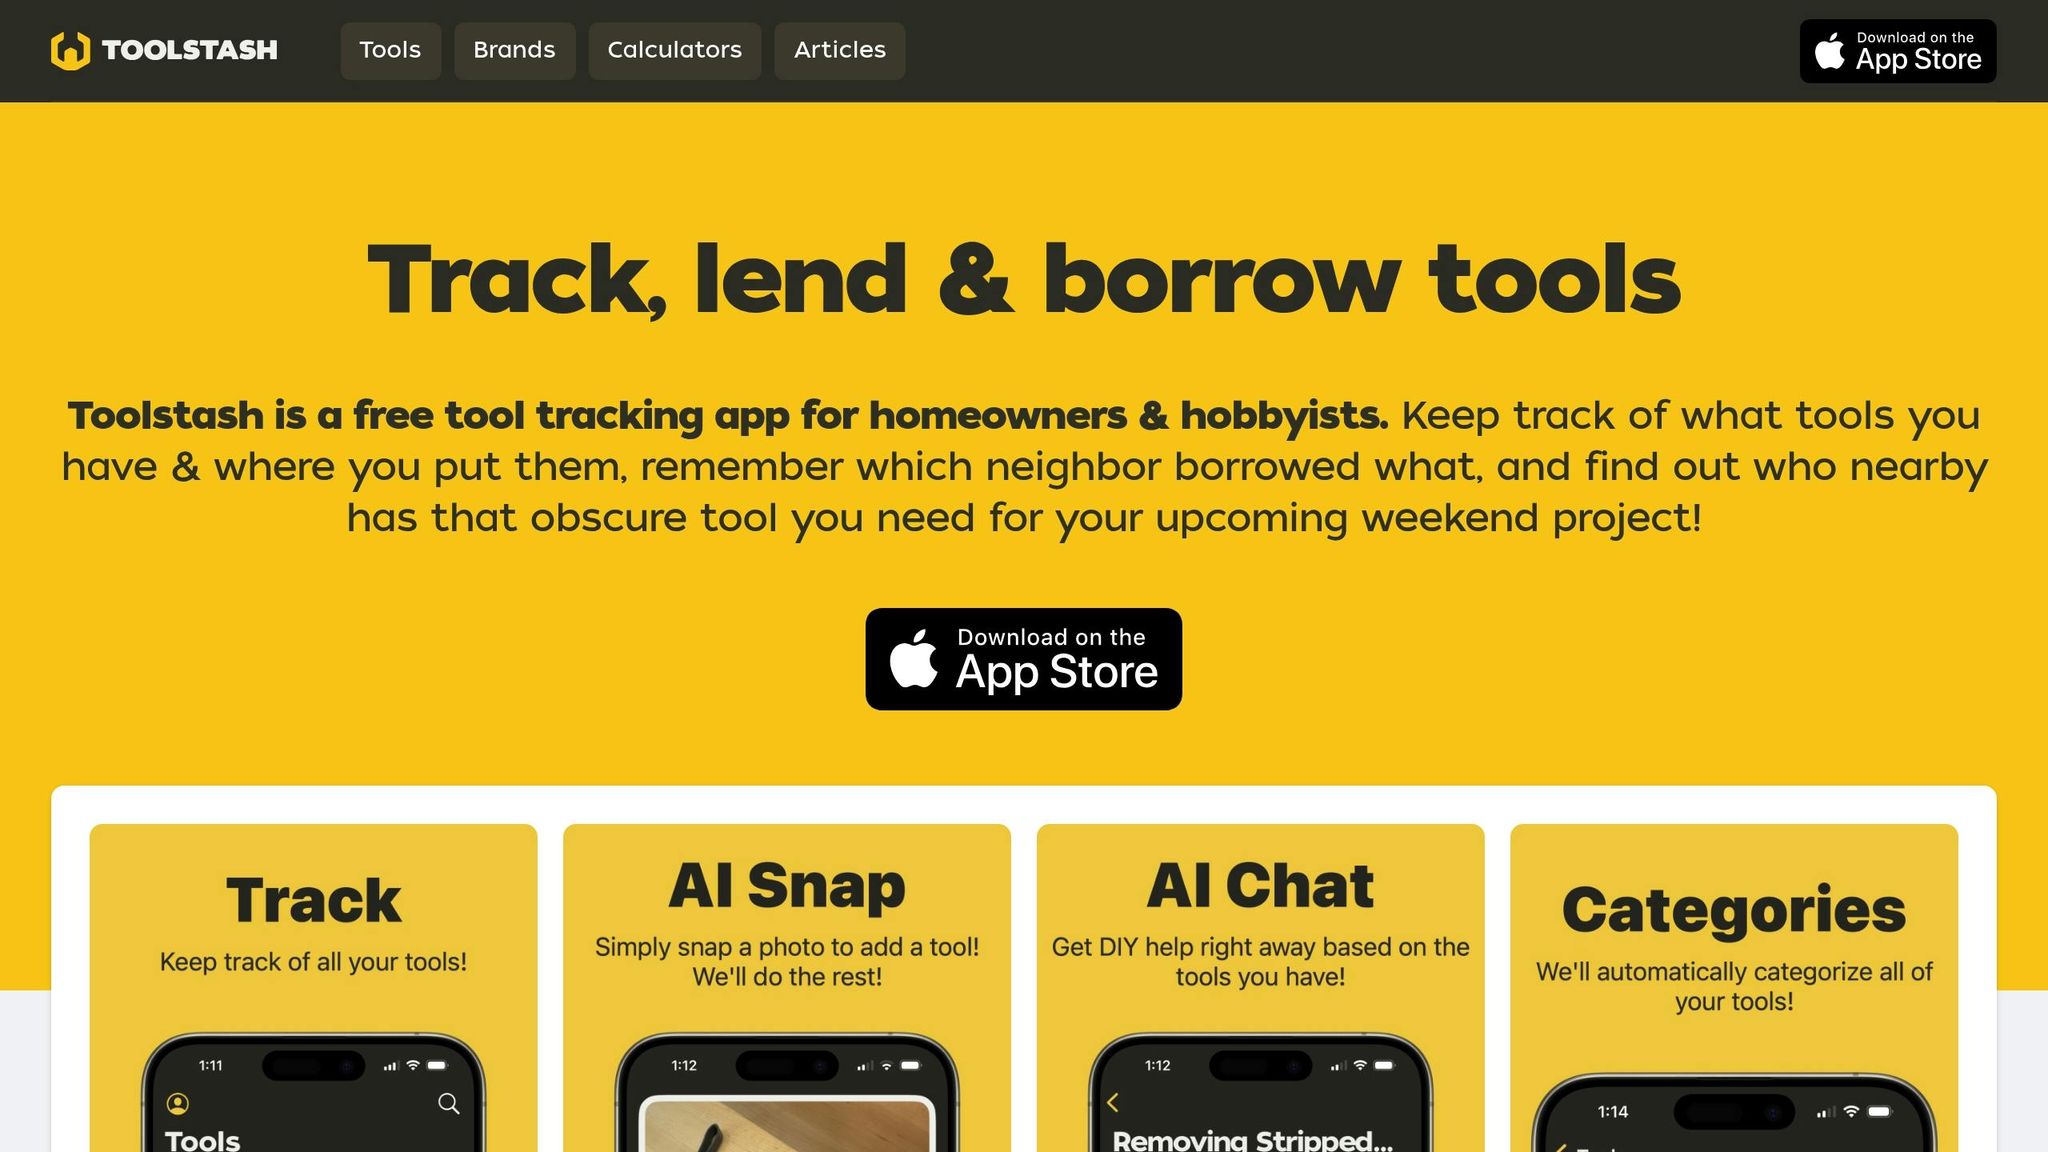
Once you've sorted and labeled your tools, managing them becomes much easier with a digital platform. Toolstash takes the hassle out of manual data entry and eliminates the need for clunky spreadsheets. It’s a simple, efficient way for homeowners and DIY enthusiasts to keep track of their tools. Let’s dive into how its features make tool management a breeze.
Adding Tools with AI Snap
The AI Snap feature changes the game when it comes to adding tools to your inventory. Instead of manually typing out tool details, all you need to do is snap a photo of the tool using the Toolstash app. The app’s AI identifies the tool, including its model number, and automatically updates your inventory [2].
This feature works particularly well for tools with visible branding or model information, saving you the time and effort of traditional cataloging methods. It’s designed to be fast, allowing you to catalog several tools in just seconds.
Best of all, Toolstash is a free tool tracking app, so you can try out this functionality without spending a dime.
Organizing Tools with Smart Categorization
Once your tools are added, Toolstash’s smart categorization system steps in to organize them. It automatically groups similar tools and creates categories that make sense for your collection. For example, it might separate automotive tools from woodworking tools based on inventory patterns.
This feature makes it easy to find what you need when you’re planning a project or just managing your collection. Plus, it sets the stage for more detailed tracking, which we’ll cover next.
Tracking Tool Location and Lending
Toolstash also helps you keep tabs on where your tools are stored - whether they’re in your toolbox, on your garage workbench, or tucked away in the basement. On top of that, it tracks who has borrowed your tools and when they’re due back, saving you the headache of chasing down loaned items.
Organizing and Storing Tools at Home
While digital organization with Toolstash is a fantastic way to keep track of your tools, it's just as important to have a well-organized physical space. A tidy and efficient setup not only makes tools easier to find but also complements your digital records. Let’s dive into how you can bring order to your physical workspace.
Group Tools by Type
The best way to start organizing your tools is by grouping similar items together. This method mirrors your digital categories, creating a seamless connection between your physical and digital systems.
Assign specific storage areas for each tool category. For example:
- Hand tools like wrenches, screwdrivers, and pliers can go in a toolbox or drawer system.
- Power tools should have their own shelf or cabinet, along with chargers and accessories.
- Measuring tools - such as tape measures, levels, and squares - are best stored in shallow drawers where they can lay flat and stay protected.
For larger collections, modular storage systems are a great solution. Rolling tool cabinets with multiple drawers let you dedicate each drawer to a specific category, while wall-mounted pegboards keep frequently used tools visible and easy to grab. This also frees up drawer space for smaller items.
Tools you use seasonally, like gardening equipment or snow shovels, should have their own designated area. Rotate these items based on the season to keep your workspace free of clutter and focused on what you need day-to-day.
Use Labels and Tags for Quick Identification
Once your tools are grouped, labeling your storage spaces will make finding and returning items a breeze. Clear and consistent labels save time and help keep your system intact.
- Drawer labels should strike a balance between being specific and flexible. For instance, instead of labeling a drawer "Phillips Head Screwdrivers", try "Screwdrivers - All Types" to leave room for growth. A label maker can give your workspace a clean, professional look.
- For bins or shelves, QR code tags add a modern twist. Link these codes to your Toolstash inventory so you can quickly see what belongs in each spot by scanning with your phone.
- Color-coded systems can simplify things even further. Assign colors to categories - like red for electrical tools, blue for plumbing, and green for automotive - to make it easy for anyone in your household or workshop to know where things go.
For bins or drawers holding lots of small items, consider attaching a printed photo of the fully stocked area. This visual guide helps you spot missing items at a glance and ensures everything stays in its place.
Secure Storage Options
For expensive tools, security is just as important as organization. Protecting your tools from theft and environmental damage will save you money and frustration in the long run.
- Lockable tool cabinets are a solid option for most home workshops. Choose heavy-duty steel cabinets with reinforced locks and multiple locking points for added security.
- For high-value items like professional-grade power tools or precision instruments, a dedicated tool safe is worth considering. These safes often include foam inserts and adjustable shelving to prevent damage while keeping your tools secure. Fire-resistant models add an extra layer of protection.
- Chain and cable systems are a good choice for larger, stationary tools like table saws or drill presses. Secure them to wall studs or concrete floors with hardened steel cables to deter theft, especially in garages where tools might be visible from outside.
Don’t forget about environmental protection. Tools exposed to moisture, extreme temperatures, or dust can be damaged just as easily as if they were stolen. For precision tools or those with wooden handles, climate-controlled storage is a smart investment. Use moisture-absorbing packets and ensure proper insulation in spaces like basements or unheated garages. Simple measures like covering windows can also prevent prying eyes and reduce exposure to damaging sunlight.
Tracking and Auditing Your Tool Inventory
Now that you've got your tools neatly organized and logged into a digital inventory, it's time to focus on keeping those records accurate over time. Regular tracking and auditing can help you avoid the frustration of misplaced tools and save both time and money in the long run.
Conduct Regular Audits
Audits are like routine check-ups for your tool inventory - they help you catch issues before they become big problems. For most home workshops, occasional audits will do the trick, but if you lend tools often or manage an extensive collection, you might want to check more frequently.
Start by creating a detailed master list of all the tools that need monitoring. Include essential details like the make, model, serial number, current location, and maintenance history for each item [4]. If you're using a tool like Toolstash, it can simplify this process by letting you cross-check your digital inventory with the physical condition and location of your tools.
When conducting an audit, walk through your workspace and compare each tool’s actual location and condition with your digital records. Look for signs of wear or damage, and ensure that your data entries are consistent - use the same naming conventions, ID numbers, and descriptions every time [3]. This makes it easier to spot any discrepancies over time.
Pay extra attention to high-value tools or ones you use frequently. If you find something out of place, update both your physical setup and your digital records immediately. Keeping everything aligned prevents small mistakes from snowballing into bigger issues.
Monitor Maintenance and Warranties
Digital tools like Toolstash can also help you stay on top of maintenance, ensuring your tools last longer [3][4]. Schedule routine upkeep before problems arise and log maintenance activities, including dates and service details. This way, you’ll know exactly when a tool might need repairs or replacement.
Don’t forget to track warranty expiration dates. Set reminders so you can address any issues while the tool is still under warranty. Keeping these records up-to-date can save you from unexpected repair costs down the road.
Now, let’s tackle one of the trickiest parts of tool management - lending tools.
Track Loaned Tools
Lending tools can quickly throw your inventory out of sync if you’re not careful. To avoid headaches, establish clear borrowing rules upfront. Agree on return dates, borrowing periods, and who’s responsible for consumables or potential damage [5].
With Toolstash’s lending management features, you can assign tools to borrowers digitally. Record details like the borrower’s name, contact information, the date the tool was loaned out, and the agreed return date [5]. This creates a clear record and ensures accountability.
Set up reminders in your system to alert you when a borrowed tool is due back [7]. During your regular audits, don’t forget to check your lending records. If you spot overdue items, follow up promptly to get your tools back on schedule [6][8].
Comparison of Tool Tracking Methods
When it comes to managing your tools, the right tracking method depends on your needs, budget, and comfort with technology. Each option has its perks and drawbacks, so understanding these can help you pick the best fit for your home workshop. Here's a closer look at how these methods stack up, along with a comparison table to simplify your decision-making.
Manual tracking is as straightforward as it gets. All you need is a notebook and a pen, making it nearly free to start. But as your tool collection grows, this method can quickly become a hassle. Searching through handwritten notes takes time, and there's no backup if your notebook gets misplaced. Keeping track of loaned tools or maintenance schedules is also tricky without digital reminders.
Physical labeling systems are great for keeping your workshop organized. Color-coded tags, numbered stickers, or engraved labels make it easy to spot tools at a glance. However, they don’t provide detailed information like purchase dates, warranties, or who borrowed a tool. Over time, labels can wear off or get damaged, especially with heavy use.
Digital platforms like Toolstash offer a more advanced solution. These systems handle complex inventories, send automated maintenance reminders, and keep detailed records - all things that are tough to manage manually. While there’s a bit of a learning curve and a subscription fee for premium features, the benefits often outweigh these minor inconveniences.
Comparison Table
| Method | Setup Cost | Monthly Cost | Time Investment | Best For | Key Limitations |
|---|---|---|---|---|---|
| Manual Tracking | $0-$5 | $0 | High (ongoing) | Small collections, budget-conscious users | No search function, no backups, hard to scale |
| Physical Labels Only | $10-$50 | $0 | Medium (initial setup) | Visual organization, workshop efficiency | No detailed records, no lending tracking |
| Toolstash Basic | $0 | $0 | Low (AI-assisted) | Beginners, basic inventory needs | Limited advanced features |
| Toolstash Pro | $0 | $9.99 | Low (AI-assisted) | Serious DIYers, tool lending, maintenance tracking | Subscription cost |
| Hybrid Approach | $15-$60 | $0-$9.99 | Medium | Combining physical and digital benefits | Requires managing two systems |
The hybrid approach - pairing physical labels with digital tracking - offers the best of both worlds. It’s ideal if you need quick physical access to tools while also keeping detailed records. This method shines for those with large collections or who frequently lend tools.
For most homeowners, starting with a free digital platform like Toolstash Basic is a smart move. It’s easy to upgrade to Pro later if you need advanced features like tool lending or maintenance tracking. Features like AI Snap can save you hours by automating the cataloging process, making the setup far easier compared to traditional methods. Whether you’re a casual DIYer or a serious hobbyist, these options can help you stay organized and efficient.
Conclusion
Keeping track of your tools at home doesn’t have to be a hassle. Whether you prefer jotting things down, using labels, or embracing technology, the trick is to pick a system that works for you and stick with it. By staying organized, conducting regular checks, and keeping accurate records, you’ll save yourself both time and money over the long haul.
For homeowners and DIY enthusiasts, Toolstash is a standout option for digital tool tracking. Tailored for personal tool collections, Toolstash simplifies the entire process by automating cataloging and offering robust tracking features - all for free at the basic level.
"Toolstash is a free tool tracking app for homeowners & hobbyists. Easily monitor your tools and their locations, remember which neighbor borrowed what, and find out who nearby has that obscure tool you need for your upcoming weekend project!"
What sets Toolstash apart is its thoughtful design and affordability. The basic version is free, while the Pro plan, packed with advanced features, is available for just $9.99 per month. It not only makes managing your tools easier but also helps you connect with neighbors who might have that one tool you’re missing for your next project.
FAQs
What’s the best way to keep my home tool inventory accurate and up-to-date?
Keeping your home tool inventory organized and up-to-date doesn’t have to be a hassle. Start by setting a routine for regular checks - monthly or quarterly works well - to ensure all your tools are accounted for. Whenever you purchase new tools or decide to part with old ones, make it a point to update your inventory right away.
To simplify tracking, label and categorize your tools clearly. You might also want to use a system to keep tabs on items you use most often. Staying consistent with audits and updates will help you stay organized and minimize the chances of losing anything.
What are the advantages of using a digital tool tracking system like Toolstash instead of traditional methods?
Using a digital tool tracking system like Toolstash comes with several advantages compared to older, manual tracking methods. For starters, it minimizes mistakes by automating data entry, while also offering real-time updates on where your tools are located. This means managing your inventory becomes quicker and far more precise.
These systems also simplify tasks like categorizing and labeling tools, keeping them securely stored, and even generating in-depth reports. The result? Less risk of losing tools, better organization, and time saved - ideal for homeowners and DIY enthusiasts who want an easier way to stay on top of their tool collection.
How can I keep track of tools I lend out to avoid losing them?
To ensure you don't lose track of tools you lend out, start by setting up a detailed inventory system. Assign each tool a unique identifier, like a label, barcode, or QR code, and keep a record of key details. This should include who borrowed the tool, the date it was loaned, and the expected return date.
You can manage this process using a digital tool or even a simple spreadsheet. Both options will help you stay organized and maintain clear records. Make it a habit to update your inventory regularly and clearly communicate return expectations to borrowers. By staying consistent with your tracking, you'll minimize confusion, avoid losses, and ensure your tools are always available when you need them.