Achieving a smooth, durable finish starts with proper surface preparation, and sanding tools are your go-to solution. Whether you're working on wood, metal, or concrete, choosing the right sanding tool and technique is critical to ensuring your project succeeds. Here's what you need to know:
- Surface Prep Basics: Sanding removes imperfections, old finishes, and contaminants, creating a clean surface for paints, stains, or coatings.
- Manual Tools: Ideal for small, detailed tasks. Options include sanding blocks, sponges, and contour sanders.
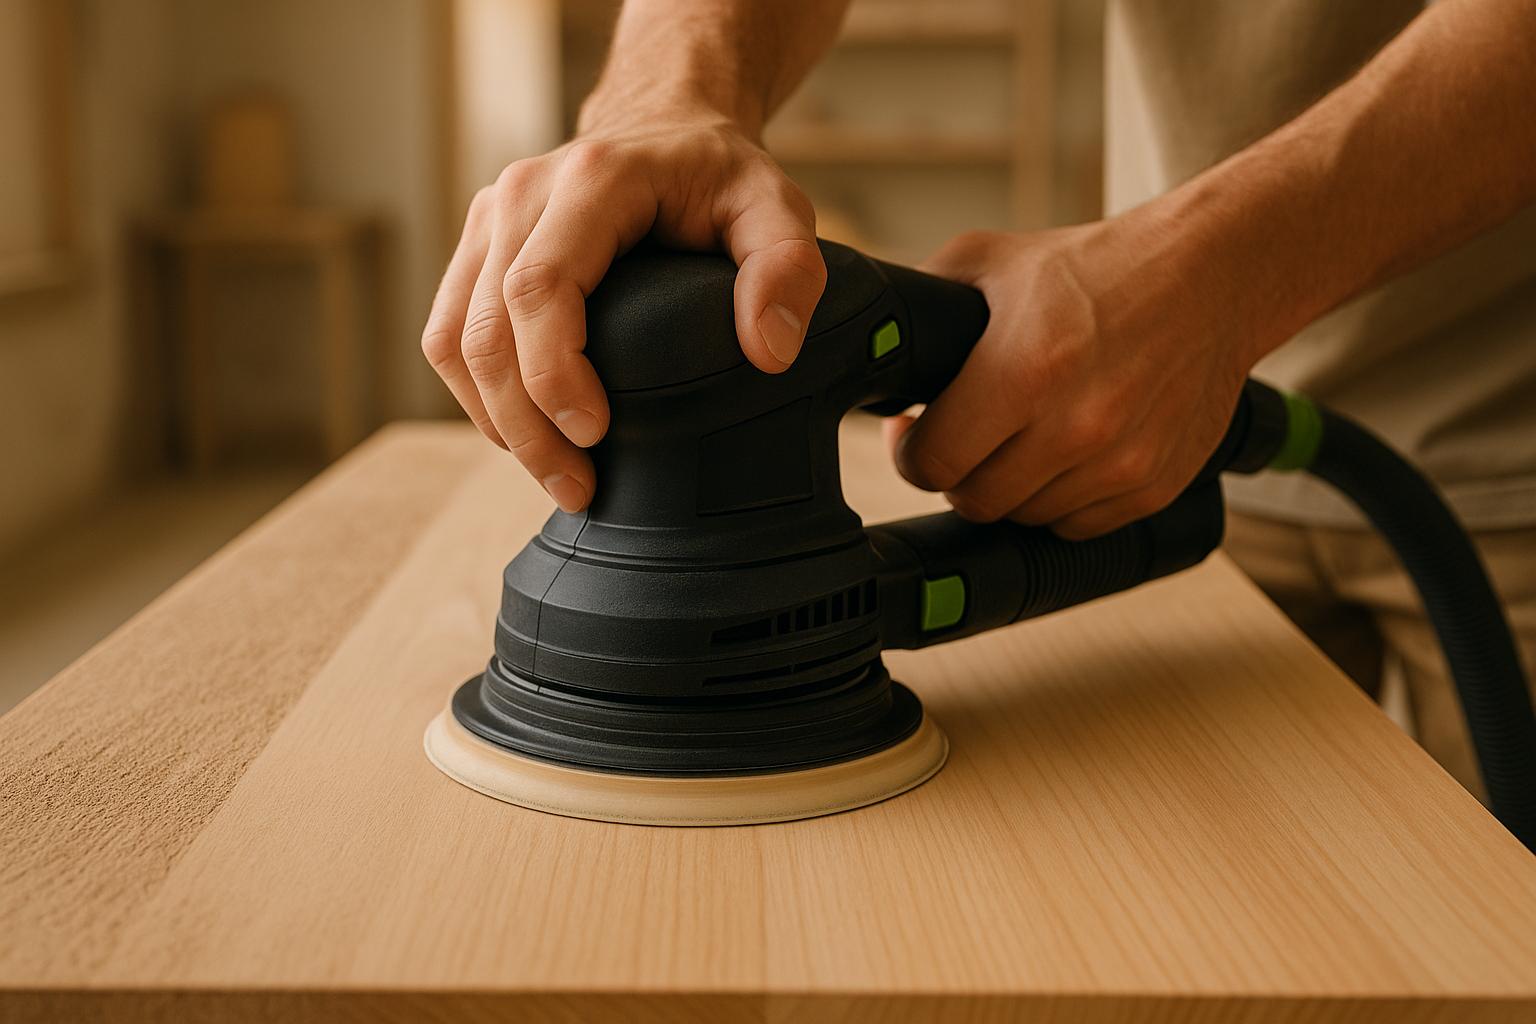
- Power Tools: Best for large surfaces. Popular types include belt sanders, random orbital sanders, and palm sanders.
- Grit Progression: Always sand in stages, moving from coarse to fine grits to avoid scratches and ensure smooth results.
- Safety First: Use dust collection systems, wear respirators, and work in ventilated spaces to protect your health.
- Maintenance: Clean tools after each use and store them properly to extend their lifespan.
Quick Comparison of Sanding Tools
| Tool Type | Best For | Pros | Cons |
|---|---|---|---|
| Manual Sanding | Small/detail work | Precise, no power needed | Slower, more effort required |
| Belt Sander | Heavy material removal | Fast, efficient | Aggressive, less control |
| Random Orbital Sander | Smoothing and finishing | Swirl-free finish, versatile | Less effective for heavy removal |
| Palm Sander | Tight corners, touch-ups | Lightweight, precise | Limited power |
No matter the tool, proper technique and preparation are key to achieving a professional finish. Read on to learn how to choose, use, and maintain sanding tools effectively.
SurfPrep Sander Review | Is the SurfPrep Sander Worth it? | Cheap SurfPrep Sander Alternative

Manual Sanding Tools: Types and Uses
When it comes to getting that perfect finish, manual sanding tools are a must. They provide precision and control, making them ideal for detail work, small repairs, and delicate surfaces. Whether you're smoothing out imperfections or preparing a surface for finishing, these tools help you achieve professional results without the risk of over-sanding.
Types of Manual Sanding Tools
Sanding blocks are the go-to tools for flat surfaces. These rectangular blocks distribute pressure evenly, preventing the uneven sanding that can happen with loose sandpaper. They're perfect for tackling flat surfaces like drywall panels or tabletops. Many sanding blocks come with foam or cork bases, which securely hold the sandpaper while allowing for slight surface variations.
Sanding sponges bring flexibility to the table. Unlike rigid blocks, these foam-backed tools adapt to curves, corners, and irregular surfaces. They're especially useful for detailed work on moldings, furniture edges, or any contoured areas. Plus, they work well for both wet and dry sanding, making them versatile for tasks like smoothing drywall compound or prepping wood surfaces.
Contour sanders are your precision tools. Available as sanding sticks, files, or profiled blocks, these are designed for intricate profiles and curves. They're indispensable for working on decorative trim, detailed furniture edges, or any surface with complex shapes where standard blocks or sponges just can't reach.
| Tool Type | Best Applications | Key Advantage |
|---|---|---|
| Sanding Blocks | Flat surfaces, drywall, tabletops | Even pressure distribution |
| Sanding Sponges | Curves, corners, moldings | Flexibility and adaptability |
| Contour Sanders | Intricate profiles, trim | Precision for tight spaces |
Choosing the right tool is only half the battle; pairing it with the appropriate sandpaper grit ensures optimal results.
How to Pick the Right Sandpaper Grit
The grit number on sandpaper determines how rough or smooth the finish will be. Higher numbers mean finer finishes, while lower numbers are for heavy-duty work.
Coarse grits (40–80): These are your heavy lifters, perfect for removing old finishes, paint, or shaping wood. They cut quickly but leave visible scratches, so they're best for initial material removal, like stripping paint from furniture or leveling rough wood.
Medium grits (100–150): These grits smooth out surfaces after coarse sanding. They're great for general woodwork and preparing drywall for finer sanding or finishing.
Fine grits (180–220 and above): Use these for creating a smooth surface ready for paint, stain, or clear finishes. They remove scratches left by coarser grits but still leave enough texture for finishes to adhere properly.
The "P" designation on sandpaper standardizes grit sizes for consistency.
Don't skip grit steps. For example, jumping from 80-grit to 220-grit might seem like a time-saver, but it can leave deep scratches that finer grit won't fix. Instead, move through the grits systematically. For wood projects, a typical sequence might be 80-grit, followed by 120-grit, and then 180-grit before finishing.
Benefits of Manual Sanding Tools
Manual sanding tools come with a host of advantages beyond their simplicity.
- Precision and control: These tools let you adjust pressure and monitor progress, making them ideal for delicate surfaces or thin layers of material.
- Perfect for detail work: Manual tools excel in areas where power sanders are too aggressive or can't reach, like inside corners or curved edges.
- Safety: Without motors or spinning parts, manual tools are safer for beginners and reduce the risk of accidental damage.
- Quiet operation: No noisy motors mean you can work late at night or in quiet environments without disturbing others.
- Portability: Manual tools don't need power outlets, making them perfect for outdoor projects or quick fixes around the house.
- Convenience for small jobs: For touch-ups or minor repairs, manual tools are often faster and easier to set up than power sanders.
Another big plus? Manual sanding helps prevent over-sanding. The slower material removal gives you time to assess your progress and stop when the surface is just right. Whether you're smoothing a drywall patch or refinishing a piece of furniture, manual sanding tools are a reliable choice for precision and control.
Power Sanding Tools: Types and Comparison
For bigger projects, power sanders are a game changer. They make quick work of removing material and leave surfaces smooth and ready for the next step. But picking the right tool is key - choosing the wrong one can do more harm than good. While manual sanding tools are great for precision work in tight spots, power sanders are built for speed and efficiency on larger surfaces. Let’s break down the different types of power sanders and how they fit various project needs.
Types of Power Sanders
Belt sanders are the heavy-duty workhorses of sanding. They use a loop of sandpaper that moves around two drums to aggressively remove material. These are perfect for leveling uneven surfaces, stripping old finishes, and tackling large, flat areas like tabletops or deck boards. Expect to pay between $60 and $250 for one of these tools.
Random orbital sanders are a favorite among both pros and DIY enthusiasts, making up over 40% of U.S. power sander sales as of 2024 [9]. They combine spinning and orbital motions to deliver a swirl-free finish, making them ideal for prepping surfaces on wood, metal, or composites. Prices usually range from $40 to $180.
Palm sanders (sometimes called detail sanders) are small but mighty, designed for precision work. Their compact size and vibrating pads make them perfect for tight corners, small projects, or finish work where control is critical. They’re lightweight and easy to handle, with prices ranging from $30 to $120.
Disc sanders come in two main forms: handheld models, often adapted from angle grinders, and stationary bench-top versions. Handheld disc sanders are great for aggressive material removal and edge work, while bench-top models - priced between $100 and $400 - offer stability and precision for flat surfaces and detailed edge work.
Rotary sanders use a spinning pad to remove material quickly, making them great for polishing and heavy sanding tasks. However, they can leave swirl marks, so they’re best suited for initial material removal rather than finishing.
Die grinders are the go-to tool for intricate detail work. These versatile tools provide high precision and control, especially in tight spaces or on complex shapes. They typically cost between $50 and $200.
When to Use Each Power Sander
The best sander for your project depends on the material and the job at hand. Belt sanders are your best bet when you need to remove a lot of material fast. They’re a staple in over 60% of large woodworking shops for initial surface prep [9]. Use them for stripping paint from large areas or leveling uneven boards, but be cautious with softer materials to avoid over-sanding.
Random orbital sanders are perfect for smoothing and finishing. Their swirl-free results make them ideal for prepping surfaces for paint or stain. While versatile, they’re less aggressive than belt sanders, so heavy material removal may take longer.
Palm sanders shine in projects where precision is key. They’re great for sanding inside corners, delicate surfaces, or doing touch-ups after using heavier tools. Their lightweight design also makes them comfortable for extended use.
Disc sanders are best for edge work and shaping. Stationary models provide excellent control for precise tasks, while handheld versions can handle tougher material removal. However, they’re less suited for curved surfaces.
How to Choose the Right Power Sander
When deciding on a power sander, consider the size of your project, the material you’re working with, and the finish you want. For large, flat surfaces like floors or tabletops, a two-step process often works best: start with a belt sander for quick material removal, then use a random orbital sander for smoothing. Hardwoods can handle more aggressive sanding, while softer materials like pine or drywall require a gentler touch with orbital or palm sanders. For metal, start with a disc sander or angle grinder and finish with an orbital sander for a polished look.
Key features to look for include dust collection, variable speed control, and ergonomic design. Built-in dust ports help keep your workspace clean and protect your lungs, while variable speed settings let you adjust the tool’s intensity based on the material and stage of your project. A comfortable grip and balanced design can reduce fatigue during long sessions.
Cordless models offer great mobility for smaller jobs, but their battery life might fall short for heavy-duty tasks.
If you’re juggling multiple tools, platforms like Toolstash can help you keep track of your gear, manage inventory, and access helpful guides for tool maintenance and selection.
Sanding Techniques and Best Practices
Achieving a professional-quality finish with your sanding tools isn’t just about owning the right equipment - it’s about using the right techniques. The difference between a perfectly smooth, paint-ready surface and one riddled with scratches or uneven patches often comes down to mastering a few key methods and understanding how they work.
Basic Sanding Techniques
To prepare a surface for finishing, focus on these foundational sanding techniques:
Scratch sanding: This involves using coarse grit sandpaper to create a rough texture, which helps paint or primer stick better. It’s especially useful for prepping glossy surfaces.
Smooth sanding: This method smooths out ripples, textures, and imperfections, creating a uniform finish. It’s ideal for preparing wood for stain or metal for a topcoat. Finer grits and consistent coverage are essential here.
Block sanding: By using a sanding block to hold the sandpaper, you can apply even pressure and avoid finger marks. This technique is particularly effective for large panels or surfaces where flatness is critical.
When sanding wood, always move with the grain to reduce visible scratches. For painted surfaces, you can start by sanding in any direction, but finish with light, even strokes for the best results. Apply gentle, consistent pressure and let the abrasive do the work - this helps prevent gouges or uneven areas.
Using Grits in the Right Order
Skipping grit levels can ruin your finish. Each grit removes the scratches left by the previous one, so jumping from a coarse grit like 80 directly to a fine grit like 220 will leave deep marks that finer paper can’t erase.
Stick to a logical grit progression. For instance, you might start with 80-grit to strip old paint, move to 150-grit to smooth out scratches, and finish with 220-grit before applying primer. Between each grit, clean the surface thoroughly with a vacuum or a damp cloth to remove dust that could scratch the finish.
Once you’ve mastered grit progression, it’s time to focus on managing dust and staying safe while sanding.
Dust Control and Safety
Sanding generates fine dust that can pose serious health risks if inhaled over time. Dust extraction systems can eliminate up to 90% of airborne particles, improving both safety and air quality [10]. Many modern power sanders come equipped with dust collection ports that can connect directly to a shop vacuum.
Personal protective equipment (PPE) is essential. Use NIOSH-approved respirators rated N95 or higher, wear safety goggles to shield your eyes, and don’t skip hearing protection when working with power tools for extended periods. Always work in a well-ventilated area - whether by opening windows, using fans, or working outdoors - to keep dust from settling back onto your freshly sanded surface.
According to the U.S. Bureau of Labor Statistics, more than 20,000 workplace injuries each year are linked to improper use of hand and power tools, including sanding equipment [10]. Frequent cleaning with a vacuum or tack cloth can prevent debris from ruining your finish.
For those who sand regularly, investing in dustless sanding systems or sanders equipped with HEPA filters is worth considering. These tools, increasingly popular due to stricter OSHA regulations and growing awareness of respiratory health risks, may cost more upfront but offer long-term benefits [10].
Finally, keeping your tools in top condition is just as important as technique. Use platforms like Toolstash to manage tool maintenance and inventory, ensuring your sanding equipment stays in peak working order.
Tool Maintenance, Storage, and Organization
Taking care of your sanding tools can make a big difference. Regular maintenance can extend their lifespan by 25–50%, while a smart organization system can shave up to 20% off your project time [8]. Keeping your tools clean and well-organized ensures they’re always ready to deliver top performance.
Cleaning and Maintaining Sanding Tools
After every use, make it a habit to clean your sanding tools. Use a brush, vacuum, or compressed air to remove dust and debris [8]. For power sanders, pay extra attention to vents and moving parts - clogged vents can lead to overheating and damage the motor.
Don’t overlook manual sanding tools. A cleaning eraser can help restore clogged sandpaper, making it usable again. If you’ve been working with oils or chemicals, use a solvent wipe-down to avoid contaminating future projects [1][4].
Replace sandpaper and pads as soon as they show signs of wear, such as clogging, tearing, or reduced performance [1][8]. It’s also a good idea to keep a range of grits on hand to handle different stages of sanding [1].
Lastly, follow the manufacturer’s guidelines for regular inspections and lubrication. Staying on schedule with these checks can prevent unexpected breakdowns [3][11][6].
How to Store Sanding Tools
Store your tools in a clean, dry space using options like toolboxes, wall-mounted racks, or drawer organizers [8]. Sandpaper and pads need special care - store them flat to prevent curling and sort them by grit for easy access. Clear containers are great for smaller accessories, while larger sheets can be filed vertically to keep them organized.
If you live in a humid area, consider adding moisture-absorbing packets or silica gel packs to your storage to protect tools from rust and corrosion. In drier climates, focus on controlling dust by using sealed containers and cleaning your storage area regularly.
| Storage Method | Pros | Cons |
|---|---|---|
| Toolbox/Drawer | Portable; shields from dust/moisture | Can get cluttered |
| Wall-Mounted Rack | Saves space; easy to access | Exposed to dust/humidity |
Label your storage areas to make it easier to find and return tools quickly.
Using Toolstash for Tool Organization

Digital tool management is becoming a game-changer for both professionals and DIY enthusiasts. Misplaced or lost tools can account for up to 30% of tool-related costs, but platforms like Toolstash are here to help.
Toolstash’s AI Snap feature simplifies organization by letting you catalog tools with just a photo. It tracks tool locations, records essential details, and even sends maintenance reminders - all in one platform. Plus, its secure data storage ensures your inventory is backed up and accessible whether you’re on-site or planning a project from home. It’s a modern way to keep your tools in check and reduce the hassle of mismanagement.
Key Points About Sanding Tools for Surface Prep
Choosing the right tools and techniques is crucial for achieving strong adhesion and durable finishes [2][1].
- Manual Tools: Sanding blocks and hand sanders are perfect for precision work, especially when tackling small details.
- Power Tools: Orbital and belt sanders are ideal for larger surfaces, offering speed and efficiency. Random orbital sanders are particularly popular because they leave surfaces smooth and free of swirl marks [7][9].
The tools you select can directly impact both the quality of your work and the safety and longevity of your project.
Grit Progression Matters
Using the correct grit progression - from coarse to fine - is essential. This approach ensures surfaces are smooth and prevents deep scratches that could compromise the finish [1][5][10].
Safety First
Sanding produces fine particles that pose health risks if inhaled. To stay safe, always use dust extraction systems and wear proper protective gear. The growing use of HEPA filters and advanced dust extraction systems aligns with stricter OSHA and EPA regulations aimed at improving workplace safety [1][8][9].
Tool Maintenance and Organization
Well-maintained tools deliver consistent performance. Cleaning tools after each use and storing them properly can prevent issues like rust, clogging, and premature wear [1][8]. For those managing multiple tools, digital platforms like Toolstash make it easier to track and maintain equipment. This not only reduces downtime but also minimizes the risk of losing valuable tools.
FAQs
How do I choose the right sandpaper grit for different surfaces and materials?
When choosing sandpaper grit, it’s all about matching the grit size to the surface and the finish you’re aiming for. Coarse grits (40-60) are your go-to for heavy-duty tasks like stripping paint or tackling rough, uneven wood. Moving up, medium grits (80-120) are versatile and great for general sanding or prepping surfaces for a finish. If you’re looking to smooth things out or sand between coats of paint or finish, fine grits (150-220) are the way to go. For those ultra-smooth finishes or working on delicate materials, extra-fine grits (240 and above) are the best choice.
The type of material you’re sanding also plays a big role. Softer woods, for instance, might need finer grits to prevent scratches, while metals often require specialized sandpaper. If you’re unsure, try testing the sandpaper on a small, inconspicuous area first to make sure it delivers the result you’re after without causing any damage.
What are the best ways to maintain and store sanding tools to keep them effective and long-lasting?
To keep your sanding tools working efficiently and to extend their lifespan, it's all about proper care and storage. After every use, take a moment to clean them up. Use a brush or compressed air to clear away dust and debris from sandpaper, pads, or discs. If you're working with power sanding tools, make it a habit to inspect and clean vents and moving parts regularly - this helps prevent buildup that could mess with their performance.
When it comes to storage, choose a dry, cool spot to protect your tools from moisture, which can lead to damage or warping. Toolboxes or wall racks are great for keeping everything organized and avoiding unnecessary wear from stacking. For sandpaper, store it flat or in a protective sleeve to preserve its grit and quality. A little effort in maintenance and smart storage goes a long way in saving you time, money, and hassle!
What safety precautions should I take to protect myself from dust and other hazards while sanding?
When sanding, keeping safety at the forefront is essential to avoid exposure to dust, debris, and other risks. Wear a dust mask or respirator to safeguard your lungs from fine particles, which can cause long-term harm. Protect your eyes with safety goggles to block flying debris, and if you're using loud power tools, don't forget hearing protection.
A well-ventilated workspace is key to minimizing dust buildup, so ensure proper airflow. Gloves are also a smart choice to shield your hands from splinters or abrasions. Before using any power tools, inspect them carefully to confirm they’re in good working order, and always stick to the manufacturer’s safety instructions. These simple steps can make your sanding experience both safer and more comfortable.