Painting furniture is all about preparation and using the right tools. Without them, you risk uneven finishes, streaks, or peeling paint. Here's what you need to know:
- Preparation Tools: Use TSP cleaner ($5–$15) for cleaning, sandpaper (120–220 grit, $5–$15) for smoothing, and wood filler ($10–$25) to repair imperfections.
- Painting Tools: Invest in quality brushes like Purdy or Wooster ($10–$20 each), foam or microfiber rollers ($8–$15), and accessories like paint trays and stir sticks ($5–$15).
- Finishing Supplies: Apply primers and topcoats for durability. Options include polycrylic ($18–$25) for clear finishes or polyurethane ($15–$28) for added strength.
- Safety Gear: Protect yourself with N95 masks ($10–$20), safety glasses ($5–$20), and nitrile gloves ($8–$15).
- Organization: Use labeled bins or tools like Toolstash to keep everything in order and avoid mid-project frustration.
Preparation, quality tools, and safety ensure a smooth process and professional results. Read on for detailed tips on each step.
DIY Furniture Painting: A Beginner's Guide to a Flawless Finish
Preparation Tools
When it comes to painting furniture, preparation is key to ensuring a long-lasting, professional finish. Skipping this step can lead to peeling, chipping, or uneven results. To get your furniture and workspace ready, you’ll need specific tools and supplies to clean, repair, and protect.
Cleaning Supplies
Start with a TSP cleaner (trisodium phosphate) to deep-clean your furniture. This powerful degreaser removes grime, old polish, and oils that can prevent paint from adhering properly [1][2]. Mix it with water as directed, then scrub the surface with a sponge. Make sure to wear gloves and work in a well-ventilated area, as TSP can be an irritant.
If you prefer a gentler option, eco-friendly cleaners like Wise Owl Paint's Green Eze are excellent alternatives. They clean effectively without releasing harsh fumes [2].
You’ll also need lint-free cloths and sponges for applying cleaners and wiping surfaces. Regular towels can leave fibers behind, creating bumps under your paint. After cleaning, rinse thoroughly with clean water to remove any residue that might interfere with paint adhesion [2].
Lastly, use tack cloths to pick up fine dust after sanding. This step is essential for achieving a smooth, flawless finish [4].
Surface Preparation Tools
For sanding, keep both medium-grit (120–150 grit) and fine-grit (220+) sandpaper on hand. Use medium grit to strip old finishes and fine grit to prepare the surface for painting. Always sand along the wood grain for the best results [1][4].
For curved or intricate surfaces, sanding sponges are a better option than flat sandpaper. They flex to fit grooves and detailed areas that are hard to reach otherwise [4][6]. If you’re working on larger pieces, a power sander can save you a lot of time, but use it carefully to avoid over-sanding.
To fix any imperfections, use wood filler and a putty knife to repair holes, dents, or scratches. Apply the filler, let it dry completely, and sand it smooth before painting. Rushing this step can leave visible flaws in your finish. Products like Elmer's Wood Filler, which costs around $6–$18, are a reliable choice [3].
| Preparation Step | Essential Tools | Cost Range |
|---|---|---|
| Cleaning | TSP cleaner, lint-free cloths, sponges | $5–$15 |
| Sanding | Medium & fine grit sandpaper, sponges | $5–$15 |
| Repairs | Wood filler, putty knife, tack cloth | $10–$25 |
Protective Items
Drop cloths are a must to protect your floors and surrounding furniture from paint splatters and dust [1][3]. Canvas drop cloths, priced at $15–$25, are reusable and absorb spills better than plastic ones. However, plastic sheets work fine for light-duty protection.
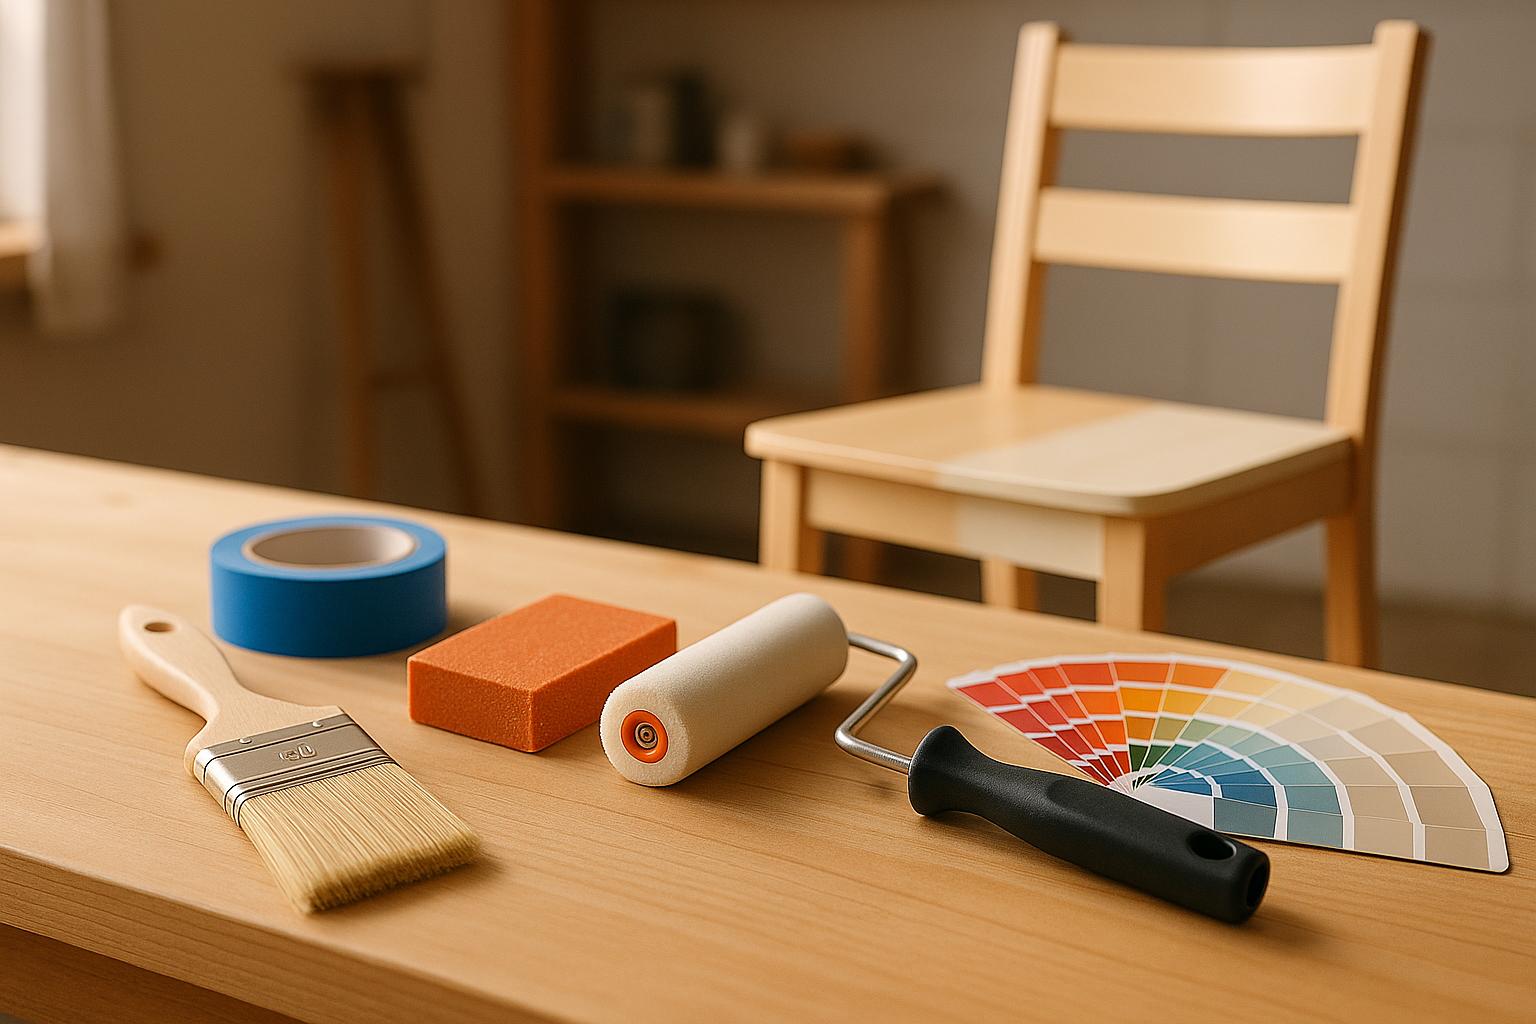
To ensure clean, sharp lines and protect areas you don’t want painted, invest in painter’s tape. High-quality tape costs $6–$12 per roll but can save you hours of cleanup. For the best results, remove the tape while the paint is still slightly wet to avoid peeling [1][3][6].
Wear old clothes or a designated painting outfit, as furniture paint can leave permanent stains. Even the most careful painters are bound to encounter splashes or drips [1].
Finally, remove all hardware like handles and hinges before painting. Label and store them carefully to make reassembly easier [1].
Painting Tools
Using the right painting tools can make all the difference when it comes to achieving a smooth, professional finish. These tools not only streamline the painting process but also help minimize the need for corrections. Below, we’ll dive into the essential tools you’ll need to apply paint effectively and efficiently.
Brushes and Rollers
Angled brushes are perfect for painting edges and corners with precision. They allow you to create clean lines around hardware, raised panels, and intricate details. For larger, flat surfaces like tabletops, drawer fronts, or cabinet doors, flat brushes are your best bet, as they provide smooth, even coverage. If you’re working on tight spaces or intricate designs, detail brushes offer the control needed for those finer touches [1][4][5].
When choosing brands, Purdy and Wooster stand out for their durability and high-quality finishes, consistently earning ratings of 4.7/5 or higher [4][5]. Although these brushes cost between $10–$20 each, they’re a worthwhile investment. Cheaper brushes often shed bristles, which can stick to your paint and create bumps that require additional sanding.
For flat surfaces, foam rollers are ideal for achieving a smooth, streak-free finish. A small roller (4"–6") with a thin nap of 1/4"–3/8" works well for most furniture projects, as it minimizes texture and reduces roller marks [1][5]. Alternatively, microfiber rollers are a fantastic choice because they hold more paint and reduce streaks, though they can be a bit bulky for smaller areas.
Pro tip: Match your brush bristles to the type of paint you’re using. Synthetic bristles work best with water-based paints, while natural bristles are better suited for oil-based paints [4][5].
Painting Accessories
To make your painting process smoother, consider these handy accessories:
- Paint trays with disposable liners: These simplify cleanup and ensure even paint application. Once you’re done, just toss the liner instead of scrubbing dried paint off the tray [1][5].
- Paint stir sticks: Properly mixing your paint is crucial for a consistent color. Many paint stores provide these for free, or you can purchase a pack for $1–$3 [3]. Skipping this step could lead to uneven color tones in your finished piece.
- Paint can openers: These prevent damage to the lid and rim, making it easier to reseal your paint for later touch-ups. A painter’s multi-tool ($20–$35) is another great option, combining a can opener with other useful features like a scraper and nail puller [3].
- Mister bottles: If you’re working with water-based paints, a light mist can maintain a wet edge and reduce brush marks, especially during blending techniques [2].
| Tool Category | Essential Items | Price Range |
|---|---|---|
| Brushes | Angled, flat, detail brushes | $10–$20 each |
| Rollers | Foam or microfiber (4"–6") | $8–$15 each |
| Accessories | Paint tray, liners, stir sticks | $5–$15 total |
Optional Tools
For larger projects or pieces with intricate details, paint sprayers can save you time while providing an even, professional-looking finish. Entry-level models, priced between $60–$100, are great for experienced DIYers who want a factory-like result. However, using a sprayer requires careful masking and thorough cleaning to avoid issues [7].
To keep all your painting tools organized, consider using Toolstash. This platform helps you manage your inventory, categorize tools, and even track their locations. It also offers DIY guides and tips for selecting the right tools and maintaining them for long-term use. Whether you’re a seasoned DIYer or just starting out, staying organized can make your projects much more manageable.
Finishing Supplies
Once your project has dried, finishing supplies are the key to ensuring durability and a polished appearance. These products not only protect your work from scratches, moisture, and daily wear but also elevate your paint job with long-lasting protection and a refined finish.
Primers and Topcoats
After prepping your surface and applying paint, finishing supplies complete the job. Primers lay the groundwork by improving paint adhesion and blocking stains that could seep through your finish. Depending on your project, you can choose between oil-based and water-based primers:
- Oil-Based Primers: Great for sealing wood tannins and blocking tough stains, making them ideal for surfaces with knots or previous staining issues. However, they take longer to dry - up to 24 hours.
- Water-Based Primers: Easier to clean, with lower odor and faster drying times (2–4 hours). These are a convenient choice for most projects.
When it comes to topcoats, the right choice depends on your needs:
- Polycrylic: A water-based finish that dries clear, making it perfect for light-colored furniture. It dries quickly - usually to the touch in about 30 minutes - and resists yellowing.
- Polyurethane: Known for its durability, this finish comes in oil- and water-based options. Oil-based polyurethane offers maximum protection but can add a yellow tint to lighter colors. Water-based polyurethane, on the other hand, dries clear and is versatile for various projects.
- Furniture Wax: Ideal for decorative pieces, this finish gives a soft, matte sheen and pairs well with chalk paint. While easy to apply, it provides less protection than polycrylic or polyurethane.
| Topcoat Type | Dry Time | Best For | Yellowing Risk | Price Range (Quart) |
|---|---|---|---|---|
| Polycrylic | 30 min–2 hrs | Light-colored furniture | Low | $18–$25 |
| Oil Polyurethane | 24 hrs | High-traffic pieces | High (on light colors) | $15–$22 |
| Water Polyurethane | 2–4 hrs | All-purpose protection | Low | $18–$28 |
| Furniture Wax | 1–2 hrs | Decorative pieces | None | $12–$20 per tin |
Application Tools
The tools you use for applying finishing products can make or break your final results. Tack cloths, previously mentioned, are essential for removing dust between coats to achieve a flawless finish. For wax finishes, a dedicated wax brush is your go-to tool - it helps work the wax into crevices evenly and typically costs between $10 and $25. For water-based topcoats like polycrylic, foam applicators are a smart choice. These applicators provide a smooth, streak-free finish without leaving brush marks and are available in packs priced at $3 to $8.
A 2023 DIY Furniture Trends Report revealed that 68% of furniture painters prefer water-based topcoats for their ease of use and low odor, while 24% choose oil-based options for their unmatched durability.
To stay organized and avoid running out of supplies mid-project, consider using Toolstash. This platform helps you manage your inventory, access application guides, and maintain your tools, ensuring your finishing supplies perform at their best.
Safety and Protection
Working with paints, primers, and sanding materials can expose you to health risks, but using the right safety gear can significantly reduce these dangers. According to the U.S. Consumer Product Safety Commission, over 60,000 emergency room visits each year are tied to home improvement injuries, with many involving eye injuries and respiratory issues due to poor use of personal protective equipment (PPE) [6]. Oil-based paints and finishes release volatile organic compounds (VOCs) that can cause headaches, dizziness, or respiratory irritation. Even water-based paints can produce fine particles during sanding, which, if inhaled regularly, can harm your lungs over time [6]. Thankfully, affordable and straightforward safety measures can help keep you protected.
Here’s a look at the essential personal protective equipment you’ll need to stay safe.
Personal Protective Equipment
Dust masks and respirators are your first line of defense against airborne hazards. For light sanding tasks, a disposable N95-rated dust mask works well to filter out fine particles, and they typically cost between $10 and $20. For jobs involving strong fumes, such as spray painting, a respirator with organic vapor cartridges is a better choice. These reusable respirators, priced between $25 and $40, provide more reliable protection against harmful chemicals. Always ensure a snug fit to prevent unfiltered air from leaking in.
Safety glasses are crucial for protecting your eyes from paint splatters, dust, and other airborne debris. The Centers for Disease Control and Prevention (CDC) notes that nearly 45% of DIY-related injuries in the U.S. involve the eyes, many of which could be avoided with proper protection [6]. Look for glasses with side shields and an ANSI Z87.1 rating for impact resistance. Basic safety glasses are both effective and affordable, ranging from $5 to $20.
Chemical-resistant gloves shield your skin from exposure to paint, solvents, and cleaning agents. Nitrile gloves are a popular choice due to their durability and resistance to a wide range of chemicals. A box of 100 nitrile gloves costs around $8 to $15 and offers dependable protection for multiple projects. Be sure to replace gloves immediately if they become torn or heavily soiled.
| PPE Item | Use | Typical Price | Key Features |
|---|---|---|---|
| Dust Mask | Sanding, light fumes | $10–$20 | Disposable, N95-rated filtration |
| Respirator | Strong fumes, spray painting | $25–$40 | Reusable, with organic vapor cartridges |
| Safety Glasses | All painting/sanding tasks | $5–$20 | Impact protection, side shields |
| Nitrile Gloves | Chemical handling | $8–$15 (box of 100) | Chemical resistant, durable |
In addition to PPE, proper ventilation is critical when working indoors. Open windows and set up fans to create cross-ventilation, which helps carry harmful fumes out of your workspace. This is especially important when using oil-based products.
It’s also wise to keep a basic first aid kit handy for treating minor injuries like cuts, chemical splashes, or eye irritation. If you experience symptoms like dizziness, skin irritation, or eye discomfort while working, stop immediately. Move to an area with fresh air and rinse any affected areas thoroughly with water. Seek medical help if symptoms persist or worsen.
To make safety a seamless part of your project planning, tools like Toolstash can help you organize your safety gear, set reminders to replace disposable items, and access DIY safety guides. This kind of preparation ensures you’re always equipped with the protection you need before starting any project.
Tool Organization and Management
A tidy workspace can make all the difference when tackling a painting project. In fact, a Jobber survey found that over 60% of professional painters believe a well-organized tool kit boosts their productivity and cuts project time by up to 20% [3]. For DIY furniture painters, the impact is just as noticeable - spending up to 30 minutes per project hunting for misplaced tools is a common frustration [3].
Before you even pick up a brush, take time to organize your tools. Start by setting up designated zones in your workspace. Create separate areas for preparation, painting, and finishing supplies. This keeps everything in its place, prevents cross-contamination, and ensures a smooth workflow from start to finish.
Physical storage solutions are key to staying organized. Labeled bins or portable caddies make it easy to group similar tools and transport them as needed. Magnetic strips are perfect for keeping metal tools like scrapers and utility knives in plain sight, while pegboards offer visibility for frequently used items. For smaller spaces, think vertically - wall-mounted organizers, stackable bins, and over-the-door storage can help you make the most of your area without adding clutter. Pairing these physical setups with digital tools can take your organization to the next level.
Digital management tools, like Toolstash, simplify the process even further. Toolstash’s inventory tracking keeps a detailed record of all your tools, from specialty brushes to safety gear, ensuring nothing gets lost in the shuffle. It uses AI to catalog and categorize tools quickly, so you always know where everything is. With its location tracking feature, you won’t waste time searching for that elusive sandpaper roll or safety glasses - they’ll be exactly where the system says they are.
For those sharing tools with family or friends, Toolstash also offers lending and borrowing management. It tracks who has borrowed what and even sends reminders for returns, avoiding confusion or unnecessary duplicate purchases. Additionally, its AI chat provides tailored advice on tool selection and maintenance, helping you make informed decisions and avoid common mistakes.
Another often-overlooked aspect of organization is tool maintenance tracking. Toolstash helps you stay on top of things by logging key details like when brushes were last cleaned, when sandpaper needs replacing, or when safety gear requires an update. This proactive approach ensures your tools are always in top condition, reducing the risk of mid-project hiccups.
To keep everything running smoothly, establish a daily organization routine. At the end of each work session, return tools to their designated spots, update your digital inventory with any changes, and prep the tools you’ll need for the next day. For multi-day projects, cover paint trays and brushes with plastic wrap to keep them from drying out, and use your tool management system to identify any items that might need attention before the next session.
Conclusion
The right tools can turn a challenging project into a rewarding experience. A well-thought-out checklist ensures you're fully prepared and eliminates those frustrating, mid-project trips to the hardware store. By covering every step - from preparation to finishing - you’ll set yourself up for success and create results you can be proud of.
Preparation is the foundation of any painting project. A smooth, clean surface ensures the paint adheres properly and lasts for years. Skipping essential tools or steps can lead to uneven application, visible brush marks, or premature wear, undoing all your hard work.
Investing in high-quality brushes and rollers is equally crucial. These tools can mean the difference between a polished, professional finish and one that looks rushed or uneven. Cheap brushes often shed bristles and leave streaks, while reliable tools help you achieve smooth, consistent coverage.
Safety should never be overlooked. Protective gear like dust masks, eye protection, and proper ventilation are non-negotiable when dealing with fumes and particles. Ignoring safety measures can quickly turn a fun DIY project into a hazardous situation.
Finishing touches matter just as much as the earlier steps. Using a high-quality primer and topcoat, applied with the right tools, protects your work from scratches, moisture, and daily wear. For example, a satin topcoat applied with a foam brush creates a sleek, wipeable surface - perfect for furniture that sees regular use.
Staying organized is another key to efficiency. Whether you prefer physical storage solutions or digital tools like Toolstash to manage your supplies and access guidance, keeping everything in order allows you to focus on the creative process rather than hunting for missing items.
Every tool in your arsenal plays a role, from the tack cloth that removes dust after sanding to the painter's tape that ensures sharp, clean lines. When all your supplies are within reach, the painting process becomes seamless, flowing naturally from prep work to the final coat. Each phase builds on the last, resulting in a finished piece that reflects your effort, planning, and skill.
FAQs
What are the advantages of using eco-friendly cleaners like Wise Owl Paint's Green Eze instead of traditional TSP for prepping furniture?
Eco-friendly cleaners, such as Wise Owl Paint's Green Eze, are a smart alternative when prepping furniture for painting. Unlike traditional TSP (trisodium phosphate), these cleaners are non-toxic, biodegradable, and much gentler on both you and the planet. Plus, they’re less likely to harm delicate surfaces or leave behind any harmful residues.
Opting for an eco-friendly cleaner doesn’t just help the environment - it also creates a safer, healthier workspace, especially when working indoors. This makes them an ideal choice for DIY furniture painting projects.
What’s the best way to decide between using a paint sprayer, brush, or roller for painting furniture?
Choosing the right tool - paint sprayer, brush, or roller - comes down to the size of your project, its complexity, and the finish you're aiming for.
- Paint sprayers are perfect for covering large areas or tackling detailed pieces. They deliver a smooth, even coat and save time, but they do require extra prep work and proper ventilation.
- Brushes shine when it comes to smaller areas or intricate details, giving you more precision and control.
- Rollers are your go-to for flat, wide surfaces, offering quick and even coverage with minimal effort.
Don't forget to factor in the furniture's material, the type of paint you're using, and your comfort level with each tool. If you're feeling unsure, test your chosen method on a small surface first to see which one delivers the finish you're looking for.
How can I apply primers and topcoats to furniture for a long-lasting, professional finish?
To create a lasting and polished finish when painting furniture, start by thoroughly cleaning the surface to remove dirt and oils. Follow this with a light sanding to help the paint adhere properly. Once prepped, apply a high-quality primer using a brush or roller. Use smooth, even strokes and let the primer dry completely, following the drying times specified by the manufacturer.
When it’s time for the topcoat, choose a paint designed specifically for furniture. Apply it in thin, even layers, allowing each coat to dry thoroughly before adding the next. For smooth surfaces, a foam roller works great, while a brush is ideal for intricate details. Always ensure you’re working in a well-ventilated space, and stick to the recommended drying times for both the primer and paint to achieve a flawless, durable finish.