Organizing your tools saves time, reduces frustration, and protects your gear. A good system ensures you always know where your tools are, prevents unnecessary duplicates, and keeps your workspace efficient. Here's the process in a nutshell:
- Set Goals: Identify what frustrates you most about your current setup (e.g., lost tools, duplicates, or clutter).
- Prioritize by Use: Keep frequently used tools within easy reach and store rarely used ones in less accessible spots.
- Inventory Your Tools: List everything you own, noting condition, location, and details like model numbers or warranties.
- Group by Function: Sort tools by category (e.g., cutting, drilling) or project type to make them easier to find.
- Assign Storage: Use pegboards, labeled bins, rolling chests, or magnetic strips to create dedicated spots for each tool.
- Label Everything: Clear, consistent labels help everyone return tools to the right place.
- Track Lending: Record who borrows tools and set clear return dates to avoid losses.
- Maintain Regularly: Inspect tools for damage, clean them, and update your inventory to keep your system running smoothly.
Start small by organizing one section of your workspace, and build from there. Tools like Toolstash can simplify inventory and location tracking, making your system easier to manage over time.
How to Organize Tool Storage Drawers | Ask This Old House

Step 1: Set Your Tool Organization Goals
Before diving into reorganizing your tools, take a moment to define what success looks like. Clear goals act as your guide, ensuring the system you create actually solves your daily frustrations instead of adding to them.
Start by reflecting on your biggest pain points. Do you spend 10 minutes every morning searching for your drill? Have you bought duplicate screwdrivers because you couldn’t find the ones you already own? Think about past issues with lending tools to others. These everyday annoyances can help shape your goals.
Your goals might include creating a complete tool inventory, grouping tools logically, tracking their exact locations, and managing lending effectively. The key is to focus on goals that fit your workflow and are realistic for your available space and time. By identifying usage patterns and frustrations, you’ll have a solid foundation for your organization plan.
Prioritize Tools by Usage Frequency
The tools you use every day should be the easiest to access. Organizing by how often you use your tools is one of the best ways to create a system that genuinely saves time.
Spend a week tracking which tools you grab most often. You’ll likely find that about 20% of your tools handle 80% of your tasks. These high-frequency items - like drills, screwdrivers, measuring tape, and safety gear - should be stored where you can grab them quickly, ideally within arm’s reach of your main workspace.
Tools you use less often, like once a week or month, can go in secondary storage areas that are still easy to get to. Specialty tools or those you rarely use can be stored in less convenient spots since they won’t be needed as often. This approach ensures your most-used tools are always accessible, keeping your workspace efficient.
Your physical workspace also plays a role. In a small garage, you might hang high-frequency tools on a pegboard above your workbench. In a larger space, a rolling cart could house these essentials. Once you’ve mapped out usage patterns, you can start addressing what’s not working in your current setup.
Identify Current Problems
With your goals in mind, take a close look at your current system and pinpoint its weak spots. Common issues include missing inventory, poor categorization, and unclear storage locations.
Walk through your typical workflow and note every time you hit a snag. Are you rifling through multiple drawers to find the right wrench? Are your measuring tools scattered across a toolbox, a workbench, and a random shelf? These inefficiencies highlight areas where better organization can save you time and frustration.
Another common issue is a lack of detailed records. Without information like model numbers, purchase dates, or warranty details, it’s hard to make smart decisions about tool maintenance or replacements. Plus, not knowing exactly where a tool is stored can lead to wasted time and unnecessary stress.
Digital tools like Toolstash can help solve many of these problems. With features like comprehensive inventory tracking, logical categorization, and location management, platforms like this make it easier to keep everything organized. Toolstash even offers AI-powered features to simplify adding tools and maintaining detailed records.
| Common Problem | Impact on Workflow | Goal to Address It |
|---|---|---|
| No comprehensive inventory | Missing tools, duplicate purchases | Create a detailed tool database |
| Poor categorization | Wasted time searching | Implement a logical grouping system |
| Unknown tool locations | Project delays | Establish precise location tracking |
| Lost lent tools | Financial loss, strained relationships | Set up a lending management system |
Once you’ve identified the specific problems holding you back, you can set focused goals to make your daily tasks smoother. Keep in mind that modular and customizable storage options are a great choice, as they can adapt to your growing collection and changing project needs [3].
Step 2: Review Your Current Tool Storage
Taking stock of your tools is a must if you want to streamline your workspace and boost productivity. A thorough review not only helps you inventory your tools but also evaluates whether your storage solutions are helping - or hindering - your daily tasks. Think of this as the groundwork for a system that can save you time and reduce frustration.
Count and List All Tools
Start by gathering every tool you own. Check your garage, basement, car trunk, kitchen drawers, and even those forgotten storage bins. Your list should include everything from power tools to hand tools and even consumables like drill bits, sandpaper, and fasteners. These smaller items are just as much a part of your tool setup as the larger ones.
If you want to simplify this process, consider using digital tools like Toolstash's AI Snap. This feature lets you document your tools by snapping a photo, and the AI takes care of identifying and categorizing them for you. It’s a quick way to build a well-organized database.
As you compile your list, take note of each tool’s condition and current location. For instance, is your circular saw stored in the garage even though you mostly use it in the basement? Are your measuring tools scattered across multiple drawers? These details will help you make smarter decisions when it’s time to reorganize.
A homeowner featured in This Old House discovered that over 30% of their tools were duplicates or rarely used. These could be stored elsewhere, donated, or even sold [3].
For added value, include details like model numbers, purchase dates, and warranty information when available. This information can be a lifesaver when it comes to scheduling maintenance, handling insurance claims, or deciding when to replace worn-out tools.
Check Current Storage Methods
Once your inventory is complete, it’s time to evaluate your current storage setup. Ask yourself: Does your storage system make it easy to access tools, or does it slow you down? Your workflow can reveal a lot about what’s working and what isn’t.
Common storage issues include stacking boxes so high that accessing one tool means moving several others, mixing unrelated tools in the same drawer, or storing heavy items on high shelves. These inefficiencies not only waste time but can also increase the risk of injury and make it harder to maintain order over time [3][2].
Look for signs of disorganization. Are tools scratched or damaged because they’re jumbled together? Do you forget you own certain items because they’re buried in containers? Or do you avoid certain storage areas altogether because they’re too chaotic? Each of these issues highlights areas where your system could improve.
Accessibility is another critical factor. If you’re constantly bending down to retrieve frequently used tools or climbing on chairs to reach items, your setup isn’t ideal. The best systems keep high-use tools at waist level and within arm’s reach of your primary workspace.
For added convenience, features like Toolstash’s location tracking can help you pinpoint exactly where each tool is stored, saving you from digging through multiple containers. Plus, its lending management feature ensures you don’t lose track of tools loaned to friends or colleagues.
Take note of the problems you uncover, but don’t try to fix everything all at once. Instead, focus on identifying patterns. Are certain types of tools always hard to find? Do some storage areas seem impossible to keep organized? Understanding these recurring issues will help you design long-term solutions that address the root causes of disorganization.
Step 3: Group Related Tools Together
Now that you've reviewed your tool inventory, it's time to organize them into logical groups. Thoughtful grouping makes it easier to find and use tools when you need them.
Sort by Function or Project Type
Start by grouping tools based on their primary function (e.g., cutting, drilling, fastening, measuring) or by the type of project they’re used for (e.g., electrical, plumbing, woodworking). For instance, a circular saw, reciprocating saw, and oscillating multi-tool could all go under the cutting category. Meanwhile, a hammer drill, impact driver, and drill bits would naturally fit into a drilling group.
If you’re working in a woodworking shop, project-based grouping might make the most sense. On the other hand, a general workshop might benefit more from functional categories. Another consideration is power source: separating corded tools from cordless ones can streamline your setup. Cordless tools should be stored near charging stations, while corded tools are best kept close to outlets with proper cord management in place.
With your tools sorted into clear groups, you’ll be ready to assign storage locations in the next step.
Create Smaller Groups Within Categories
Once you’ve established broad categories, break them down into smaller, more specific groups. For example, within your hand tools, you could separate screwdrivers, pliers, and hammers into distinct sections. For power tools, you might organize by function - like drilling, cutting, or sanding - or by their power source, keeping all cordless tools together for easy access.
Use dividers, labeled bins, or drawer organizers to separate these subgroups. The "One-Touch" rule is a helpful guideline here: arrange tools so you can grab each one without digging through layers of clutter [2]. Avoid deep bins where items get buried, and make sure frequently used tools are always within reach.
Size-based grouping can also save time. For instance, store precision screwdrivers apart from heavy-duty ones, and organize drill bits by size range. This prevents small items from getting lost among larger ones and makes tool selection faster and easier.
For an extra layer of organization, consider using digital tools like Toolstash. These platforms let you create a searchable database that mirrors your physical setup, helping you check your inventory before starting a project.
Finally, remember that your grouping system isn’t set in stone. As your tool collection grows or your projects shift, adjust your categories and create new subgroups as needed. Visual aids - like outlining tool shapes on a pegboard - can also help you quickly spot missing items and encourage you to return each tool to its proper place.
Step 4: Assign Storage Locations
Now that you’ve grouped your tools logically in Step 3, it’s time to assign each group a dedicated storage spot. Thoughtful storage assignments can turn a cluttered workshop into an organized, efficient space where every tool has a home and a purpose.
Choose the Best Storage System
Pair each tool with a storage solution that matches its size, frequency of use, and purpose. For example:
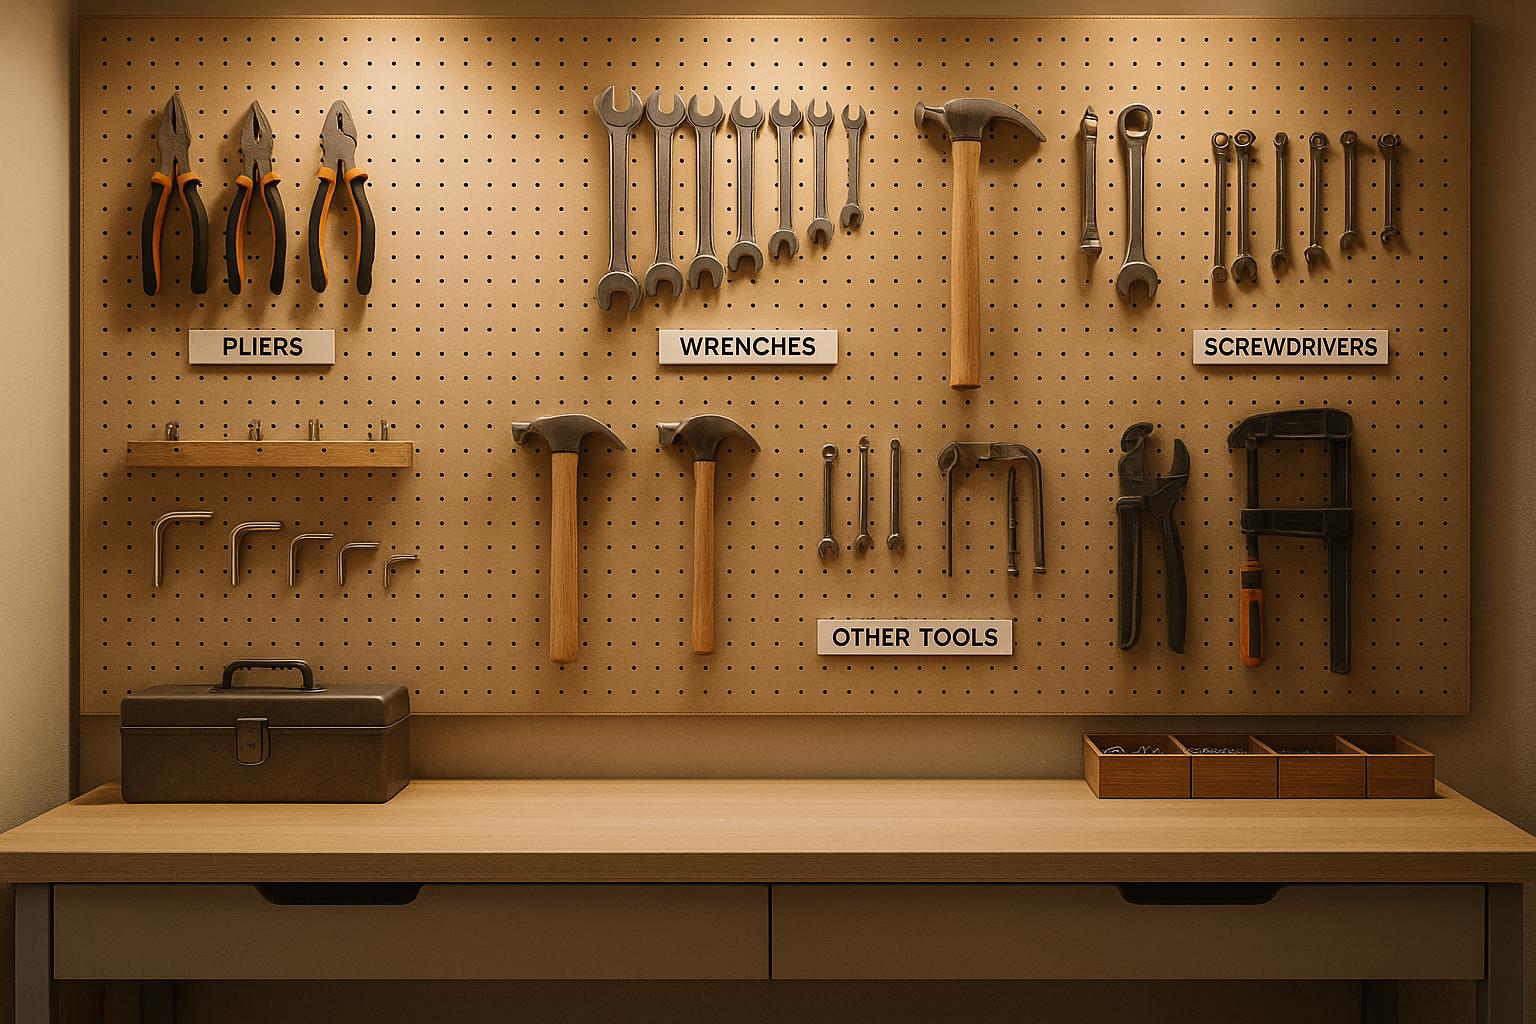
- Pegboards are perfect for hand tools like hammers, screwdrivers, and pliers. They keep tools visible and within easy reach, making it simple to spot missing items. Mount these at eye level near your main work area for quick access.
- Magnetic strips work well for small metal tools like drill bits and utility blades. Attach them to the side of your workbench or the inside of cabinet doors to keep these items handy and prevent them from disappearing into drawers.
- Clear, labeled bins are ideal for organizing screws, bolts, and washers. Store these bins on shelves or in cabinets where you can easily see and grab what you need.
- Rolling tool chests provide mobile storage that keeps everything organized and easy to transport around your workspace.
Keep your workflow in mind when setting up storage. Place tools where you naturally use them: cutting tools near your lumber storage, assembly tools close to your workbench, and finishing supplies in a well-ventilated area [3]. This setup minimizes unnecessary trips across the workshop.
For heavy tools like large power tools or table saw accessories, store them on lower shelves or in bottom drawers. This makes them easier to access and reduces the risk of injury from lifting overhead. Position these items at waist level or below for added safety.
If you use battery-powered tools, set up a charging station near an outlet. Dedicate a spot for each tool and its batteries, so everything stays charged and organized [3]. For added convenience, rolling carts can provide project-specific mobility. Some workshops even assign carts to specific tasks - one for electrical work, another for plumbing, and a third for carpentry [3].
Once every tool has a designated home, labeling becomes the key to maintaining order.
Label Everything Clearly
Labels are the glue that holds your organization system together. They ensure tools end up back in the right spot - even if someone else is using your workspace. A combination of physical labels and digital tracking can make your system foolproof.
Start with physical labels. Use a label maker or permanent markers on tape to create labels that are easy to read from a distance. Keep the formatting consistent throughout your workshop for a clean, professional look. For pegboards, outline tool shapes with a permanent marker or colored tape. This gives you a visual reminder of where each tool belongs and makes it obvious when something is missing. You can even color-code labels by category - red for cutting tools, blue for measuring tools, and green for fastening tools.
For a high-tech touch, consider using a digital tool tracking platform like Toolstash. It lets you track tool locations, organize them into categories, and even add tools by snapping a photo [1]. This digital backup complements your physical labeling system and keeps your inventory up to date.
When labeling drawers and bins, place labels on the front edge where they’re easy to spot. Add simple icons alongside text - like a small drill bit image next to the word "Bits" - to make identification faster and more intuitive, especially for non-English speakers.
For hand tools stored in drawers, foam organizers can create custom-fitted spots. Cut out shapes that match your tools, ensuring each one has a specific place. This not only makes it easy to see when something’s missing but also encourages proper storage habits.
As your tool collection evolves, update your labels to reflect any changes. Remove outdated labels and create new ones as needed. A labeling system is only effective if it accurately represents your current setup and inventory.
Step 5: Add Labels and Keep Records
Organizing your tools doesn’t stop at storage - it’s equally important to label everything clearly and keep accurate records. A solid labeling and tracking system ensures tools are easy to locate and return, saving valuable time and keeping your workshop running smoothly.
Make Clear, Readable Labels
Good labels are the backbone of a well-organized workspace. They should be easy to read and durable enough to withstand the workshop environment. Opt for large, clear fonts and materials that can handle wear and tear, like laminated or weatherproof labels [3]. These choices ensure your labels remain legible over time, even in busy or messy conditions.
To take it a step further, stick to a consistent font, size, and format for all your labels. A color-coded system can also be a game-changer, allowing you to quickly identify tools by category at a glance. For example, you might use red for power tools, blue for hand tools, and green for safety gear. While physical labels provide instant identification, pairing them with a digital record can give you detailed and up-to-date information.
Keep a Digital Tool List
Once your tools are labeled, maintaining a digital inventory becomes the next step. A digital tool list complements physical labels by providing a centralized and easily accessible record of your equipment. Tools like Toolstash's AI Snap make it simple to add tools to your inventory - just snap a photo, and the details are logged.
Digital systems like Toolstash offer features that go beyond basic inventory tracking. Here’s a breakdown of what they can do:
- Smart categorization: Automatically group tools into logical categories, saving you time and effort.
- Location tracking: Record each tool’s storage spot, making it easy to find and update as your setup changes.
- Lending management: Keep track of tools that are loaned out, including who borrowed them and when they’re due back.
- Detailed records: Log important details like purchase dates, warranty information, and maintenance schedules to stay on top of care and replacements.
- Security and privacy: Protect your inventory data while allowing you to share specific details with trusted contacts when needed.
| Method | Pros | Cons |
|---|---|---|
| Manual Labeling | Affordable, simple to implement, no tech needed | Can wear out, harder to update |
| Digital Inventory | Real-time updates, remote access, detailed tracking | Requires setup and familiarity with software |
| Hybrid (Manual + Digital) | Combines the strengths of both systems | Requires maintaining both systems |
A hybrid approach - using both physical labels and digital tracking - offers the best of both worlds. Physical labels provide quick, visual guidance, while a digital inventory offers a deeper level of detail and flexibility. To keep everything running smoothly, make it a habit to update your digital records regularly. Set aside time each month to verify that your inventory matches your physical setup, update tool locations, and add any new tools you’ve acquired. This ongoing maintenance ensures your system stays accurate and reliable, saving you time and hassle in the long run.
Step 6: Set Up Regular Tool Maintenance
Keeping tools organized goes beyond simply labeling and recording their locations. Regular maintenance is a crucial step in ensuring your tools last longer and your system remains efficient. Well-maintained tools are more likely to be returned to their proper places and far less likely to cause headaches during projects.
Schedule Regular Tool Inspections
Setting up a routine for inspecting your tools can help you catch small issues before they turn into bigger problems. A good rule of thumb is to check tools based on how often they’re used: inspect tools you use daily on a weekly basis, tools used occasionally on a monthly basis, and those that sit idle every three months.
During inspections, look for signs of wear and tear. For example:
- Power tools: Check for frayed cords or rusted parts.
- Hand tools: Look for loose handles or dull cutting edges.
- Measuring tools: Test for calibration accuracy.
- Safety equipment: Inspect for cracks, wear, or expired certifications.
Using maintenance tracking tools like Toolstash can make this process easier. You can log inspection dates, note any issues, and schedule follow-up tasks. Over time, this creates a record that helps you identify patterns and plan replacements before tools fail unexpectedly.
The key is to make maintenance part of your routine. Many workshop owners find success by setting aside 15-20 minutes at the end of each week for quick inspections. This small investment of time can save you from the frustration of dealing with broken tools during critical moments.
Once inspections are complete, take the opportunity to clean your tools right away. It’s a simple step that locks in their performance and keeps them ready for the next job.
Clean Tools Before Storing Them
Cleaning tools before putting them away is essential for preventing rust and extending their lifespan. Dirt, residue, and moisture can lead to corrosion, mechanical failures, or unsafe conditions.
Different tools require different cleaning methods:
- Metal hand tools: Wipe them down with a dry cloth after each use. Apply a light coat of oil to moving parts to prevent rust.
- Power tools: Clear air vents of dust and debris, and clean the exterior with appropriate cleaners that won’t damage plastic or rubber parts.
- Cutting tools: Use specialized cleaners to remove pitch and resin buildup from saw blades, drill bits, and similar items.
Humidity makes cleaning even more critical. In damp environments, rust can form quickly. Tools used outdoors or in wet conditions should be dried and treated immediately. A quick routine of wiping tools dry and applying a thin layer of protective oil can add years to their lifespan.
Proper storage also plays a big role in tool preservation. Store clean, dry tools in areas with good air circulation and stable temperatures. Small additions like silica gel packets in toolboxes can help control moisture, while vapor corrosion inhibitor strips offer long-term rust protection for metal tools.
When every tool has a designated spot, it’s easier to notice when something needs attention before it’s stored. This creates a positive cycle: good organization encourages consistent maintenance, and proper maintenance helps your organizational system thrive.
Step 7: Track Tool Lending and Returns
Sharing tools can make a workshop more collaborative, but it also comes with challenges - chiefly, keeping track of who has what. Whether you're lending tools to family, neighbors, or coworkers, staying organized is crucial to protect your investment and ensure tools are available when you need them.
Record Who Borrowed What
Every time a tool leaves your workspace, make a note of the key details. This includes the borrower's name and contact information, the tool's description (brand and model, if relevant), the date it was borrowed, and the agreed return date. It's also a good idea to document the tool's condition at the time of lending to avoid disputes and to monitor wear and tear.
For simple setups, a paper sign-out sheet might do the trick, but these can be prone to errors and are hard to search through later. Digital spreadsheets are a step up, offering searchable records, though they still require manual input. For busier workshops, specialized tool management platforms can save time and reduce headaches. For example, Toolstash offers a "Lending Management" feature that helps you "Keep tabs on which friends have borrowed your tools." It also lets you "Maintain comprehensive details for every tool in your Toolstash collection" [1].
The key is to make the recording process easy and quick. A simple smartphone app or a no-fuss checkout form can streamline the process, encouraging everyone to stick to it. Once you’ve got the system in place, the next challenge is making sure tools come back on time.
Make Sure Tools Are Returned on Time
Timely returns require clear expectations, reminders, and follow-ups. Start by setting firm return deadlines and confirming them with borrowers. Automated reminders - like a quick text or app notification - can help ensure no one forgets.
When tools do come back, make sure they’re returned to their proper spots. If a tool isn’t returned on time, start with a friendly reminder. If that doesn’t work, a more direct conversation might be needed to resolve the issue.
Borrowers who feel trusted and respected are more likely to take care of the tools and communicate if delays happen. By treating everyone equally and sticking to consistent follow-up procedures, you can build trust and keep your lending system running smoothly.
Step 8: Test and Improve Your System
Once your organization system is in place, it’s time to see how well it actually works. Spend a few weeks using it during your daily tasks to evaluate its effectiveness. This phase calls for patience and a willingness to tweak things based on real-world use, not just the initial plan.
Check How Well the System Works
Pay attention to how efficiently you can locate and return tools while working on projects. Are the tools you use most often easy to grab? Are your storage areas arranged in a way that makes sense for how and where you work?
If you’re using digital tracking tools like Toolstash, take advantage of location tracking to confirm whether tools are where they should be. These tools can help you spot inconsistencies and refine your system. Don’t forget to update your digital records as you notice issues.
Research shows that well-organized workshops can cut project time by up to 30% by reducing the time spent searching for tools [5].
If you’re not seeing noticeable improvements after a few weeks, it’s time to make adjustments. Use what you’ve learned to fine-tune your layout, improve accessibility, or revise labels.
Ask Others for Input
Your perspective is important, but it’s not the only one that matters. Get feedback from others who use the workshop. Ask them if they’ve had trouble finding specific tools or if the labels are easy to read and understand.
Pay close attention to feedback about your labeling system. What seems obvious to you might confuse someone else. If multiple people struggle with unclear categories or find labels hard to read from a normal distance, it’s a clear sign changes are needed.
Observe others as they navigate the system - without stepping in to help. Watch where they instinctively look for tools, whether they hesitate at certain spots, or if they naturally place items back in the correct locations.
Take all feedback into account, but remember, you can’t please everyone. Focus on recurring issues or common suggestions to guide your improvements. The goal is to create a system that works well for everyone in the space, not just for you.
Step 9: Keep the System Running
Once you've established a well-organized system, the next step is ensuring it stays that way. Setting up an efficient tool organization system is just the start; the real test lies in maintaining it over time.
Build Strong Organization Habits
Start with the One-Touch Rule: as soon as you’re done with a tool, return it to its designated spot. This simple habit prevents clutter and keeps items from going astray [2]. Dedicate 15 minutes at the end of each day for a quick reset. Some workshops even schedule a more detailed clean-up every Friday afternoon. Visual aids, like pegboards with outlined tool shapes, can also act as helpful reminders for proper storage [2][4].
Keep your digital records up to date. Whenever you acquire a new tool or make changes, log it immediately. Many systems now include AI features that let you snap a quick photo to add new tools without disrupting your workflow.
Don’t forget to declutter regularly. Set aside time monthly or quarterly to review your inventory. Remove tools that are broken, redundant, or simply no longer needed [2]. This habit ensures your workspace remains efficient and free of unnecessary items.
And remember, these habits aren't just for you - they should apply to everyone who uses the space.
Ensure Everyone Plays by the Rules
In shared workspaces, consistency is key. Assign someone as the system manager or rotate the responsibility among team members to keep everyone accountable [4]. Use your lending management system to track borrowed tools, send reminders for overdue returns, and maintain borrowing histories. A digital platform can make this process seamless.
Training is another must. Don’t assume your labeling and storage logic will make sense to everyone. Take the time to walk new team members through the system. Show them how tools are grouped, explain any special rules for high-value or often-used items, and answer their questions.
If someone isn’t following the system, address it right away. Sometimes, what looks like non-compliance might just mean the storage setup doesn’t match the workflow. Adjustments based on real-world use can make the system more intuitive.
Encourage feedback from everyone who uses the space. When people feel they’ve had a say in how the system works, they’re more likely to stick to the rules. Regular check-ins can also uncover areas for improvement or reveal new challenges.
Finally, consider modular storage solutions like rolling tool chests or expandable pegboards. These make it easier to adapt your setup as your collection grows or changes [2]. Pairing flexible storage with updated digital records ensures your system evolves with your needs. When users see the system adapts to them, they’re more motivated to maintain it.
Conclusion: Keep Your Tools Organized Long-Term
Setting up an organized tool system isn’t just a one-and-done task - it’s a commitment that keeps delivering over time. By following a solid plan, you’ll save time, avoid unnecessary repurchases, and keep your projects running smoothly.
A well-maintained system doesn’t just save you hassle; it also helps extend the life of your tools by promoting better care and tracking. Plus, when you know exactly what you own and where it’s stored, you can make smarter decisions about what to buy, borrow, or upgrade.
Digital management tools can take your organization to the next level. For instance, Toolstash offers features like AI Snap, smart categorization, location tracking, and lending management. With AI Snap, you can instantly add a tool to your inventory by snapping a photo. Smart categorization takes the guesswork out of sorting, while location tracking ensures you always know where your tools are. And if you lend tools out, the lending management feature helps you keep track, so nothing goes missing for good.
To keep your system running smoothly, make it a habit to return tools to their designated spot after use, update your inventory whenever you add new items, and periodically declutter to get rid of broken or unnecessary tools.
Start small - choose one storage area or tool category to organize first. By tackling one section at a time, you’ll see immediate benefits and feel motivated to expand the system to your entire collection. With modular storage options and digital tracking tools, your system can grow right alongside your tool collection.
The effort you put into organizing your tools today will save you hours of frustration, protect your gear, and make every project less stressful. An organized workspace isn’t just efficient - it’s a game changer.
FAQs
How do I decide which tools should be easily accessible and which can be stored away?
When deciding how to organize your tools, start by thinking about how often you use each one. Tools you reach for regularly - like a hammer or screwdriver - should be stored where they're easy to grab. On the other hand, items you use less often, such as seasonal gear or highly specific tools, can go in labeled bins or cabinets for later use.
Grouping tools by type or project can also make your workspace more efficient. For instance, keep all your woodworking tools in one spot or assign a drawer specifically for automotive tools. Putting thought into how you arrange and store your tools now can save you a lot of hassle down the road.
What are the best ways to keep track of my tools digitally?
To keep track of your tools efficiently, start by building a detailed digital inventory. Include essential details like the tool's name, category, and where it's stored. Make it a habit to update this list whenever you add new tools or make changes.
A tool management platform can make this task much easier. These platforms often come with handy features like automatic categorization, location tracking, and lending management tools to help you keep your inventory accurate and well-organized.
What’s the best way to make sure tools I lend out are returned on time and in good condition?
To keep your tools in good shape and ensure they're returned on time, try using a lending management system. This tool allows you to track who has borrowed your items and when they're expected back. Having a clear record minimizes confusion and makes it easier to follow up if needed.
It's also a good idea to set expectations right from the start. Talk to the borrower about return dates and how to properly care for the tools. This approach helps you maintain your equipment while sharing responsibly.