DIY projects can be rewarding, but they come with risks. Every year, hundreds of thousands of people visit emergency rooms due to avoidable injuries like falls, cuts, or electric shocks. The good news? A few simple precautions can keep you safe.
Here’s what you need to know:
- Falls and ladder accidents are the most common, often due to unstable surfaces or overreaching. Follow the 4-to-1 ladder rule and use a spotter.
- Cuts and lacerations happen when tools are misused or dull. Always cut away from your body and wear gloves.
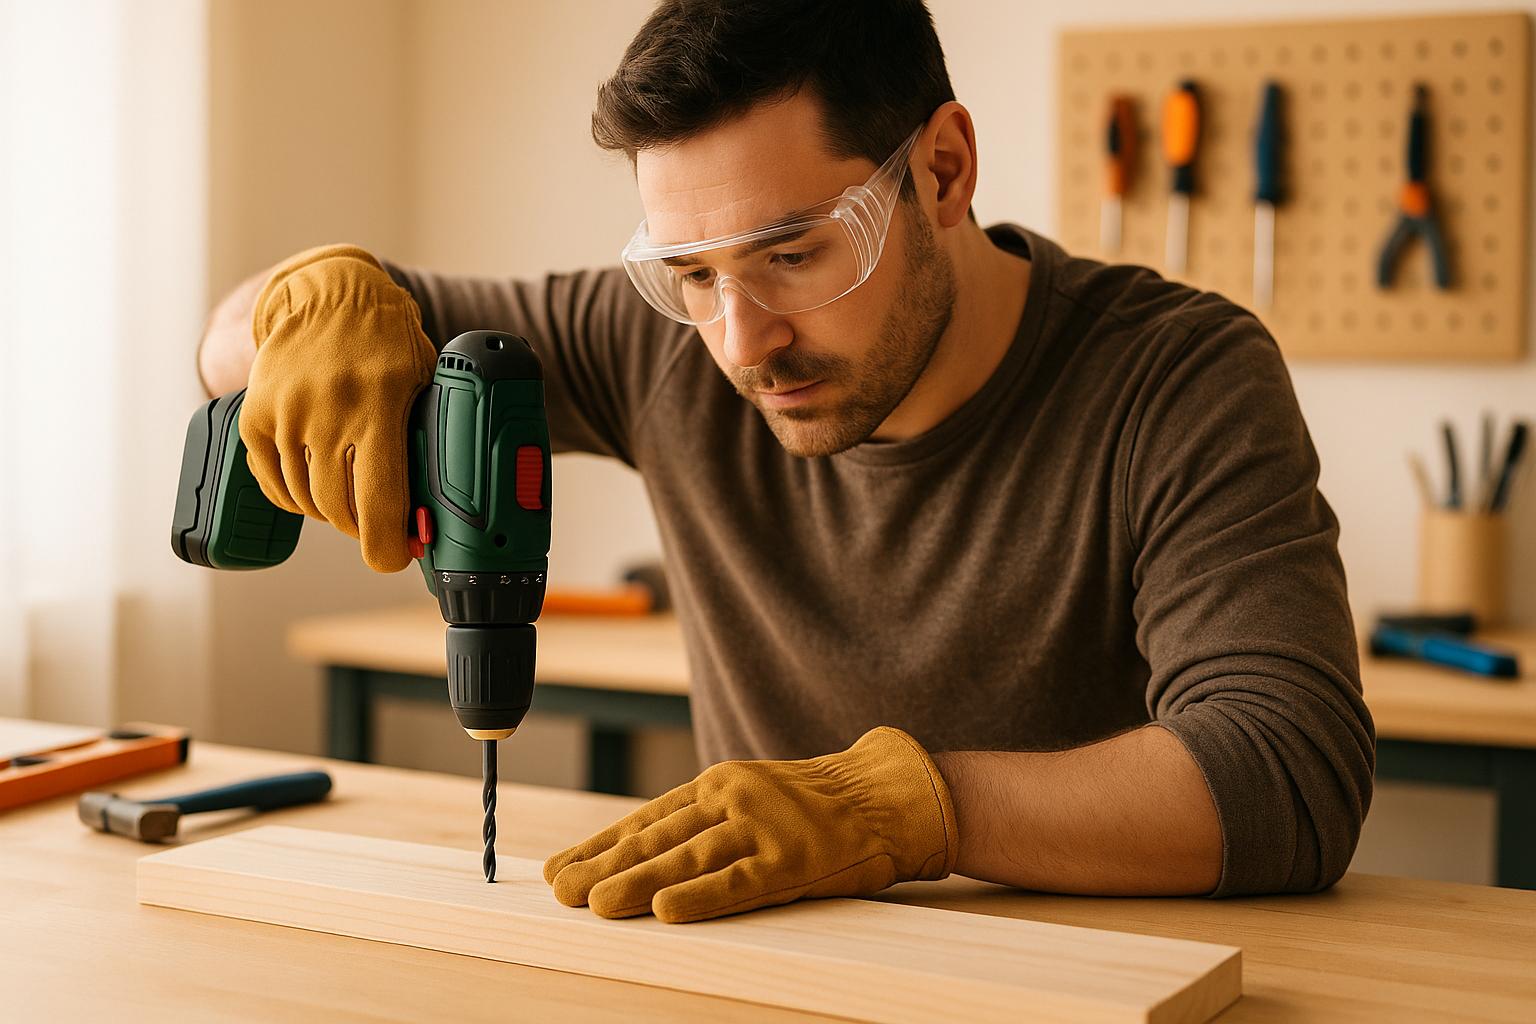
- Eye injuries are caused by flying debris or chemicals. Protect your eyes with ANSI-rated safety goggles.
- Electric shock occurs when working on live circuits. Always turn off power at the breaker and use a voltage tester.
- Muscle strains result from poor lifting techniques. Lift with your legs, not your back, and take breaks.
Safety tips to remember:
- Wear proper protective gear (goggles, gloves, boots).
- Keep tools sharp, clean, and in good condition.
- Organize your workspace to eliminate clutter and hazards.
- Plan your projects carefully, and don’t rush.
- Always have a first-aid kit and emergency contacts nearby.
10 Simple Safety Tips Every DIYer should Know
Most Common DIY Injuries
Every year, hundreds of thousands of Americans end up in emergency rooms due to injuries from do-it-yourself projects. Below are the five most common types of injuries and some practical tips to help you avoid them. By understanding these risks, you can take smarter precautions and stay safe while tackling your projects.
Cuts and Lacerations
Sharp tools are essential for most DIY tasks, but they can also be dangerous if not used correctly. Cuts and lacerations are among the most frequent injuries, often caused by improper tool use or skipping protective gear. A common mistake is cutting toward your body instead of away from it. If a utility knife or saw slips - especially when using a dull blade that requires more force - it can lead to serious injuries. To stay safe, always cut away from your body, keep blades sharp, and wear cut-resistant gloves.
Falls and Ladder Injuries
Falls are the top reason for DIY-related emergency room visits, with ladder accidents making up a significant portion. In fact, over 170,000 Americans are treated for ladder-related injuries every year[3]. Common errors include placing ladders on uneven surfaces, not following positioning guidelines, or overreaching while working. A good rule of thumb is to place the ladder base 1 foot away from the wall for every 4 feet of ladder height. Avoid overreaching - move the ladder instead - and consider using a spotter for added stability.
Eye Injuries
Even small debris can cause serious damage to your eyes, making protection a must. Power tools like drills and saws often send particles flying at high speeds, while tasks like sanding or hammering can create dust and debris. Chemicals such as paint thinners or adhesives can also splash and harm your eyes. To protect yourself, wear ANSI-rated safety goggles or a face shield whenever you're working on a project.
Electric Shock
Electric shock is another serious hazard, often stemming from seemingly simple mistakes. Common risks include working on live circuits without turning off the power or using tools with damaged wiring. To reduce the risk, always shut off the power at the breaker box and double-check that the circuit is off using a voltage tester. If you're unsure about handling electrical work, it’s safer to hire a professional.
Muscle Strains and Back Injuries
Lifting heavy objects the wrong way or repeating the same movements can lead to muscle strains or back injuries. Bending over and twisting while lifting puts a lot of stress on your spine. To avoid injury, use proper lifting techniques: keep your feet shoulder-width apart, bend at your knees instead of your waist, and hold objects close to your body. Regular breaks and tools like dollies can also help reduce strain.
Here’s a quick reference table summarizing the most common DIY injuries and how to prevent them:
| Injury Type | Most Common Causes | Key Prevention Steps |
|---|---|---|
| Cuts & Lacerations | Cutting toward the body, dull blades, no protective gear | Cut away from the body, keep blades sharp, wear cut-resistant gloves |
| Falls & Ladder Injuries | Unstable surfaces, improper ladder use, overreaching | Follow the 4-to-1 rule, reposition instead of overreaching, use a spotter if possible |
| Eye Injuries | Flying debris, chemical splashes | Wear ANSI-rated safety goggles or a face shield |
| Electric Shock | Working on live circuits, damaged tools | Shut off power at the source, verify circuits are off, inspect tools before use |
| Muscle Strains & Back Injuries | Poor lifting techniques, repetitive motions | Lift with your legs, take breaks, use equipment for heavy lifting |
These examples highlight the importance of taking safety seriously during DIY projects. By recognizing potential risks and following these precautions, you can focus on the fun of home improvement without unnecessary trips to the ER.
Safety Gear and Personal Protection
The right safety gear can be the difference between completing a DIY project successfully and ending up in the emergency room. Many injuries happen during seemingly routine tasks when safety precautions are overlooked. By investing in reliable protective equipment and wearing it consistently, you can shield yourself from common risks. Below, we’ll cover essential safety gear and tips for appropriate attire.
Basic Protective Equipment
Equipping yourself with the right safety gear is crucial for any DIY project. Here are the essentials:
Safety glasses or goggles: Protect your eyes from flying debris, especially when using tools like drills or saws. Look for ANSI-rated options that fit securely and offer side protection. These typically range in price from $3 to $15.
Work gloves: Keep your hands safe from cuts, abrasions, and chemical exposure. Choose gloves that fit well to maintain dexterity. Leather gloves work well for heavy-duty tasks, while nitrile-coated gloves provide excellent grip and resistance to chemicals. Expect to pay between $5 and $25 for quality gloves.
Ear protection: Prolonged exposure to loud power tools can lead to permanent hearing damage. Disposable foam earplugs or noise-reducing earmuffs are affordable solutions, with prices starting at $2 for earplugs and going up to $30 for earmuffs.
Sturdy work boots with steel toes: These protect your feet from falling objects and sharp materials. Look for boots with slip-resistant soles for extra safety. Reliable options typically cost between $40 and $150.
For tasks that generate dust, fumes, or vapors, consider adding a respirator or mask. A basic dust mask is sufficient for sanding, but projects involving chemicals may require a respirator with specialized filters.
Proper Clothing for DIY Projects
Your clothing plays a significant role in keeping you safe during projects:
Snug-fitting clothes: Loose clothing can get caught in power tools, leading to severe injuries. Opt for well-fitted, durable fabrics that protect against cuts, burns, and spills.
Hair and accessories: Tie back long hair and keep it secured to avoid it getting tangled in equipment. Remove loose jewelry, watches, or anything that could catch on tools or materials.
Task-specific attire: Match your clothing to the project. For instance, painting or refinishing might call for old clothes and chemical-resistant gloves, while woodworking is better suited for natural fiber clothing. Outdoor construction projects benefit from durable pants and long sleeves to guard against scrapes and sun exposure.
Footwear: Besides steel-toed boots, avoid sneakers, sandals, or any open-toed shoes. These leave your feet vulnerable to hazards like dropped tools or chemical spills.
Outdoor Safety Considerations
Outdoor projects come with their own set of challenges, so it’s important to tailor your gear to the environment:
Sun protection and hydration: Use a broad-spectrum sunscreen with at least SPF 30 and take regular water breaks. Reapply sunscreen every two hours or after heavy sweating to stay protected.
Weather-appropriate gear: Wear a wide-brimmed hat to shield your face and neck, and opt for breathable, light-colored clothing to stay cool. In colder weather, dress in layers so you can adjust as needed.
Be prepared for environmental hazards: Outdoor work can expose you to stinging insects, uneven terrain, and sudden weather changes. Check the forecast beforehand and have a plan for unexpected storms or temperature drops. Keep a first aid kit nearby and know the location of the nearest medical facility.
A tool management platform like Toolstash can help you keep track of your safety gear along with your tools, ensuring everything is in working order. Regularly inspect your equipment - such as checking for cracks in safety glasses or wear on gloves - as maintaining your protective gear is just as important as caring for your tools.
Safe Tool Use and Maintenance
Using and maintaining tools properly is at the heart of DIY safety. Many injuries happen because of simple mistakes, like picking the wrong tool for a job or ignoring visible wear and tear. By making it a habit to select, inspect, and care for your tools, you can avoid accidents and keep your equipment in good shape for longer.
Using the Right Tool for the Job
Every tool has a purpose, and sticking to that purpose is one of the easiest ways to stay safe. Using a screwdriver as a chisel or a wrench as a hammer might seem like a quick fix, but it often leads to trouble. Tools used incorrectly can slip, break, or behave unpredictably, putting you at risk.
For instance, trying to hammer nails with a power drill can not only damage the tool but also lead to hand injuries. Similarly, using pliers instead of a wrench to turn a bolt can result in a slipped grip and scraped knuckles.
Choose tools that match the task. If you're cutting wood, pick a saw designed for the material and its thickness. Working with electrical systems? Use insulated tools rated for the voltage you'll encounter. When driving screws, ensure the bit size matches to avoid stripping or slipping.
Not sure which tool to use? Platforms like Toolstash offer AI-powered suggestions to help you pick the right one. This ensures you're working efficiently and safely while making the most of the tools you already have.
Once you've selected the correct tool, it's time to ensure it's in safe working condition.
Inspecting Tools Before Use
Before you start using a tool, a quick inspection can make all the difference. Catching damage or wear early prevents accidents and keeps your projects on track.
Begin with a visual inspection. Check for cracks in handles, dull or chipped blades, and other signs of wear that could impact performance. For power tools, look at the electrical cord for fraying or exposed wires, which are serious hazards that need immediate attention.
Make sure safety features are intact and functional. Blade guards, safety switches, and shields are there to protect you. Never bypass or remove them. Also, check that moving parts operate smoothly and that screws and bolts are secure.
For battery-powered tools, confirm the batteries are in good shape and fully charged. Tools with weak batteries can behave unpredictably or lose power mid-task, which can be dangerous.
If you spot any damage or defects, don’t use the tool. A cracked hammer handle, for example, could snap during use, causing injuries and delays. It’s always better to repair or replace damaged tools than to risk an accident.
Tool Maintenance and Storage
Taking care of your tools not only keeps them safe to use but also extends their lifespan. Regular maintenance and proper storage are key parts of a complete safety plan.
Clean your tools after every use. This removes debris, moisture, and corrosive materials that can lead to rust or other damage. Keeping tools clean also ensures moving parts work smoothly.
Sharp tools are safer than dull ones. While it might seem counterintuitive, dull blades require more effort to cut, increasing the risk of slips and loss of control. Regular sharpening keeps tools efficient and safer to handle. If sharpening feels intimidating, many hardware stores offer this service.
Lubricate moving parts as recommended by the manufacturer. Sticking or binding mechanisms can cause tools to malfunction, so keeping them properly lubricated helps avoid unexpected problems.
Store your tools in a safe and organized manner. A dry, well-organized space prevents rust and damage. Keep sharp or heavy tools out of children’s reach, and use lockable storage for power tools and other dangerous equipment.
Options like wall-mounted racks, pegboards, and labeled bins make it easier to find what you need while reducing clutter and tripping hazards. Plus, when everything has its place, it’s easier to notice if something is missing or damaged.
Platforms like Toolstash can help you stay on top of maintenance. Their features include maintenance reminders, inventory tracking, and even lending management, so you can keep your tools in top condition and know where they are at all times.
Schedule regular maintenance checks. Beyond daily cleaning, this might involve replacing worn brushes in power tools, recalibrating measuring devices, or checking that safety equipment is up to date. Keeping records of maintenance can help you spot patterns and anticipate when tools might need replacement.
Well-maintained tools don’t just perform better - they’re much safer to use. A little effort in cleaning, storing, and maintaining your tools can save you from the frustration and pain of tool-related injuries.
Creating a Safe Work Environment
When it comes to DIY projects, safety starts with the tools and gear you use, but it doesn’t end there. The environment you work in plays a huge role in preventing accidents. A well-organized, hazard-free workspace can stop problems before they even begin.
Organizing and Decluttering Your Workspace
Clutter isn’t just messy - it’s dangerous. Piles of tools, misplaced materials, or scattered debris can lead to trips, falls, or grabbing the wrong item at a critical moment. The solution? A clean, organized workspace.
Begin by clearing out anything you don’t need for your current project. That includes leftover materials, unrelated tools, or unfinished projects. If kids or pets have access to your workspace, make sure it’s secured - they can unknowingly create hazards. Safety experts estimate that better organization, along with proper ladder use, could prevent up to 40% of home improvement injuries[2][5].
Designate a specific spot for every tool and material. Use labeled bins, pegboards, or wall-mounted storage to keep everything in place. This setup not only reduces clutter but also makes it easy to spot missing or broken tools before they cause issues.
For areas where you stand frequently, consider using non-slip mats. They improve your footing and reduce fatigue, which can help you stay focused and avoid mistakes. Sweep the workspace regularly to clear out debris like wood shavings or dust that could cause slips.
Lighting is another crucial factor. Poor lighting can lead to mistakes with measurements or improper tool handling. Make sure your workspace has bright, even lighting from multiple angles to eliminate shadows and blind spots.
If staying organized feels overwhelming, platforms like Toolstash can simplify the process. They offer features like inventory tracking and smart categorization to help you keep your tools and materials in check, creating a safer and more efficient workspace.
Once your workspace is in order, safe ladder use becomes much easier.
Ladder Safety Guidelines
Using a ladder might seem straightforward, but improper use is a common cause of injuries. Start with the basics: follow the 4-to-1 rule for placement. For every four feet of ladder height, set the base one foot away from the wall. Always place the ladder on a level, stable surface and lock it in place before climbing.
Avoid standing on the top two rungs - they aren’t designed to support your full weight and can easily tip the ladder backward. If you can’t reach your target safely, reposition the ladder or switch to a taller one.
Whenever possible, have someone hold the ladder steady, especially for tasks that require both hands or involve force, like drilling or hammering. Never lean too far to the side; if you can’t reach, climb down and move the ladder. Lastly, check that the ladder is rated to handle your combined weight and the load of your tools.
Even with all these precautions, accidents can happen. That’s where emergency readiness comes in.
Emergency Preparedness
Preparation is key to dealing with unexpected incidents. A well-stocked first-aid kit should always be within reach. Include essentials like bandages, antiseptic wipes, gauze, medical tape, pain relievers, and instant cold packs. Regularly check expiration dates and replace items as needed. Avoid burying the kit in a toolbox where it might be hard to find during an emergency.
A fire extinguisher is another must-have, especially when working with power tools or flammable materials. Familiarize yourself with the PASS method: Pull, Aim, Squeeze, Sweep. For tasks involving heat, like welding or soldering, keep a bucket of ice water or a hose nearby to quickly cool burns.
Know the location of your main electrical panel and how to shut off power in your workspace. Clearly label circuit breakers for quick access. The same goes for water and gas shutoffs if your project involves plumbing or gas lines.
Keep your phone charged and within reach. In a serious emergency, you’ll need to act fast. Save important numbers like poison control (1-800-222-1222) and local emergency services in your contacts ahead of time.
Finally, ensure pathways to exits are clear for easy access by emergency responders. Working with a partner adds another layer of safety - they can assist in emergencies or help with tasks that are safer with two people, like moving heavy materials or stabilizing equipment.
Prevention Habits and Emergency Preparedness
Staying safe while tackling DIY projects requires more than just knowing how to use tools properly. Developing good habits and being prepared for emergencies are just as important. According to the Home Safety Council, 1 in 5 DIYers have suffered injuries serious enough to need medical attention[4]. Many of these accidents could have been avoided with better planning, regular breaks, and smart safety practices.
Planning and Taking Breaks
Careful planning is a cornerstone of DIY safety. Rushing through a project increases the risk of mistakes and injuries. Many accidents happen when people are distracted, tired, or trying to finish quickly[4]. By taking the time to plan ahead, you can identify potential hazards, gather the right tools and safety gear, and break the project into smaller, manageable steps[4].
If you're working outdoors, check the weather - wind, rain, or extreme heat can add unexpected dangers. Make sure you have all materials and tools ready before starting, and organize your workspace to eliminate clutter and distractions that could lead to errors[4][2].
Taking regular breaks is another key safety measure. Fatigue can slow your reaction time and increase the temptation to cut corners. Short breaks every 20–30 minutes and longer ones each hour allow you to stretch, hydrate, and rest your muscles[1][2]. For repetitive tasks like painting or sanding, alternating with other activities - such as measuring or organizing materials - can help prevent overuse injuries and keep you mentally sharp. These habits not only reduce strain but also help you maintain focus and avoid costly mistakes.
Platforms like Toolstash can also help by keeping your tools organized, ensuring you have the right equipment on hand and minimizing the need to improvise with unsafe alternatives.
Shutting Off Power for Electrical Work
When it comes to electrical work, the first rule is simple: always shut off the power at the circuit breaker or fuse box before starting[2][4]. After turning off the appropriate breaker, use a voltage tester to confirm that the power is completely off before handling any wires[2].
For example, replacing a light fixture without cutting the power can lead to severe electric shocks, burns, and even a trip to the emergency room. Such incidents are entirely avoidable by taking the extra step to ensure the power is off[2][4].
If you're not experienced with electrical work, it’s a good idea to consult a licensed electrician. Mistakes can lead to serious injuries, house fires, or even code violations that might impact your insurance or home resale value[2]. Additionally, working with a partner can provide an extra layer of safety when dealing with potentially hazardous tasks.
Working with a Partner
Having a partner by your side can make a huge difference in both safety and efficiency. They can steady ladders, hold materials, and keep an eye out for potential hazards[4][2]. Your partner doesn’t need to be an expert - they just need to stay alert and ready to assist. If something goes wrong, they can call for help or step in to prevent further issues.
Even for simpler jobs, a second pair of eyes can catch hazards you might overlook. A partner can remind you to follow safety steps, encourage breaks, or simply provide moral support when a project becomes challenging. Safety experts frequently recommend working with a partner for larger or riskier tasks, as this adds an extra layer of protection and accountability[4].
Platforms like Toolstash not only help you find the tools you need but can also connect you with others who might have experience or equipment to share. This makes it easier to find a knowledgeable partner while promoting safe resource sharing.
Beyond safety, having a partner can lead to quicker and more effective results. Two people can tackle complex projects more efficiently, all while keeping each other safe and ensuring proper procedures are followed.
Conclusion: Preventing DIY Injuries
DIY projects can be incredibly rewarding, offering a chance to flex your creativity and tackle hands-on challenges. But the risks? They're no joke. In 2022, emergency rooms treated over 290,000 people for DIY-related injuries. Falls from ladders alone accounted for a staggering 170,000 visits annually [4]. These numbers highlight just how important it is to prioritize safety.
Staying safe during DIY work boils down to three key factors: using proper safety gear, planning ahead, and keeping tools in good condition. Safety gear protects you from common hazards, while careful planning helps you spot risks, gather the right materials, and avoid rushing - one of the biggest culprits behind accidents. Regularly inspecting and maintaining your tools ensures they're in working order, reducing the chance of equipment failures that could lead to injury.
Even seemingly simple tasks can pose dangers if you’re not careful. Avoid distractions, take your time, and don’t skip breaks. Building good habits, like keeping your workspace organized and working with a partner when possible, can go a long way in minimizing risks.
On top of that, managing your tools effectively is a game-changer for safety. Platforms like Toolstash can help you stay on top of your inventory, keep equipment in good shape, and maintain an organized workspace. When you know what tools you have and where they are, you're less likely to grab unsafe alternatives or use damaged gear. Safety starts with preparation, and these habits can make all the difference.
FAQs
What safety gear should I use to stay protected during DIY projects?
Wearing the proper safety gear is a key step in avoiding injuries while tackling DIY projects. Here are some must-haves to keep in mind:
- Safety goggles: These shield your eyes from dust, flying debris, or unexpected splashes.
- Work gloves: Protect your hands from cuts, scrapes, and burns while handling tools or materials.
- Hearing protection: Earplugs or earmuffs are essential if you're working with noisy equipment.
- Dust masks or respirators: These help prevent inhalation of harmful particles, fumes, or dust.
- Sturdy footwear: Steel-toe boots or other durable shoes guard your feet against falling objects or sharp materials.
Make sure your gear fits properly and meets safety standards for the task at hand. A little preparation with the right equipment can go a long way in ensuring your safety.
What are the best ways to keep my workspace safe and organized during DIY projects?
Creating a safe and tidy workspace is essential to preventing injuries during DIY projects. Start by clearing away any clutter and making sure all tools are securely stored when not in use. Using a tool management system like Toolstash can make this process easier by helping you categorize your tools, keep them organized, and always know exactly where to find them.
Beyond organization, take the time to inspect your tools for any signs of damage before using them. Always wear the right safety gear and follow proper handling techniques. A clean and well-maintained workspace doesn’t just make your projects run smoother - it also helps minimize the chances of accidents.
How can I maintain my tools to keep them safe and in good condition?
Keeping your tools in top-notch shape starts with proper organization and care. A tool management platform, such as Toolstash, can make it easier to maintain a detailed inventory and keep tabs on your tools without hassle. Make it a habit to inspect your tools regularly for any signs of wear, clean them thoroughly after each use, and store them in a dry, secure spot to avoid rust or damage.
By staying on top of organization and maintenance, you’ll not only extend the lifespan of your tools but also ensure they’re always ready and safe to use for your DIY projects.