Want a flawless paint finish that saves time? Airless paint sprayers are your go-to tool for smooth, even coverage without brush marks or roller textures. They work by pumping paint at high pressure (1,500–5,000 PSI) through a fine nozzle, delivering a mist that coats surfaces efficiently. Here’s what you need to know:
- Why Use Airless Sprayers? Cover large areas up to 10x faster than brushes or rollers, with consistent results. Suitable for walls, siding, decks, cabinets, and more.
- Setup Essentials: Choose the right spray tip (e.g., 515 tip for latex paint), strain your paint, and test spray on cardboard. Keep safety gear on and work in a ventilated area.
- Technique Tips: Maintain a 12-inch spray distance, overlap strokes by 50%, and spray off edges to avoid buildup. Adjust pressure for smooth application.
- Maintenance: Clean immediately after use to prevent clogs. Flush with water (latex) or mineral spirits (oil-based), and inspect parts regularly.
Pro Tip: Use tools like Toolstash to track maintenance and keep your sprayer in top condition. A little prep and care ensure professional results every time.
Equipment and Setup Requirements
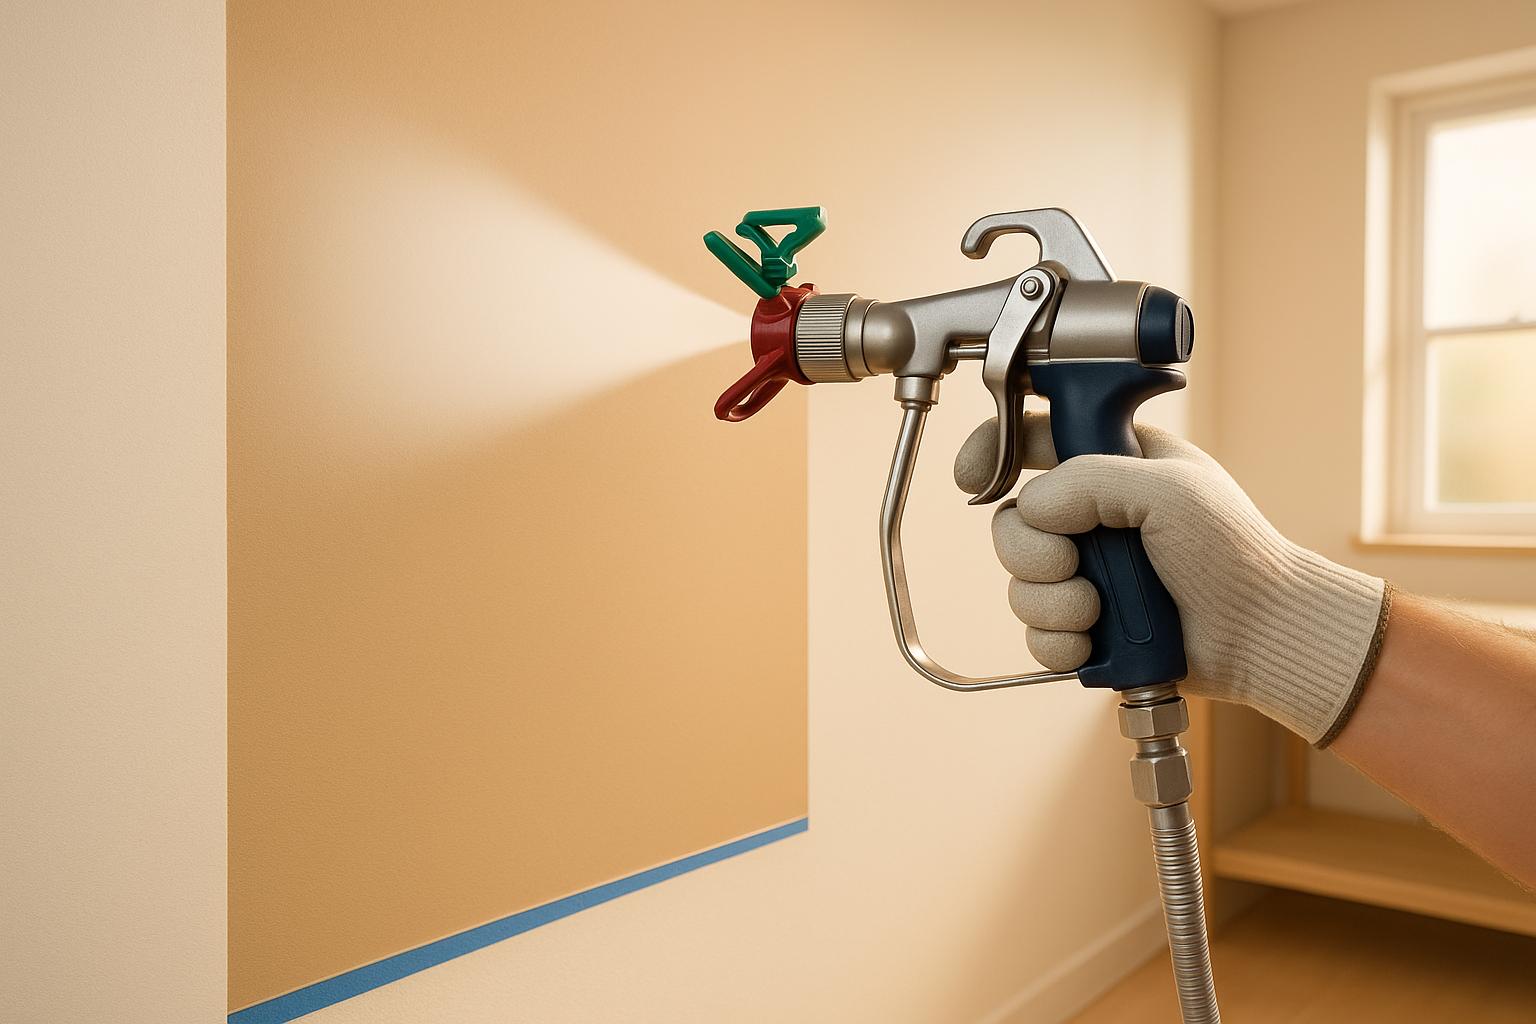
Airless Paint Sprayer Parts
Understanding the components of an airless paint sprayer is key to using it safely and effectively. Here's a quick breakdown:
- Spray Gun: Controls the flow of paint and includes safety locks to prevent accidental discharge.
- Spray Tip: Determines the width of the spray pattern and how much paint flows through.
- Hose: Transfers pressurized paint from the pump to the gun.
- Pump: Creates the pressure needed to spray paint efficiently.
- Grounded Metal Paint Container: Reduces the risk of static buildup during operation.
One critical safety feature is the tip guard, designed to help prevent accidental injection injuries. However, it’s important to note that this feature doesn’t eliminate the risk entirely. According to the US Consumer Product Safety Commission, airless paint sprayers cause hundreds of emergency room visits each year due to high-pressure injection injuries [8]. Always prioritize safety and ensure you're using the right equipment for your project.
Choosing the Right Spray Tip
Selecting the right spray tip is essential for achieving the best results. Spray tips are categorized by two key factors: orifice size and fan width.
- Thicker paints (like primers) require larger orifices to avoid clogging.
- Fan width determines coverage: wider fans are ideal for large, flat surfaces, while narrower fans are better for detailed or precision work.
For most residential latex paint jobs, a 515 tip (which sprays a 5-inch fan and has a 0.015-inch orifice) is a reliable choice. However, for exterior surfaces or thicker materials, you might need a tip with an orifice size between 0.017 and 0.021 inches. Choosing the correct tip ensures smoother application and minimizes waste.
Setup and Preparation Steps
Proper setup is crucial to ensure both safety and efficiency. Follow these steps:
- Read the Manual: Always start by reviewing the manufacturer’s instructions specific to your sprayer model.
- Prepare the Paint: Strain and thin the paint as recommended to avoid clogs.
- Mask Off Areas: Protect surfaces you don’t want painted using masking tape and drop cloths.
- Ensure a Safe Workspace: Work in a well-ventilated area away from flammable materials.
- Wear Protective Gear: Gloves, goggles, a respirator, and protective clothing are non-negotiable.
- Check for Leaks: Run clean water or the appropriate solvent through the system before adding paint to ensure everything is sealed and functioning properly.
- Safety Features: Never disable the tip guard or cover the spray tip. Engage the trigger lock whenever the sprayer is idle to prevent accidental spraying.
Lastly, for keeping track of your sprayer's usage and maintenance schedule, consider logging your records with Toolstash. Staying organized helps extend the life of your equipment and ensures consistent performance.
Step-by-Step Operating Instructions
Setting Up the Sprayer
To get your sprayer ready, start by choosing the right spray tip for the paint you're using. Thicker coatings need larger tips, while thinner paints work best with smaller ones[9]. Picking the correct tip not only improves the quality of your spray but also helps avoid clogs that can disrupt your work.
Next, strain your paint before pouring it into the reservoir. This step keeps debris out and ensures smooth operation. Once filled, securely close the lid to avoid spills.
Now, it’s time to prime the pump. Follow your manufacturer’s instructions for this process. If your sprayer has a prime mode, turn it on and aim the spray gun into a waste bucket. Pull the trigger until the paint flows steadily without air bubbles. This ensures a smooth and consistent spray, eliminating sputtering during your project.
Adjusting the pressure is a key step for professional results. Handheld sprayers typically operate between 1,500–2,800 PSI, while cart models can go up to 2,000–3,300 PSI[9]. Start with a lower pressure setting, then gradually increase it until you achieve a clean and even spray pattern. Test your setup on a piece of cardboard to fine-tune both the pressure and spray pattern before starting on your actual surface.
Once primed and adjusted, your sprayer is ready to go.
Paint Application Technique
Using the right technique can make all the difference between a subpar finish and a flawless result. Hold the spray gun at a consistent 12-inch distance from the surface[5]. This spacing ensures the paint is properly atomized, avoiding issues like uneven coverage or paint buildup.
Move the gun in smooth, parallel strokes, overlapping each pass by 50% to guarantee even coverage[5]. Skipping this step results in visible lines, while too much overlap wastes paint and can cause runs.
Always begin and end your spray off the edge of the surface you're working on. This avoids excessive paint buildup at the start and stop points. Keep the gun moving at a steady pace - moving too slowly can lead to drips, while moving too quickly results in thin, patchy coverage.
For larger areas, break the job into smaller sections and work systematically. Blend the edges of each section while the paint is still wet to avoid lap marks. Tackle corners and edges first before moving on to the broader, flat surfaces[5]. This approach gives you better control over detailed areas and ensures thorough coverage.
Safety is crucial. Never aim the spray gun at yourself or anyone else, even when it’s not in use. Always engage the trigger lock during breaks, no matter how short. These sprayers operate under high pressure, which can cause serious injuries if mishandled. Treat them with the same caution you would any powerful tool.
After finishing your painting project, move directly to cleaning and maintaining your sprayer.
Cleaning and Care
Cleaning your sprayer right after use is essential for keeping it in good working condition[5]. Letting paint dry inside the system can lead to permanent clogs and costly repairs.
Start by disconnecting the spray gun, removing the tip, and releasing any remaining pressure, following the instructions in your manual[6][7]. This step is vital to prevent accidental discharge during the cleaning process.
Flush the system with water for latex paints or mineral spirits for oil-based ones. Continue flushing until the liquid runs completely clear. For a deeper clean, take apart any removable components and soak them in the appropriate solvent to loosen stubborn residue.
Use a cleaning brush to scrub the tip guard and filter thoroughly. These parts are critical for achieving a smooth spray pattern, so make sure they’re spotless.
For storage, leave a small amount of solvent in the system. This keeps the seals lubricated and prevents them from drying out, saving you from costly replacements and ensuring the sprayer is ready to go for your next project.
To stay organized, consider using Toolstash to track your cleaning and maintenance schedule. Regular upkeep not only extends the life of your equipment but also ensures consistent, high-quality performance every time.
Fixing Common Problems
Problem Diagnosis and Solutions
Once your sprayer is up and running, keeping an eye out for potential issues is key to maintaining smooth operation. Airless paint sprayers can occasionally run into problems that impact your work, but catching these early and addressing them quickly can save you time and effort.
Clogged spray tips are one of the most common issues you’ll face. If your sprayer starts sputtering or the spray pattern looks uneven, chances are the tip is blocked with dried paint or debris [9][4]. If your sprayer has a reverse-a-tip feature, use it to clear minor clogs. For more stubborn blockages, remove the tip entirely, soak it in the correct cleaning solution, and gently clean it with a soft brush. Avoid using sharp objects like nails or wires, as these can damage the tip's precision.
Uneven spray patterns often appear as streaks, patchy coverage, or a distorted fan shape. This usually happens due to worn-out spray tips, incorrect pressure settings, or poorly mixed paint. Start by checking your pressure settings and inspecting the spray tip. If the tip is worn or damaged, replace it immediately. Test the adjustments on a surface to ensure they’re correct [9][4].
Excessive overspray not only wastes paint but also creates a messy workspace. This problem is usually caused by high pressure, using the wrong tip size, or holding the spray gun too far from the surface. To fix this, lower the pressure to the minimum effective level and keep the gun at a consistent distance of 12 inches from the surface. Switching to a smaller tip or using HEA technology can also help reduce overspray by up to 55% [4].
Paint leakage and pressure loss are often related. Loose fittings, damaged seals, or worn hoses are common culprits. Inspect all connections and tighten any loose fittings. Check hoses for cracks or other damage, and replace them if needed. If the pressure still fluctuates, examine the filter - a clogged filter can overwork the pump, leading to pressure drops [9][3].
When troubleshooting, start with the simplest and most common causes before moving on to more complex possibilities. Most sprayer issues have straightforward fixes, and regular attention can help prevent them from recurring.
Regular Maintenance Tips
Routine maintenance is crucial for keeping your sprayer in top shape and ensuring consistent results. Following these practices can save you time, money, and frustration on future projects.
Clean filters and inspect spray tips regularly. After every use, remove the filter, rinse it with the appropriate solvent, and check for damage before reinstalling it. Paint residue can quickly build up in filters, restricting flow and causing pressure problems. Spray tips should generally be replaced after spraying 40-60 gallons of paint, though heavy use or abrasive materials may wear them out sooner [9][4]. Worn tips can lead to narrower spray patterns, uneven coverage, and higher paint consumption. Always keep spare tips handy for quick replacements.
Inspect hoses and connections before each project. Look for cracks, bulges, or soft spots in the hoses, as these can indicate internal damage. Check all fittings for tightness and any signs of paint leakage. Addressing small leaks immediately can prevent larger issues down the road.
Lubricate moving parts as recommended by the manufacturer. This includes pumps, trigger mechanisms, and adjustable components. Always use the specified lubricants - using the wrong products can damage seals and void warranties.
Store your equipment properly when not in use. Never leave paint in the system, even overnight. Flush it thoroughly with the correct solvent, and leave a small amount of solvent in the system to keep the seals lubricated. Store your sprayer in a clean, dry place, away from extreme temperatures.
For frequent users or contractors, tools like Toolstash can simplify maintenance by setting reminders for tasks like filter cleaning, tip replacements, and scheduled servicing. This proactive approach helps keep your equipment in peak condition and minimizes unexpected downtime during important projects.
Additionally, maintain a simple log to track hours of use, the types of paint applied, and any issues encountered. This record can help you spot patterns and anticipate when parts might need replacement, allowing you to plan repairs instead of reacting to breakdowns.
Professional Techniques and Tips
Specialized Equipment Options
Using the right tools can make a world of difference when it comes to airless spraying. For instance, extension wands are a great choice for tackling high walls and ceilings. They let you maintain a steady 12-inch distance from the surface, ensuring even coverage without the need for ladders or scaffolding [5].
If you're working on detailed projects like trim, doors, or cabinetry, Fine Finish Low Pressure (FFLP) tips are a game-changer. These tips reduce overspray by up to 50% compared to standard tips, thanks to their finer atomization at lower pressures [5]. This precision makes them ideal for achieving clean, professional results on smaller, intricate surfaces.
Other handy accessories include pressure roller extensions and longer hoses, which are perfect for large-scale jobs. These tools allow you to cover more ground without constantly repositioning your sprayer, saving time and reducing physical strain. Plus, they help you maintain a consistent application speed throughout the project.
| Equipment | Use | Benefit | Notes |
|---|---|---|---|
| Extension Wand | High walls, ceilings | Reach without ladders | Slightly heavier handling |
| FFLP Tip | Trim, doors, cabinetry | 50% less overspray | May require paint thinning |
| Standard Tip | Large walls, exteriors | High output, versatile | Produces more overspray |
These tools, paired with the right techniques, can significantly improve your efficiency and results.
Working with Different Paint Types
Spray settings should always be adjusted to suit the paint you're using. For latex paints, which are thicker, you'll need larger tip sizes - typically between 0.015 and 0.019 inches - and higher pressure settings ranging from 2,000 to 2,500 PSI. This ensures proper atomization and smooth application [1].
When it comes to primers, adjustments depend on their viscosity. Most primers can be sprayed with similar tip sizes to latex paints, but it's always a good idea to test on a small area first. High-build primers, in particular, may need thinning based on the manufacturer's instructions to avoid clogging and achieve a uniform finish.
For enamels and specialty coatings, smaller tips - usually 0.011 to 0.013 inches - work best. These coatings often require thinning, and lower pressure settings of 1,500 to 2,000 PSI are ideal. The result is a smooth, glass-like finish that's perfect for detailed or decorative work [1].
Switching between paint types? Always clean your system thoroughly. Residual latex paint, for example, can interfere with enamels, so flush the system completely and run a small amount of the new paint through before starting your main application.
Environmental factors like temperature and humidity also play a role. In humid conditions, increasing air circulation and opting for faster-drying paints can help prevent sagging. Meanwhile, extreme temperatures may call for adjustments in pressure and spray distance to account for changes in paint viscosity and drying time [1].
The golden rule for any paint type? Start with the lowest effective pressure that produces a good spray pattern, then adjust as needed. This minimizes overspray, enhances control, and helps you avoid issues like runs or uneven coverage.
For professionals juggling multiple paint types and tools, Toolstash offers a convenient way to manage settings, maintenance schedules, and accessories across various projects. It’s a smart solution for staying organized and efficient on the job.
How to use an Airless Sprayer/How to Paint FAST
Tool Management with Toolstash

Managing airless sprayers and their accessories can get tricky, but Toolstash makes it easier to keep everything organized, maintained, and ready to perform when you need it.
Equipment Tracking and Maintenance
Knowing where your tools are and how they’re holding up is key to getting professional results. Toolstash helps you track every piece of equipment - from your sprayer to accessories - while assigning them specific storage spots for easy access.
The AI Snap feature takes the hassle out of adding tools to your inventory. Just snap a photo of your airless sprayer or accessory, and the AI automatically processes and categorizes it for you. No more tedious manual entries, and you’ll always have accurate records at your fingertips.
Toolstash also lets you set automated maintenance reminders based on usage hours, dates, or custom intervals. For example, you can schedule reminders to clean the intake filter every 40 hours or inspect hoses monthly. These proactive alerts help you avoid common issues like clogs or uneven spray patterns. Plus, the system keeps a detailed maintenance log, which can be invaluable for troubleshooting or warranty claims. According to industry data, tool loss and theft account for up to 30% of annual tool costs for contractors [Toolwatch, 2023]. By staying organized, Toolstash ensures your tools are always ready for the job.
DIY Help and Project Guidance
Toolstash doesn’t stop at tracking and maintenance. It’s also your go-to assistant for on-the-job challenges. The platform’s AI-powered DIY help offers step-by-step guidance for troubleshooting issues like clogged tips or inconsistent spray pressure. Whether you’re a seasoned pro or just starting out, this feature can save you time and frustration.
The smart categorization system organizes your tools by type, project, or how often you use them. For example, you can group spray tips, extension wands, and cleaning kits together, making it simpler to prep for your next project. Need expert advice? Toolstash has a library of how-to guides and tips covering everything from choosing the right spray tip for latex paint to cleaning your sprayer after using oil-based coatings. It’s like having a seasoned professional on call.
The AI chat feature is especially handy during active projects. Ask questions like, “What pressure should I use for exterior latex paint?” or “How do I avoid overspray when painting trim?” and get instant, tailored answers based on your equipment and project details.
Tool Sharing Management
Toolstash also simplifies equipment sharing, which is a great way to maximize the value of your investment. With airless sprayers costing anywhere from $300 to $1,500, sharing within a trusted network can save money and reduce waste.
The platform tracks who has borrowed your equipment, when it’s due back, and its condition before and after use. You can even upload photos and notes to document its state, which helps prevent disputes and encourages responsible borrowing. For contractors juggling multiple sprayers across various jobsites, Toolstash assigns each unit to a specific project and generates reports on usage and maintenance costs. This data can help you allocate resources more efficiently and avoid downtime caused by equipment failures.
Toolstash also ensures all your records - tool inventory, maintenance logs, and lending history - are securely stored and easily accessible from any device. Studies show that using digital tracking systems can cut tool loss by 50% or more and improve project efficiency by up to 20% [Toolwatch, 2023].
Whether you’re a weekend DIY enthusiast or a professional contractor managing a fleet of sprayers, Toolstash gives you the tools and insights to keep your equipment in top shape and your projects running smoothly.
Conclusion
Main Points Summary
Achieving professional results with an airless paint sprayer boils down to three key practices: solid preparation, proper technique, and regular maintenance. Preparation is the backbone of any successful project - cleaning surfaces, masking off areas, and testing your setup on scrap materials can save you from costly errors and ensure even, smooth coverage.
When it comes to technique, keeping a consistent distance and overlapping each stroke by 50% is essential for that polished, professional finish. Choosing the right spray tip for your paint type is just as important, as this decision directly impacts coverage quality and minimizes wasted material.
Maintenance is non-negotiable if you want your sprayer to last and perform consistently. Cleaning your equipment immediately after use prevents clogs that could derail future projects. Follow the manufacturer’s guidelines for pressure settings and safety precautions - simple steps like engaging the trigger lock when not in use and never pointing the spray gun at yourself or others help protect both you and your investment.
Mastering these methods can significantly boost efficiency. Airless sprayers are capable of covering large areas up to 10 times faster than traditional brushes or rollers. Plus, advancements like High Efficiency Airless (HEA) technology can reduce overspray by as much as 55%[10][2], saving both time and materials on every project.
Next Steps
Put these principles into action to elevate your painting game. Start by testing your setup on a small area to fine-tune pressure and spray patterns. Practice overlapping strokes until the motion feels natural and consistent.
For easier upkeep, consider using Toolstash to manage your equipment and maintenance records. Whether you're tackling a single room or juggling multiple projects, staying organized and keeping your tools in top shape ensures you're always ready to deliver professional results.
FAQs
What safety precautions should I follow when using an airless paint sprayer?
When working with an airless paint sprayer, prioritizing safety is key to achieving great results while protecting yourself. Start by wearing protective gear such as safety goggles, gloves, and a respirator mask. This will help shield you from paint particles and potentially harmful fumes. Additionally, make sure your workspace is well-ventilated to minimize exposure to chemicals in the air.
Take the time to read the manufacturer's instructions thoroughly before getting started. This will ensure you understand how to use and maintain the sprayer correctly. Never point the sprayer at yourself or anyone else - its high-pressure spray can cause serious injuries. If you need to clean or troubleshoot the sprayer, always turn it off and release the pressure beforehand. Lastly, keep the sprayer away from heat sources or open flames, as many paints are flammable. By following these precautions, you can work safely and achieve professional-quality results.
How do I pick the right spray tip for my painting project?
Choosing the right spray tip for your airless paint sprayer is key to getting that smooth, professional finish. The best tip size depends on two factors: the type of paint you're using and the surface you're working on.
If you're using thicker materials like latex or acrylic paint, go with a larger tip size, such as 0.015–0.019 inches, to ensure the paint flows smoothly. For thinner materials like stains or lacquers, a smaller tip size, around 0.009–0.013 inches, will give you better results. The spray fan width is another important consideration - wider fans are great for covering large, flat areas like walls, while narrower fans give you more precision for smaller or detailed sections.
To avoid surprises, check the paint manufacturer’s guidelines and test the spray pattern on a scrap surface before starting your project. This ensures you're using the right tip for the job.
What are the best maintenance tips to keep my airless paint sprayer in top condition?
To keep your airless paint sprayer in top condition and make sure it lasts for years, here are some essential maintenance tips:
- Clean it after each use: Always flush the sprayer with water or a suitable cleaning solution, like paint thinner for oil-based paints. This prevents clogs and keeps residue from building up inside the system.
- Perform regular inspections: Take a close look at hoses, seals, and filters to spot any wear or damage. Replace these parts as needed to avoid unexpected breakdowns.
- Lubricate moving parts: Use pump lubricant to keep internal components running smoothly and to protect them from rust.
- Store it correctly: Keep your sprayer in a clean, dry area. Avoid exposing it to freezing temperatures, as cold can harm internal parts.
These straightforward steps will help your sprayer perform at its best, delivering smooth, professional results every time.